A Water Bottle and a Little Imagination….
Do you have a hummingbird feeder?
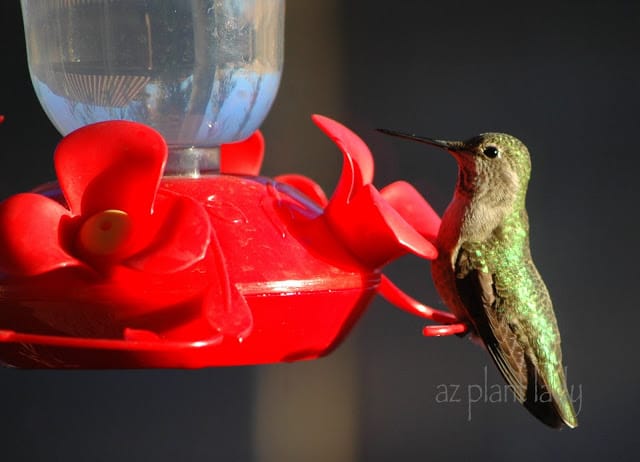
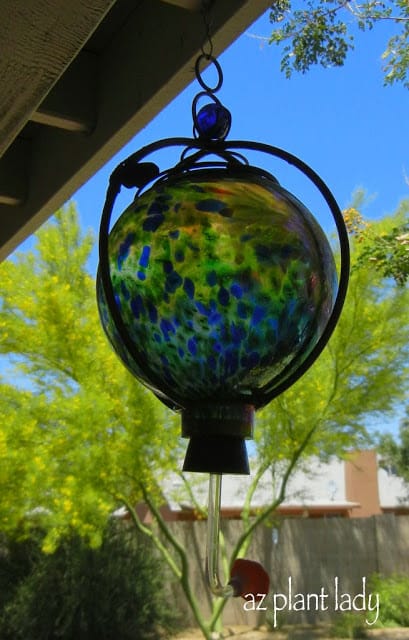
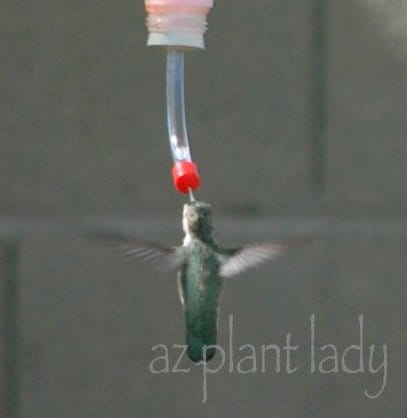
I have two. One is the popular plastic variety, above, and the other is a beautiful glass one that my sister-in-law gave me for my birthday.
However, when I first opened the glass feeder, I couldn’t find the stopper and feeding tube. So, I went online and ordered a single stopper/feeder tube.
Imagine my surprise when I received the box in the mail and discovered that instead of just one stopper/feeder tube…..there were twelve. I had evidently not read the fine print when I ordered them. But, they were really inexpensive and I figured that I would use them someday.
Well, life has a way of getting busy and I forgot about the stopper/feeder tubes sitting in my closet until the other day. I figured that there must be some way to make my own hummingbird feeder.
Okay, you might be thinking that I already have two and isn’t that enough? My answer would be “NO” 😉
I am fortunate to live in an area where we have hummingbirds visiting all year long. My plastic feeder is the most popular one with my little feathered friends and they occasionally visit my glass one. But, I had the perfect place for my third feeder in mind….hanging from my Palo Verde tree in the back garden.
And so, I collected the tools that I would require:
– a plastic water bottle
– wire
-homemade hummingbird nectar
1 part granulated (white) sugar to 4 parts water
(I use 1/4 cup sugar for every 1 cup of water)
Boil 1 cup of water and then add sugar and stir until dissolved.
Boil for 2 minutes and then let cool.
Fill your feeder
1 stopper/feeder tube
I asked my husband if he wouldn’t mind wrapping the bottle with wire so that I could hang it from a tree. In the meantime, I made the hummingbird nectar.
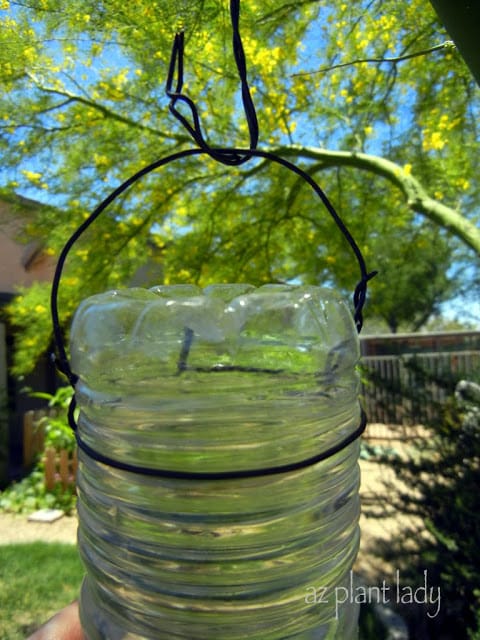
You can see how one piece of the wire is wrapped around the bottle and then another piece is used to hook onto the sides of the wrapped wire. You will notice that the wire is quite basic and not ‘curled’ into decorative shapes. I didn’t have the courage to ask my husband to do that – but you certainly could 😉
It is important to not make any holes in the bottle since this interferes with the vacuum necessary to keep the nectar from leaking out.
I filled the water bottle all the way and then inserted the stopper/feeder tube and turned it over. This action forms the vacuum that keeps all the water from leaking out.
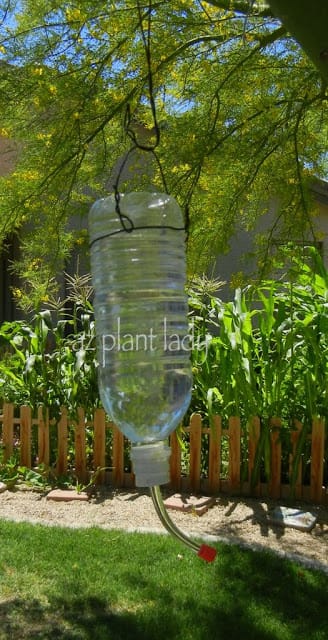
You might notice that my nectar is not colored red. It is not necessary and may even be harmful to hummingbirds.
You could decorate the bottle if you like and make the wire into decorative shapes using needle-nose pliers if you like. Since the stopper/feeder tubes were so inexpensive, I think this would be a great project for a group of kids. I bought my stopper/feeder tubes on Amazon.
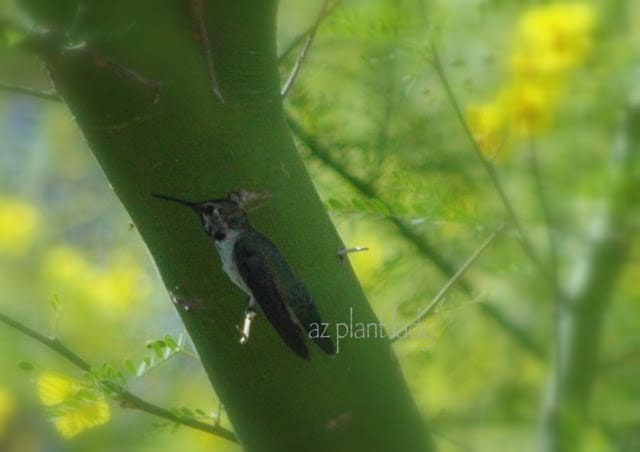
I admit that our little water bottle hummingbird feeder is rather simple, but within 24 hours of hanging it up….
Believe it or not, rather plain feeder is the most popular one in my garden. I have two hummingbirds visiting frequently during the day and then they take some time to perch up in the tree.
***************************************
I hope you are all off to a great start this week.
I have a busy week planned. I have a landscape consult today and a doctor’s visit, carpet cleaning, as well as planning my son’s birthday party later this week. But in the midst of this busy week, my husband and I will be celebrating our 25th wedding anniversary. My husband and I will be leaving the kids home and go out for dinner and a movie. Later we will go on a trip for a few days…..I can hardly wait 🙂
“Talk” to you soon!

 Noelle Johnson, aka, 'AZ Plant Lady' is a author, horticulturist, and landscape consultant who helps people learn how to create, grow, and maintain beautiful desert gardens that thrive in a hot, dry climate. She does this through her consulting services, her online class Desert Gardening 101, and her monthly membership club, Through the Garden Gate. As she likes to tell desert-dwellers, "Gardening in the desert isn't hard, but it is different."


Thank you for this clever idea. I don't have the courage to ask for decorative shapes, either, but the result is amazing nonetheless.
What a wonderful, inexpensive idea. How neat that this has turned into a hot spot for the hummers to visit.
FlowerLady
Great ideas! Thanks for sharing. We have two hummingbird nests right now and they are flying all over the place:) I really love the first pic. Do you know what that green hummer is called?
I'm so happy for you. Twenty five years is a long time. I made it to 29. Love the simplicity of your feeder. Lucky you to capture them on your camera.
Hello!
Rohrerbot,
It was an Anna's Hummingbird. I get tons of them. I do see Costa's and Black-chinned nearby, just not in my garden 😉
Noelle
Great how-to post. Congratulations on 25 years of marriage. Your hummer is a cutie. I stopped putting up feeders and focused on flowers they might like. They don't seem to mind but we don't see them hovering like we used to, they just cruise by and hurry to flowers.
Happy 25th! A quarter century…congrats. Love the feeder.
Muchas gracias. I have such a hard time labeling hummingbirds…the males and females are all different looking and we have lots of hummingbirds that make Arizona home. We're very lucky….I've got some more reading to do on these birds:)
I went to the Sonoran Desert Museum yesterday and saw they had several home made hummingbird feeders using pill bottles with stoppers. My husband wore a red shirt and he was literally swarmed by the hummers who thought he was a big red flower!
Cattleya orchid needs repotting every year when the plant is young, and when it becomes older we have to reduce the frequency of repotting to once every two years and eventually to once every three years. It is recommended to repot right after the blooms fade or when new growth is emerging, but if necessary you can repot anytime. For a Cattleya orchid it is best to use a medium grade fir bark as potting mix.
Cattleya orchid needs repotting every year when the plant is young, and when it becomes older we have to reduce the frequency of repotting to once every two years and eventually to once every three years. It is recommended to repot right after the blooms fade or when new growth is emerging, but if necessary you can repot anytime. For a Cattleya orchid it is best to use a medium grade fir bark as potting mix.