This has not been a very fun summer for me or our family.  We have been largely confined to our home as our son, Kai, recovers from hip surgery.  I have written about his journey which you can read here if you like.

Well, we received some great news from the doctor 2 weeks ago…Kai was allowed to start to walk again.  Yeah!!!  Although it has been slow going, he is making great progress – he has already ditched the walker the doctor prescribed and insists on walking by himself, he goes to PT twice weekly and is making great progress.   We have been waiting for this moment and decided to take some time to go on a little vacation before the kids start school.

A Welcome Retreat

We do have a favorite vacation spot up in the Arizona mountains called Williams.  Williams is a little town, just east of Flagstaff and is situated right on Route 66 and is the gateway to the Grand Canyon.  We are blessed that my sister-in-law’s family has some cabins up there that they graciously allow us to use.

We couldn’t wait to go, especially the kids.  We wanted to do something special for all of them – Kai because he was such a great patient and his sisters because they were so helpful to him and didn’t mind the extra attention that he got.  And so we packed up our van and started up the mountain.

Arizona mountains

Now all of us love to fish, so we dropped our bags off at the cabin and drove to the lake to start fishing right away.  My youngest daughter, Gracie, caught a fish but we had to leave soon after we arrived because a thunderstorm moved in.

The next day we went to one of our favorite lakes and started fishing.  The morning was windy and we didn’t catch a thing, not even a nibble.  I was ready to quit after 4 hours, but my husband talked me into staying for 15 more minutes.  Well, guess what happened?

Arizona mountains

 Kai caught a fish and the wind calmed down.  Over the next 2 hours, we caught 18 rainbow trout between the five of us – Kai caught 6!

Arizona mountains

Arizona mountains

We threw some of them back, but came back to the cabin with 13 fish which I cooked for the kids.  As for me, I caught 5 fish and 2 severely sunburned feet 😉

Kai

Although we were only able to spend two full days there, it was just what we needed as a family to refresh and rejuvenate before school starts again in only 5 days….

**I do want to apologize for not posting, visiting and commenting as often as I would like, but my life has been quite crazy this summer.  I am thankful that school is starting again and my life will get back to normal 🙂

Hello Everyone!  It is hard to believe that it is already time for July Monthly Garden Bouquet (MGB).  The summer seems to be flying by.  Soon my kids will be back in school and I will be able to get back to blogging more regularly and commenting on your posts 🙂  I miss my normal routine and my life seems to revolve around my kids 24/7.  Not that that is bad, mind you….I love my kids a lot, but I am looking forward to having a little time to do the things that I enjoy.

The bouquet that I created for July is made up of Lysiloma leaves, Bougainvillea brachts and Yellow Bell (Tecoma stans) flowers.    *Did you know that the colorful magenta ‘flowers’ on the bougainvillea are not the flowers?  They are actually brachts that form around the tiny, cream colored flower in the middle.

I must confess that it took me awhile to decide where to take the picture of my bouquet and I finally settled on the lawn in our back garden.  I love how the color green can make me feel like the temperatures have dropped a few degrees.

July Garden Bouquet

July Garden Bouquet

 As you can see, my bouquet is rather simple like me but rather colorful at the same time.

I would love to see your July bouquets.  The guidelines for MGB are very simple….

1. MGB is held the third week of each month and bouquets can be submitted during a 7 day period (or even later if you like).

2. Create your own bouquet as fancy or simple as you like.

3. I would appreciate it if you would provide a link back to my post inside of your MGB post, but it is not required 🙂

4. Add your link to Mr. Linky below and that’s it!

I cannot wait to see what bouquets you create from your summer gardens.

Have a great week!

Who doesn’t like Queen’s Wreath Vine? I have a renewed appreciation for my Queen’s Wreath Vine, also known as Antigonon leptopus. In the garden during the summer months it is fabulous. Now, I realize that there are some who do enjoy the satisfaction of working hard with their plants. The last thing I want to do is have to fuss over a plant in the middle of the summer heat so that it will look beautiful for me. I would much rather enjoy the ‘natural beauty’ of my summer plants looking through the windows from the comfort of my air-conditioned home.

Embracing the Beauty of Queen’s Wreath Vine

Earlier this summer, I wrote about one of my favorite ‘natural beauties’ in the garden, Yellow Bells.  Today, I would like to introduce you to one of my favorite summer vines. It is a wonderful example of fabulous vine that is a ‘natural beauty.’

Queen's Wreath vine pink flowers

Queen’s Wreath vines grace the Arizona State University campus.

The Natural Charm of Queen’s Wreath Vine

Queen Wreath Vine (Antigonon leptopus) is a colorful asset to my gardenThis ‘natural beauty’ is a vine that is native to Mexico and Central America. The vibrant vine graces your garden with stunning pink sprays of flowers that last from spring until the first frost. While it can be invasive in tropical areas, it’s easily managed in the desert climate.

Queen's Wreath Vine heart-shaped leaves

In our desert climate, they do require supplemental water, but no fertilizer is needed.  Bees are attracted to the beautiful flowers, and I love the pretty heart-shaped leaves. 

Queen’s Wreath is a robust vine.  It can endure in full sun including areas of reflected heat.  It will also grow in light shade although flowering will be reduced. The only maintenance required in my garden is pruning it back in winter once it dies back after the first frost. The roots are hardy to 20 degrees F, and in the spring, it quickly grows back with a trellis, fence or an arbor for support.

Queens Wreath vine growing on a wall

 A wall of Queen’s Wreath Vine at ASU

The only consistent maintenance required in my garden is pruning it back in winter once it dies back after the first frost.  However the roots are hardy to 20 degrees F, and in the spring, it quickly grows back with a trellis, fence or an arbor for support. See more in the mini-guide below

HOW TO GROW QUEEN’S WREATH VINE: A Mini-Guide

Step 1: Choosing the Ideal Location

Queens wreath vine pink flowers

To successfully cultivate Queen’s Wreath Vine, select a sunny spot in your garden where it can bask in plenty of sunlight. While it can tolerate light shade, it thrives when exposed to full sun, making it an ideal choice for areas with reflected heat.

Step 2: Preparing the Soil

Ensure the soil is well-draining to prevent waterlogged roots. Queen’s Wreath Vine thrives in various soil types but benefits from enriched soil containing organic matter.

Step 3: Planting the Vine

Plant your Queen’s Wreath Vine near a trellis, fence, or arbor to provide the necessary support for its growth. Dig a hole deep enough to comfortably accommodate its root system.

Step 4: Proper Watering

While Queen’s Wreath Vine becomes drought-tolerant once established, it appreciates supplemental watering, especially during dry spells. Water deeply to encourage robust root development, but make sure the plant has good drainage.

Step 5: Pruning and Maintenance

In winter, after the first frost, prune any dead or overgrown branches to promote vigorous spring growth. Minimal maintenance will keep your Queen’s Wreath Vine flourishing year after year.

By following these steps, you can enjoy the ‘natural beauty’ of Queen’s Wreath Vine in your own garden without the fuss, and revel in its stunning pink displays throughout the year.

My first experience with queen’s wreath was in our first home in Phoenix, where there was a support made up of twine tied between two palm trees. We had no idea why it was there, but it sure looked ugly. Well, before we had time to remove the twine, beautiful, light green, heart-shaped leaves began climbing up the support and quickly covered it. Gorgeous sprays of pink flowers rapidly followed, which was a pleasant surprise.  

What natural beauties are enjoying in your garden this month?  

I will be sharing another favorite ‘natural beauty’ from my garden soon.

Now, you may think that I am talking about soft, cuddly puppies finding a new home.  But, I am actually talking about my agave pups.  The word ‘pups’ refers to the small agave offsets that sometimes form from the adult agave.

Agave americana surrounded by her 'pups'.

 Agave americana surrounded by her ‘pups’.

Some agave species produce quite a few pups, while other species rarely do.  I do try to stay from agave species like Agave americana because they produce so many pups that it becomes quite a maintenance chore to constantly remove them all.  But that being said, I have many friends and clients who just love this particular agave.

Well, the day finally came in my garden for my agave pups to move away from their childhood home.

Agave americana surrounded by her 'pups'.

Can you see them?  There are 4 in the picture above.  Three are quite small still, but more then ready to leave their mother, my Agave parryi.  I am actually quite excited to be getting pups from this agave because in my experience, they do not produce many pups.  It may be that this one has because it does receive overspray from my lawn sprinklers.

Okay, this may seem obvious, but you would be amazed at how many people just start digging in the middle of their gravel (granite) without clearing it away first.  Believe me…you want to clear it away first or else you will be left with a mixture of rock and soil mixed together.

agave pups

Aren’t they cute in a prickly sort of way?  They really are quite tiny.

agave pups

I carefully removed the soil around the pups, leading to the mother plant because the pups are still attached to her by a thick, fleshy root.  You can see that the pups are beginning to form their own roots, branching out to the side.

Just cut the root connecting the pup to the adult agave….that’s it.  It is really very easy.

Now, this same adult agave also has another pup, which has grown much closer to home then these tiny pups.

agave pups

This one did not want to leave home, even though it was quite grown up.  When the pups are growing right up alongside the adult plant, just insert a shovel and push down firmly, cutting the connecting root.  **Sometimes you have to be a bit forceful in getting some pups to leave home  😉

agave pups

I was able to harvest 5 pups.  I was so happy and had fun selecting where I wanted to put them in my garden.

Before you plant them, you need to put them in a dry, shady spot for 4 – 7 days so that the cuts have a chance to dry first.  This helps to prevent rot when they are planted.  Don’t worry about them surviving without water for a few days….they have plenty stored inside – they are succulents after all.

Once you have planted them, they will need supplemental water to help them establish and grow roots.  Agave do best when given supplemental water, even when mature.  Most are connected to my drip irrigation system.  The others receive overspray from my sprinklers, which is enough for them.

If you haven’t noticed this before, I am not a perfect gardener and am likely to tell people, “Do as I say, not as I do”.  But, I do not profess to be a perfectionist and so I will show you one of my larger agave, whose pups should have left home long ago…

agave

This is my Smooth Leaf Agave (Agave desmettiana).  I love this type of agave.  It is medium size, and the sides of the leaves do not have thorns.  The thorns on the tips can easily be cut off if desired for a more pedestrian friendly agave.

As you can see from the photo above, the pups are quite large and should have been kicked out long ago.  So, I brought in the muscle (my husband) to help get them out.

Because the pups were growing close to the parent plant, a shovel had to be used to separate them.

agave

Agave desmettiana is known for producing offsets (pups), but in my experience, there are not too many.

Actually, the adult agave below was grown from a pup.

agave

A proud parent and her 8 offspring.  I planted a few and gave some to my mother, Pastor Farmer, of Double S Farms.

There were times when I worked on golf courses that my budget was tight, so I would ask residents to bring their agave pups to me so that we could use them in landscape areas around the courses.  The residents were very generous and after a while, we had more then we knew what to do with.  So, if you have some agave pups, plant one in a pretty container and give to a friend or donate them to your city, church or other organization.

**My son continues to do better each day.  We did have a little bit of a setback on Saturday, but yesterday and today, he is feeling much better.  Thank you again for your support and prayers!

Ripening Corn in My Vegetable Garden

In my vegetable garden, I’ve been closely monitoring the growth of our corn stalks and corn ripening stages; it’s been a fascinating journey.

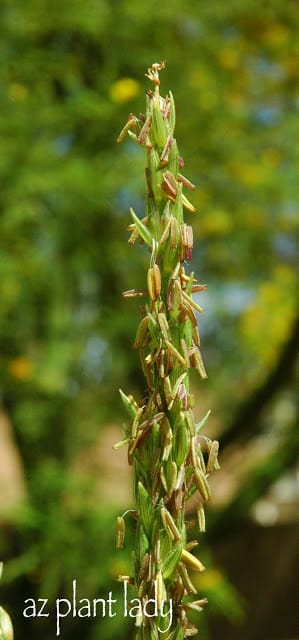
Each day, these corn stalks grow noticeably by inches, and recently, we’ve observed a significant development – the emergence of the tassel, the male part of the corn plant.

Ripening Stages of My Garden Corn

Corn with tassle corn ripening stages

Corn Ripening Stages

Did you know that corn is actually an edible herb that comes from the same family as grass?

–Noelle Johnson
Closeup of corn tassel corn ripening stages

Corn Ripening Stages

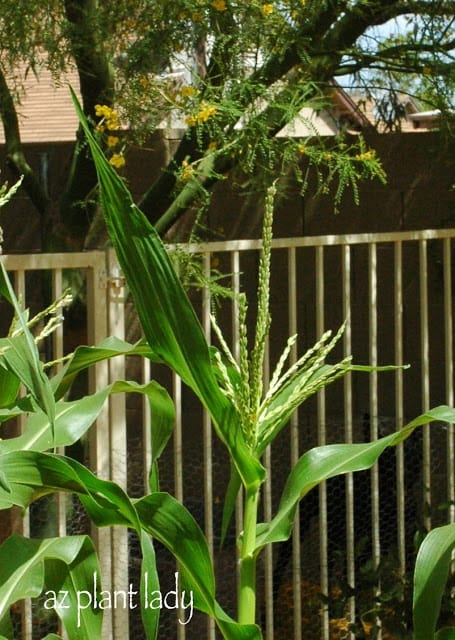
As we marveled at the tassels, full of yellow pollen, we couldn’t help but notice another intriguing phenomenon occurring on the sides of the corn stalks – the formation of corn silk. Each silk strand leads to a single ovary, and when fertilized, it will ultimately become a single kernel of corn.

Corn silk on plant corn ripening stages

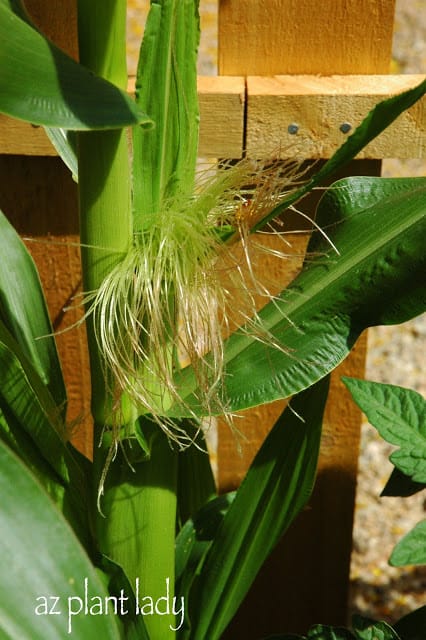
After Pollen Comes Corn Silk

Corn silk has started to form.  Each silk leads to a single ovary and when fertilized will turn in a single kernel of corn.

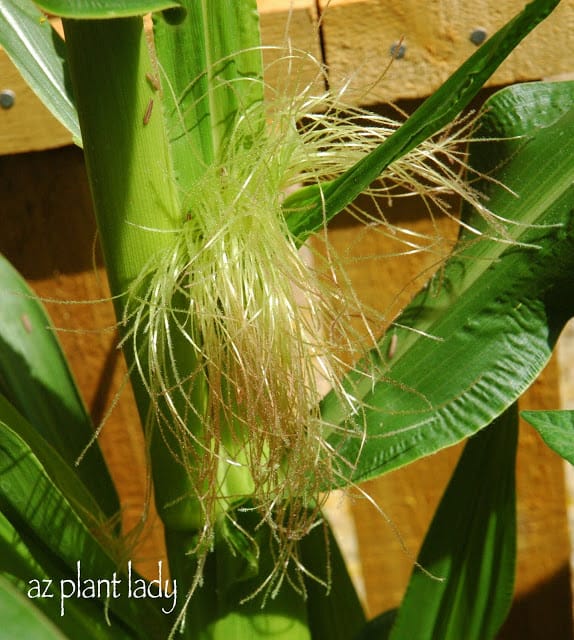
Now, when it comes to growing corn, it’s important to plant it in rows of at least three to ensure proper pollination.  My vegetable garden only has two rows. To compensate for this, my kids and I decided to assist with the pollination process by gently shaking the cornstalks daily. This action creates a delicate cloud of yellow pollen that falls onto the silk.

Corn silk with pollen corn ripening stages

After Fertilization Comes Corn Growth

Once the corn has been fertilized, the silk turns brown within 30 minutes indicating that it has been successfully pollinated.  If you look closely at the picture above, you can see the pollen sticking to the silk. Below is a complete list of the 9 corn ripening stages you might see when growing corn.

The 9 Corn Ripening Stages

A fascinating and critical part of the corn growth cycle are the corn ripening stages. Understanding these stages can help farmers and gardeners alike determine the best time for harvesting corn. Here are the key stages of corn ripening:

1. Vegetative Growth:

This is the initial stage of corn development, where the plant focuses on building a strong root system and growing tall stalks and leaves. During this phase, the plant is primarily concerned with capturing sunlight and nutrients to support future growth.

2. Tassel Formation:

As the corn plant matures, it begins to develop the tassel, which is the male part of the plant. The tassel consists of long, slender structures that release pollen into the air. This pollen is essential for fertilizing the female parts of the plant.

3. Silk Emergence:

Concurrently with tassel development, the corn plant also produces silk, which is the female part of the plant. Each silk strand corresponds to a potential kernel of corn. The silks emerge from the ear (the part of the corn plant where the kernels will develop) and extend outward.

4. Pollination:

Pollination is a critical stage in corn ripening. Wind plays a crucial role in this process. Pollen from the tassels is carried by the wind to the silks, where fertilization takes place. Each silk strand must be pollinated for a kernel to develop. Proper pollination is essential for a good corn yield.

5. Kernel Formation:

After successful pollination, the fertilized silks start to develop into kernels. Each kernel corresponds to a single strand of silk. The kernels begin to swell and fill with starch, nutrients, and moisture.

6. Milk Stage:

At this stage, the developing kernels are filled with a milky fluid that contains sugars, proteins, and other nutrients. The kernels are still soft and not yet fully mature. This is a common stage for sweet corn harvest.

7. Dough Stage:

As the corn continues to ripen, the milky fluid in the kernels starts to become more solid, and the kernels become dough-like in texture. The corn is no longer suitable for sweet corn consumption but is ideal for certain types of corn products like cornmeal or hominy.

8. Dent Stage:

The kernels in this stage develop a dent at the top, giving the stage its name. The kernels have lost most of their moisture content and are considered mature. This stage is important for field corn varieties used for livestock feed and processing into various corn products.

9. Physiological Maturity:

At this final stage, the corn plant has reached its maximum dry weight. The kernels have hardened and have a low moisture content, making them suitable for harvesting. This stage is crucial for corn grown for grain production.

corn stalk with corn ripening stages

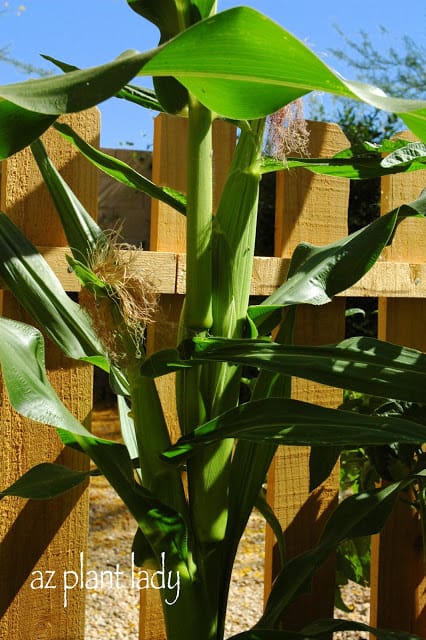
Multiple Ears of Corn on a Single Stalk

Surprisingly, some corn stalks produce not just one, but two ears of corn. While a typical corn stalk yields at least one ear, many varieties can produce two. Interestingly, the second ear forms after the first and is always smaller in size.

I bet you didn’t expect all of this corn trivia when you started to read this post, did you?  Well, I love learning new things and vegetable gardening is somewhat new to me and I find so much of what I have learned fascinating.

I hope you enjoyed this exploration of corn ripening stages in my garden. Wishing you all a wonderful day!

Container Corn is “For The Birds”

When people think of the desert southwest, images of snakes, tumbleweed and of course, the iconic Saguaro cactus come to mind.

It really is an amazing cactus.  I remember the first time I saw them…..I was driving along the highway from California into Arizona and as soon as we crossed the border, there they were.  They almost do not look real, but believe me they are.  And they do hurt if you happen to get to close to one of their spines…I know this from personal experience.

Desert Southwest

Desert Southwest

What happened was that I was not careful enough with some young saguaro cacti that I had in my plant nursery and pricked my thumb – I confess that I am somewhat clumsy.  But in my line of work as a horticulturist, this had happened countless times with no ill effects.  

Well, a couple of days later, my thumb was getting huge and very sore.  It was hard to even use my hand.  We were visiting my parents in Los Angeles and so my husband took me to the ER, where I was put on antibiotics.  To be honest, I felt rather stupid having to take pills for such a little thing.  But, cacti spines can carry some harmful bacteria, so it is wise to be careful around them.

If you have driven around the desert lately, you may have notice little bumps covering the tops of many saguaro cacti.  Now, initially you may think it looks like they are suffering from a case of bad acne.

Desert Southwest

But, these bumps are not a cacti’s version of pimples.  Actually these bumps are harboring a beautiful surprise….flowers!

In just a week or two, saguaros everywhere will be covered with beautiful, large white flowers.

I can’t wait to share them with you….

**We are celebrating our son’s 8th birthday today at the park and enjoying the beautiful weather.  I hope you all have a wonderful weekend and are able to spend some time outdoors.  

Well, the title says it all.  I love plants and shopping.  Pair those two things together and I am in heaven.

Back when I managed landscapes, I had a company credit card which allowed me to purchase to my heart’s content….okay not really, I did have to stay within my plant budget, but it was so nice to spend someone else’s money.

My most recent journey into the plant shopping occurred last week with my mother, Pastor Farmer of Double S Farms.  She was purchasing some trees for their farm and wanted my assistance in selecting them.  And so, we journeyed to a local nursery (not a big box store).

Plant shop

Plant shop

Now this particular nursery is not what I would call a native plant nursery, although they do carry many native plants.  But they also sell tropical plants that thrive in our semi-tropical climate.  You can see Gabriel coming up to help us to tag the trees we selected.

On our way to the tree section, we passed a mass of Bougainvilleas.  It looked like a Bougainvillea forest.

Plant shop

Plant shop

Then we passed through the shaded area of the nursery where frost-tender tropical and shade-loving plants were kept.

Plant shop

Plant shop

Now, we were beginning to get into the tree section of the nursery.

Plant shop

You may have noticed that my pictures are taken from behind my mother and our helper, Gabriel.  Well, put me anywhere with plants….a nursery, a garden, it doesn’t matter – I will always be lagging behind as I love to look, touch and take pictures of plants.

We passed the flowering Palo Verde trees….

Plant shop

We passed some Olive trees….

Olive trees

Did you know that the pollen of the Olive tree is highly allergenic?  It’s true.  Actually, because of this, you can only plant a certain variety of Olive tree in our area, called ‘Swan Hill Olives’®, that do not produce pollen and therefore do not produce any flowers.

The ‘Swan Hill’ cultivar was found in Australia years ago from a 30 year-old Olive tree that had never fruited.  It is an interesting story and you can read more about it here.

Okay, back to our search for our tree.  Well, I wish I could say that I had a great picture to show you of the Chilean Mesquite (Prosopis chilensis) tree we selected.  But, it turns out that I was so busy helping to select the tree, I forgot to take pictures of it.

On our way out, I did take pictures of a bunch of Sago Palms (Cycas revoluta), which aren’t actually palms at all, they are cycads.  They grow extremely well here, but must be protected from full sun or their fronds turn yellow from sunburn.

Sago Palms

Well, we were at the end of our plant shopping journey, or so I thought….

our plant shopping journey

As my mother was paying for the trees, I noticed one of the resident chickens. 

resident chicken

Can you see her?  She is poking around the base of this plant fountain.

**By the way, I think I would love to have a plant fountain someday 🙂

One of the employees noticed my interest in the chicken and motioned me over to the side of the building, where on a potting table, there was a large container.  I looked inside and saw how busy the chicken had been….

Shopping For Plants

Every afternoon, at about 4:00, she sits up there and lays another egg.

Now, the father, is no absentee father.  He takes his job very seriously.  He was keeping a keen eye on us until we left the nursery.

local nurseries

Well, I had a wonderful time, I just love visiting local nurseries.

We selected some beautiful trees and the new Mesquite tree will grow very quickly and will be quite large.  Pastor Farmer envisions having an old tire swing being put up in the tree in a few years for the grandkids to play on.

I am very blessed to have my mother and my sister live very close to me.  However, this was not always so.  Twenty-four years ago, I moved to Arizona from California as a new bride.  The rest of my family remained in California.  Of course, there were many visits back and forth.  But I never really knew how wonderful it could be to have them living close by.  Until about 3 years ago.

My sister and her family along with my mother purchased Double S Farms just over a year ago and so began a weekly tradition of us having dinner over there once a week.  I always look forward to this day because for one, I don’t have to cook dinner – but more importantly, it is a wonderful time of visiting with my mom and sister.

With our beautiful weather, we have recently been eating outside in the backyard, surrounded by their garden full of flowers, the vegetables, the fruit trees and some feathered visitors.

Each week, as soon as we drive up, I love to check to see how the fruit trees are doing in the front garden.  It looks like the peaches will soon be ready…

Double S Farms

My son is always the first to reach the front door and upon entering the house, he is promptly wrestled to the floor by his two little cousins (Little Farmer and Littlest Farmer).

Double S Farms

Each week, my mom (Pastor Farmer) always cooks something new for us to try along with fresh-baked bread.  We love to eat outside and enjoy the sunset and our food.

Beautiful weather

Beautiful weather

Then it is time for the kids to play and the adults to sit back and relax in the garden.

Of course, there are usually new vegetables to check out….

Beautiful weather

As well as seeing how the apples are growing on the trees….

Double S Farms

The kids love to play as well on the cool, green grass.

Beautiful weather

Beautiful weather

About this time, the newest residents of Double S Farms come out of their chicken coop to come and visit.

Double S Farms

Ramona is the first to come out to visit.

Double S Farms

Followed by Flo.

By the way, did you know that chickens like macaroni & cheese?  Well, these chickens do…

Double S Farms

Especially Lucy.

We enjoy watching all of the chickens and their antics.  But, our favorite is Effie. 

Double S Farms

 Now, Effie will not win any chicken beauty contest.  She is decidedly awkward looking and has fluffy cheeks.  But, it is her personality that is so endearing.  She is very friendly and lets us all hold and pet her – even the kids.  

Beautiful weather
Double S Farms

Effie is not camera shy, like Flo can be and the other day, she hopped onto my sister’s (Chicken Farmer), lap and promptly lay her head down and fell asleep.

Double S Farms

Not to be outdone by some chickens, Double S Farm’s resident hummingbird, Jose, makes an appearance as we eat our dinner.

Double S Farms

The sun is setting and it is time to go home.

Double S Farms

I hope you have enjoyed our evening visit to Double S Farms.

Double S Farms

Good Night….

May has arrived, and you may notice that your container plants aren’t looking to hot right now.  Petunias, pansies and snapdragons usually start to dry out and droop as the weather approaches the century mark. 

It is time to switch out your winter flowering annuals for those that can handle our summer sun and heat.

This is always somewhat bittersweet for me.  I do not like tearing out beautiful flowers.  They have performed so beautifully for me since last October.

container plants
container plants

Container plants

But the truth is, is that if I don’t pull them out, the heat will finish them off sooner or later.  Also, it is helpful to plant summer flowers before the heat arrives so that they can have time to establish before dealing with the stress of summer temperatures.  

And so for those reasons, I gritted my teeth and began pulling.

container plants

Container plants

Now, I am ready to start with a clean slate or should I say, clean soil.  

Now, not all of the following photos are particularly beautiful, but are helpful in illustrating how I planted my new summer flowers, which will look great soon.

Now, I couldn’t find my small hand spade this morning, which is probably a result of having four children still living at home.  I am sure one of them knows where it is, but they were at school and so I improvised.

container plants

Okay, I realize that those of you who have had the opportunity to come over and eat at my house may never do so again after seeing me use my large serving spoon.  But, it really worked out ideally and I put it in the dishwasher afterwards 😉

First, I dug up the top 6 inches of soil, taking care to remove large clumps of roots.

 large clumps of roots

**I warned you that some of the pictures were not going to be particularly pretty….

The next step was to add 6 inches of compost and mix it in with the existing soil.  Unfortunately, I do not have my own compost pile, so I used bagged compost available at my local nursery.  The brand is not important, just use what your nursery has in stock.

compost

I made a single hole for my new plant, which is 1-gallon in size, instead of the smaller sizes – I’ll explain more about that later.  I made sure that I did not add too much soil, because I do not want to deal with soil overflowing whenever I water.

hole

The area my pots are located in faces west and receives afternoon sun in the afternoon.  As a result, I need to use a plant that can withstand the intense sun and heat of summer.  From my experience around golf courses and commercial landscapes, Lantana and Vinca do best.  

Last year, I planted Vinca and so this year, I will use Lantana.  Since it is not always easy to find Lantana in a small size, I just purchased a single 1-gallon Lantana for each container.

Lantana

Now, I must admit that the picture on the plant tag, does not exactly match the flowers.  But, they have not opened up completely, so we will see what they look like.

Okay, I admit that it does not look too impressive right now.  You may be asking why I am not adding any more to the pot?  Well, first of all, my tastes are somewhat simple.  But, the major reason is that the Lantana will grow rapidly and cover the bare areas very quickly.  

Soon, it will hopefully look like this one….

Lantana

The last and maybe best reason that I love to use Lantana in containers is that when I dig them up in the fall, (in order to plant winter/spring flowers), is that I can plant the Lantana in my garden and enjoy them year-round.

What summer flowers are you planting in your containers?

Flowers for Summer? Not So Fast…..

One of my favorite flowering shrubs is Arizona Yellow Bells (Tecoma stans stans).  The other day, I spent some time pruning it back with some little hands eager to help.  

Yellow Bells is susceptible to frost damage in the winter and with spring almost here, it was time to prune back the brown tips.

Arizona Yellow Bells

Arizona Yellow Bells

My son offered to help me with pruning off the frost damaged tips of our Yellow Bells shrub.  As you can see, the shrub is taller then is.

Arizona Yellow Bells

I was happy at how they fared this winter.  Only the tips suffered frost damage.

Arizona Yellow Bells

We pruned back the brown, dead growth back to growing buds.

pruning

I am always happy when any of my children want to help me in the garden, but I particularly enjoyed having my son help me on this day because it is more difficult for him because of his disability.

We adopted our son 5 years ago from China knowing that he had a disability.  He was born with a condition in which some of his joints have limited strength and motion.  In the case of our son, his hands and feet are affected.  

He has had multiple surgeries and it is amazing at what he can do now compared to how limited he was when we adopted him when he was 2 years old.  However, he still struggles with the residual effects of his condition.  He does not always utilize his right hand and quite frankly, favors it while we are repeatedly encouraging him to use it to build up muscle strength.

As a result, I was so happy to see him having to use both hands to prune back our shrub.  He was very committed to doing a good job.

Arizona Yellow Bells

How do you think we did?  My son was very proud of the job he did.  I finished up pruning some of the taller branches that he could not reach.

Soon our shrub will be reaching the top of the wall and producing beautiful yellow flowers.