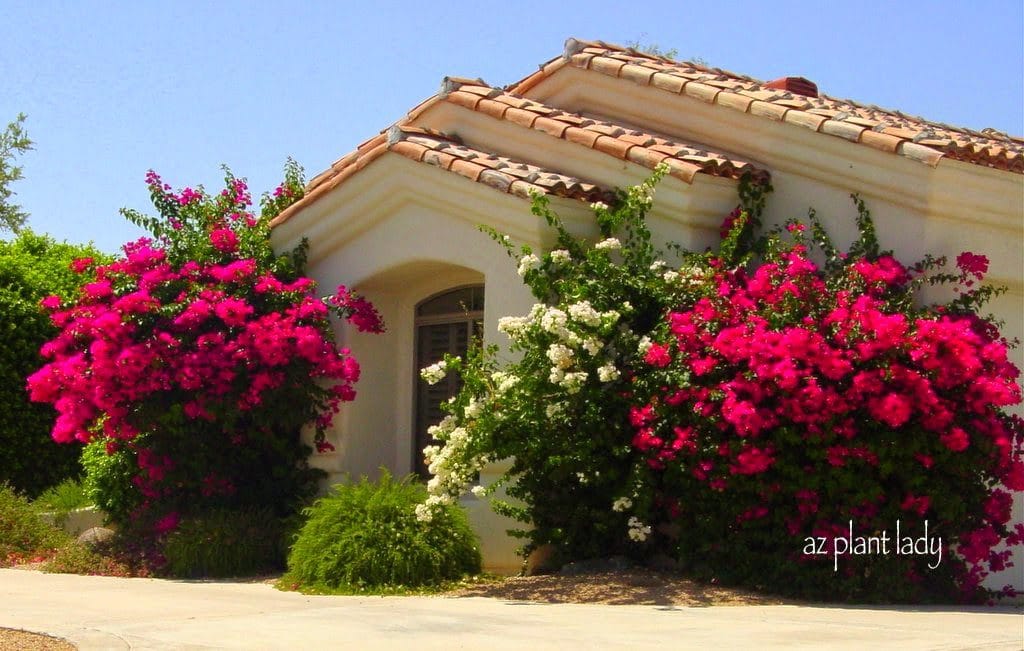
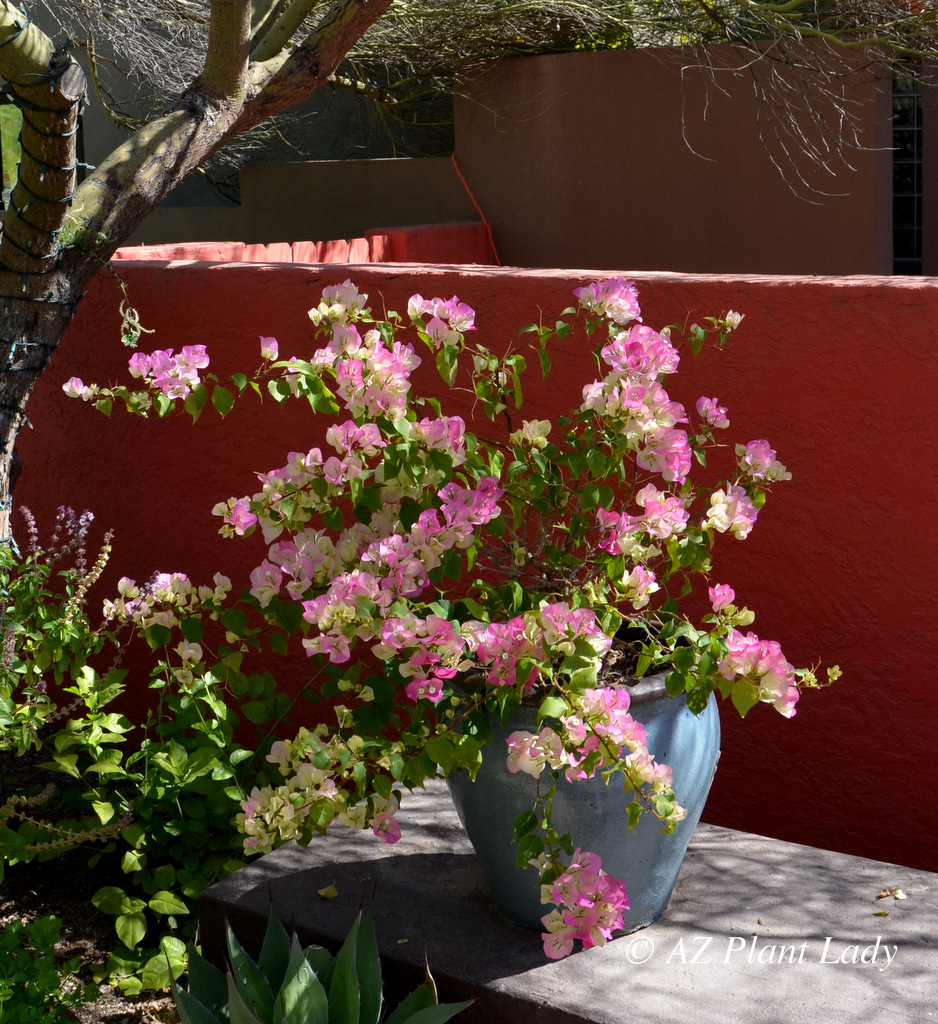
Do you love the beauty of bougainvillea? Many of us will agree that bougainvillea is beautiful, but many homeowners hesitate to grow them for a variety of reasons. The most common that I hear is that they get too big and as a result, too messy.
Embracing Bougainvillea: Maximizing Beauty while Minimizing Hassle in Containers
While both statements are certainly true, wouldn’t it be nice to enjoy the captivating and vibrant beauty of bougainvillea in a more controlled manner? One can find great satisfaction in discovering how to strategically grow bougainvillea, harnessing its enchanting colors and delicate blooms while mitigating the challenges associated with its exuberant growth and occasional unruliness.
Thriving in Harsh Desert Summers: Consider Growing Bougainvillea
Let’s face it; summers in the desert can be brutal and bougainvillea are one of the lush green, flowering shrubs that thrive in intense heat and sun. So, why not consider adding one in a high-profile area where you can enjoy their beauty throughout the warm season?
Grab my FREE guide for Fuss-Free Plants that thrive in a hot, dry climate!
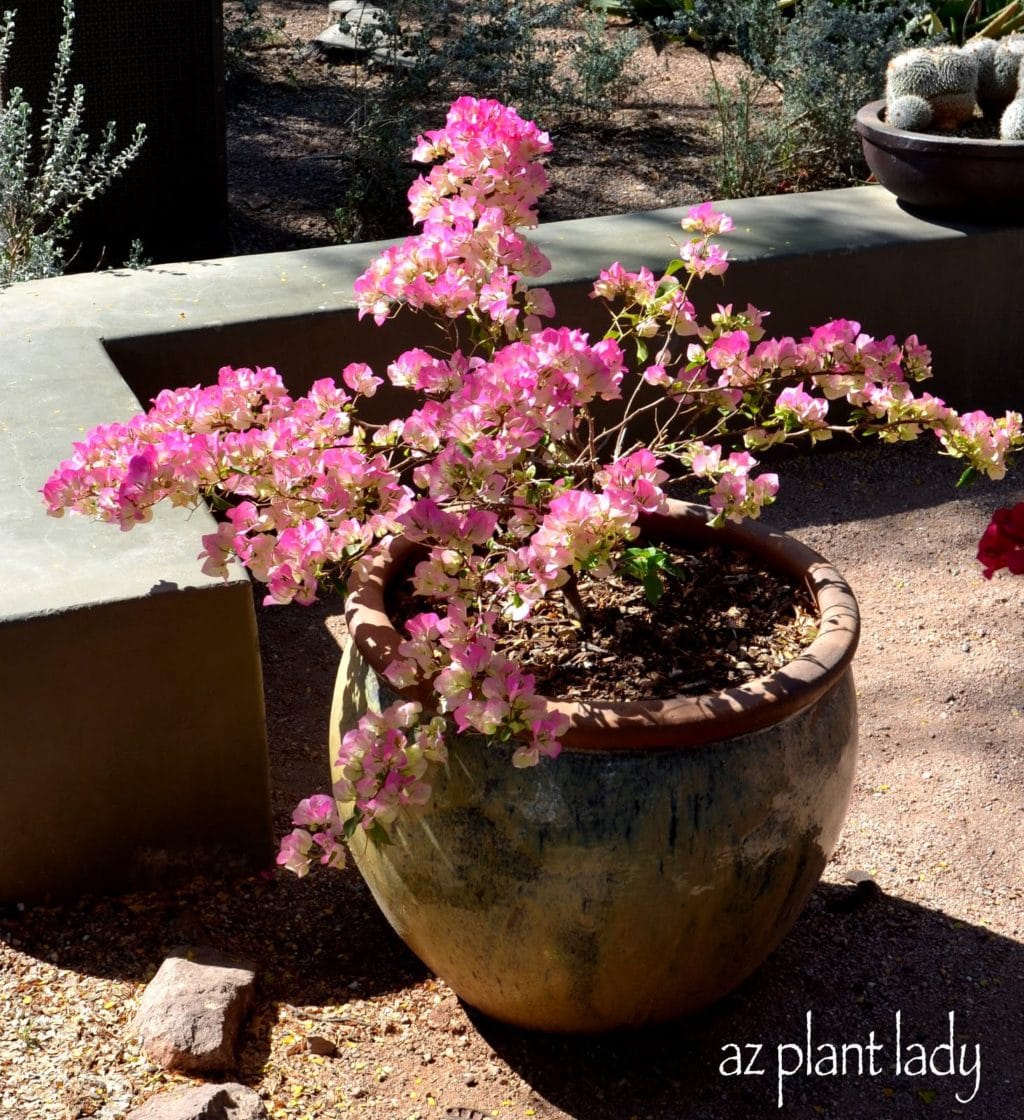
The Advantage of Potted Bougainvillea: Small Size, Less Mess
Growing bougainvillea in pots limits their overall size, and with smaller shrubs, there is less mess. It also makes it easier to protect them from frost damage in winter by moving the container to a sheltered location, such as underneath a patio or covering them with a sheet.
Bougainvillea make excellent container plants. In fact, many gardeners who live in cold climates, only grow them in pots and move them indoors in winter. I met a gardener in Austin, Texas who treats bougainvillea like an annual plant, planting a new one every year to replace the old one lost to winter cold. Thankfully, we don’t need to do add a new one every year.
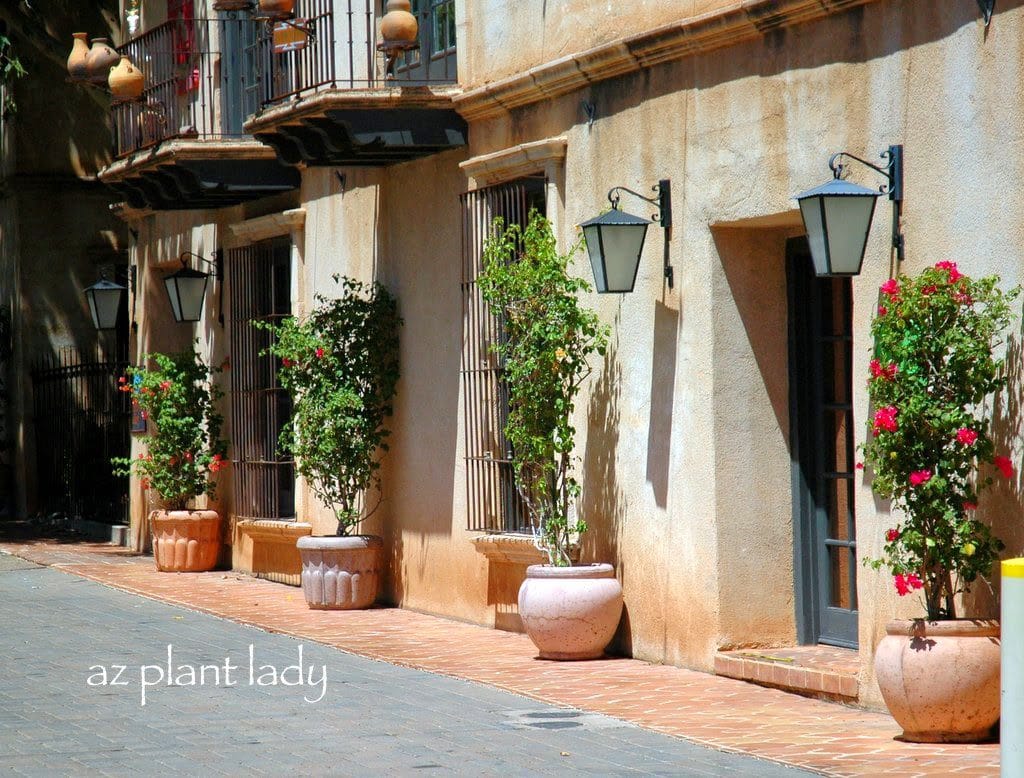
Simple Steps to Cultivating Bougainvillea in Pots
Growing bougainvillea in pots is easy to do. Select a location in full sun where it will promote the most bloom. Bougainvillea are one of the few flowering plants that can handle west-facing exposures.
Nurturing and Feeding Your Potted Bougainvillea for Optimal Growth
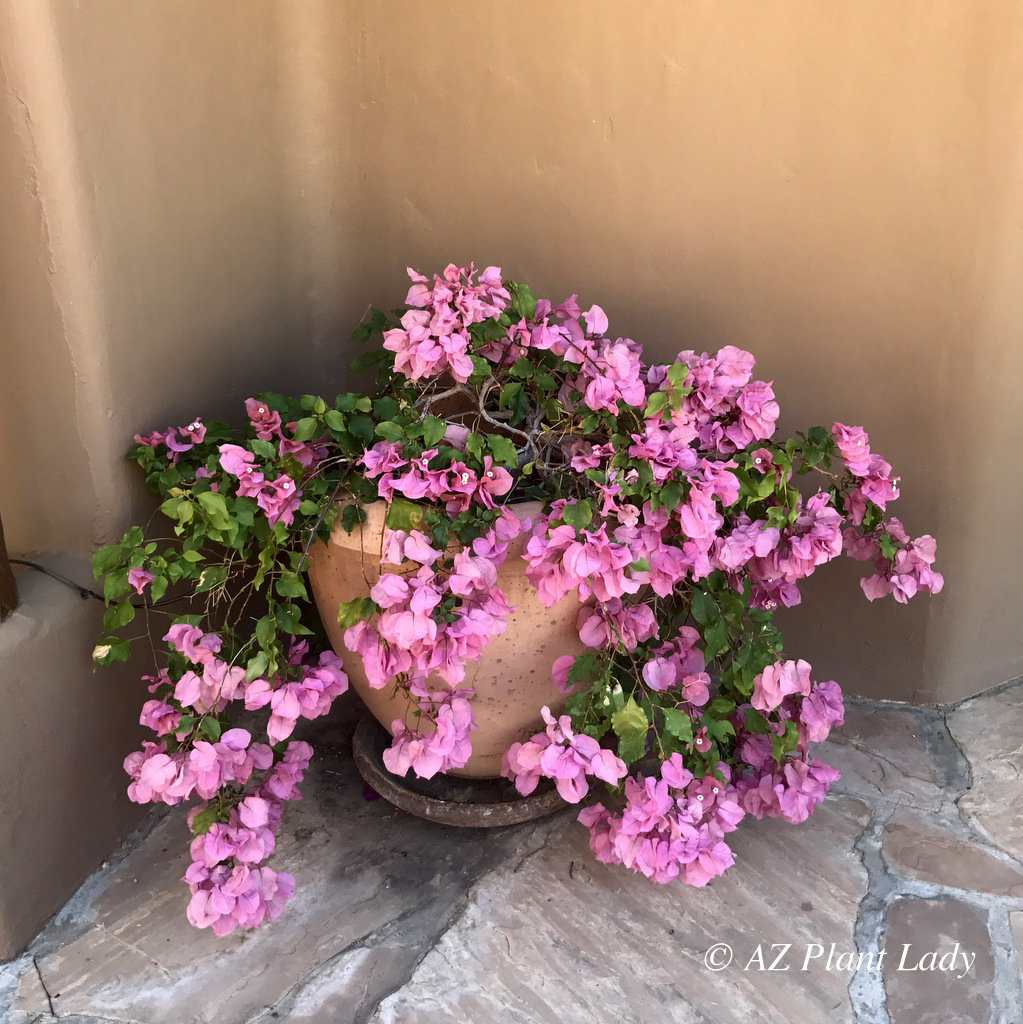
Provide support for them to grow upward if desired. You can also grow bougainvillea as more of a compact shrub form if you wish.
Water deeply and allow the top 2 inches to dry out before watering again. Bougainvillea does best when the soil is allowed to dry out between watering.
Apply a slow-release fertilizer in spring, after the danger of frost is passed. You’ll want to reapply fertilizer every three months until September.
Winter Care and Final Thoughts: Flourish with Potted Bougainvillea
Growing bougainvillea in pots keeps them small enough to make it feasible to cover them when freezing temperatures occur. So, if you like container gardening, consider growing bougainvillea in a pot for great success.
Preparing Your Garden for a Heatwave: 5 Essential Tips
Have you ever wondered how your plants fare in the scorching heat of summer? Is your garden equipped to withstand the punishing temperatures that a heatwave can bring, whether you reside in the arid desert Southwest or more temperate regions? In this guide, we’ll explore how to create a heatproof garden that thrives even during the hottest days of summer.
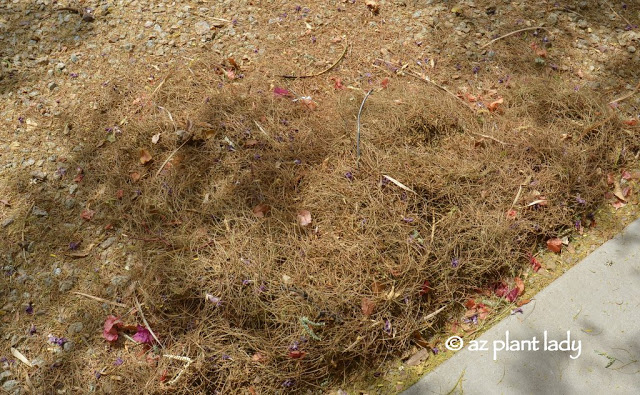
What do your plants look like in the middle of summer? Do they thrive despite the hot temperatures?
Or do they look more like this?
Assessing Your Garden’s Heat Tolerance
Before we dive into our tips for heatproofing your garden, it’s crucial to understand how to recognize the signs of heat stress in your plants. During the hottest part of the day, take a stroll through your garden and keep an eye out for wilting leaves, as well as leaves turning yellow or brown – all telltale signs of heat stress.
5 Key Strategies to Heatproof Your Garden
Here are five essential strategies to help your garden not only survive but thrive in the face of scorching summer temperatures:
1. Embrace Native and Climate-Adapted Plants
Selecting native or climate-adapted plants is a foundational step in creating an attractive, low-maintenance landscape that remains beautiful year-round. These plants possess unique characteristics that enable them to withstand local climate conditions, including extreme summer heat. Learn how plants like Langman’s Sage and Mexican Honeysuckle adapt to thrive in the heat.
All too often, we find ourselves with landscapes filled with plants. These plants often have large leaves and struggle to survive the hot, summer months. This results in unattractive plants that we work hard to help sustain them until cooler temperatures arrive. Usually, these plants are best meant to grow in climates with less extreme heat.
Plants Adapt to Change
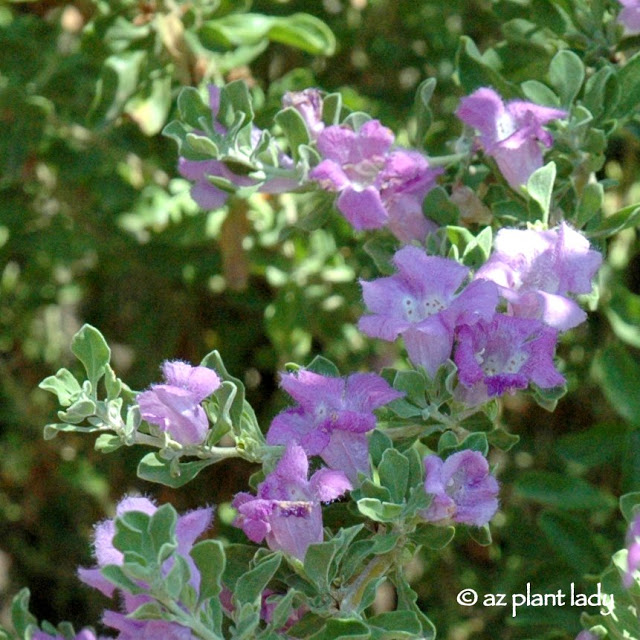
Langman’s Sage (Leucophyllum langmaniae)
Let’s look at an example of an adaptation that this Langman’s sage. The adaptation enables it to handle full sun and 110+ temperatures without undue stress.
Notice that the flowers have small hairs. So do the leaves, giving them a slightly grayish cast. These tiny hairs help to reflect the sun’s rays, which lowers the temperature of the leaves and flowers.
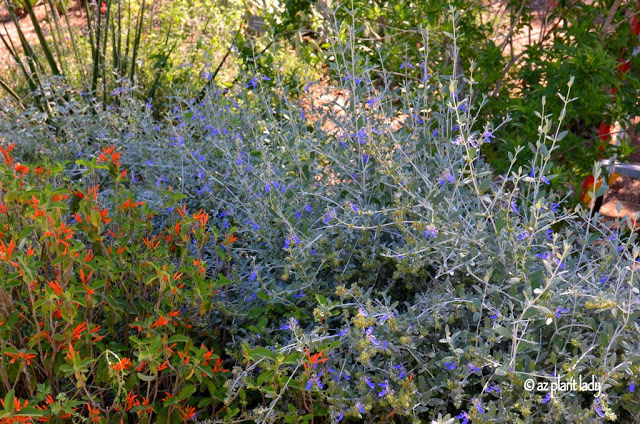
Another way that plants have to handle the heat is by having small leaves. This limits the amount of water lost, which helps them to deal with hot, dry temperatures.
Here in the desert Southwest, there are many native plants that are used. There are also plants from Australia and other arid regions, which have similar climates.
2. Harness the Power of Shade
Introducing shade into your garden offers respite from the relentless sun, benefiting both plants and your home’s overall cooling. Discover how to provide just the right amount of shade by strategically planting trees that offer filtered shade. This allows enough sunlight for other plants to flourish.
3. Master the Art of Deep and Infrequent Watering
Plants need water to survive, and not surprisingly, they need the most in the summer. However, we often water them too often and shallowly for it to do much good.
Shallow watering keeps roots close to the surface of the soil. There the soil temperatures are hot and the water dries up quickly.
Deep Watering is the Rule
Water is essential for your plants, especially during summer, but not all watering methods are created equal. Learn why deep watering, encouraging deep root growth, is far more effective than shallow watering. Discover how to gauge the depth of your watering and why early morning is the best time to hydrate your plants.
“Plants that are watered deeply and infrequently are better able to withstand the heat.”
Shrubs should be watered to a depth of 2 feet and perennials and groundcovers to 18 inches. You can determine how deeply you are watering by inserting a piece of rebar down into the soil (right after you have finished watering) to see how long you need to irrigate. On average, 2 hours is the length of time to irrigate to the desired depth.
An Online Course to Help You Understand Desert Garden Needs
In my online class, Desert Gardening 101, I teach my students that watering deeply is as important as the time of day that you water. The best time to water is early in the morning. Watering plants in the afternoon is not as useful since plants allocate their resources at that time toward surviving the stresses of the heat and so they do not take up water as efficiently.
4. Mulch for Cooler Soil and Moisture Conservation
Mulch plays a crucial role in heatproofing your garden. It helps regulate soil temperatures, keeping them cooler during the summer while conserving moisture – essential for plant health. Explore unconventional mulch options, including fallen leaves, pine needles, and even fallen flowers, and learn how they can enhance your garden’s well-being.
A bonus is that they also help to prevent weeds from taking root.
Be Creative with Mulch Components
Let’s take a minute to rethink our definition of what makes an excellent mulch.
While shredded bark and wood chips may come to mind, did you know that fallen leaves, pine needles, and even fallen flowers can also serve as a mulch? That is how nature does it.
Be Cautious with the Leaf Blower
So, the next time you are tempted to whip out your leaf blower, how about directing it toward the base of your plants where the leaves and flowers can serve as a mulch?
They will also help to improve the soil around your plants as they decay.
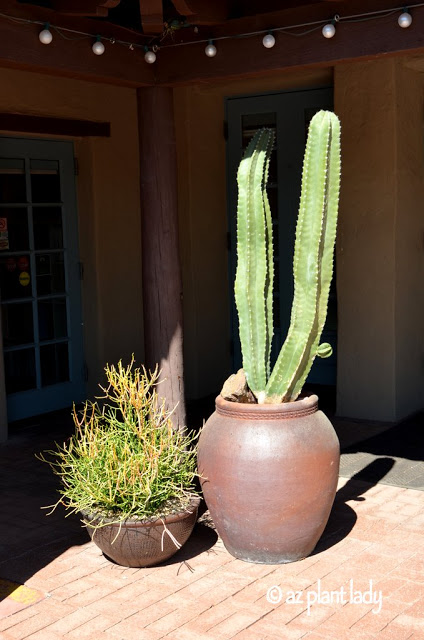
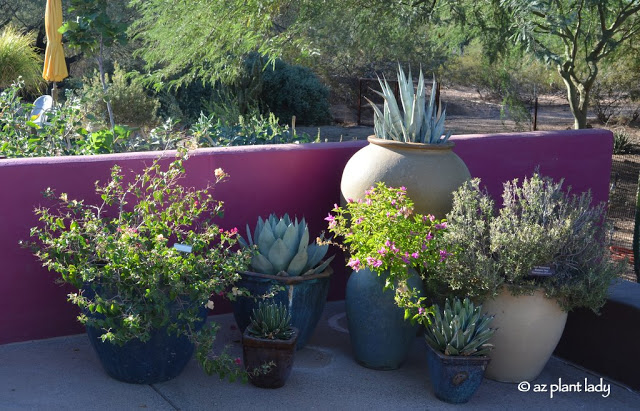
5. Opt for Succulents and Heat-Tolerant Shrubs in Containers
Tip for Heatproof Garden
While growing pretty flowers in containers is relatively simple in fall, winter and spring-summer can be another matter entirely. Often, it can be hard to grow flowering annuals in pots throughout the hot summer.
The reason for this is that the soil around the roots of container plants is hotter than if grown in the ground.
Critical Top Soil
This is especially true for the outer 6 inches of soil which heats up in response to air temperatures and the hot container. As a result, annuals can wilt and struggle to produce flowers in summer.
Succulents are a great way to enjoy attractive container plantings throughout the year, not just in summer. Their ability to store water is what makes them an excellent choice for containers.
Tip for Heatproof Garden
If you want to grow something else besides succulents, how about trying heat-tolerant shrubs? Bougainvillea does great in pots as does lantana.
Tip for Heatproof Garden
Caring for Heat-Stressed Plants
Another tip for containers is to leave them empty in the summer months and wait until fall to plant them.
When thinking in terms of growing plants in containers in hot climates, bigger is better – at least 2 feet wide at the top. The larger the pot, the more soil and therefore, more insulation for the roots from the hot outer zone.
So what can you do if you do have plants that are struggling in the heat – particularly during a heatwave?
Other than replacing them, you can provide them with temporary shade such as a patio chair strategically placed so that it protects it against the afternoon sun. A light spraying of water over the plant and surrounding area in the evening can help reduce the temperature – don’t do this when the sun is out, or you may burn the foliage.
https://www.azplantlady.com/wp-content/uploads/2015/06/Aug-Rio-Bravo-5.jpg548640arizonaplantlady@gmail.comhttps://www.azplantlady.com/wp-content/uploads/2025/08/AZ-Plant-Lady-Logo-small.jpgarizonaplantlady@gmail.com2019-06-11 07:05:002023-10-03 13:03:295 Tips for a Heatproof Garden
I am often asked this question by desert dwellers and my answer is always, “That depends.”
There are several variables that determine how much water plants need, along with the frequency of watering.
Variables include:
Type of soil (clay, sand, combination)
What kind of plant (native plants, higher water use flowering shrubs and ground covers, succulents, etc.)
Recommended depth of water
Desert region (low-desert, mid-altitude, high desert)
Efficiency of irrigation system
Water pressure (can vary between neighborhoods)
As you can see, there is no universal watering guideline in regards to how long to water or how often.
Let’s look into the variables a little more closely to help you determine what yours are:
Soil – Clay soils hold onto water longer than sandy soil. They take longer for water to permeate to the recommended depth. The result? Clay soils need irrigation less often than sandy ones but need to be watered for a longer length of time. Phoenix area soil tends to have more clay in them while those in the Palm Springs area are sandy.
Plants – Native or desert-adapted plants need less frequent irrigation versus those that come from tropical climates. Cacti and other succulents do well with infrequent irrigation.
Water Depth – Trees need to be watered deeply while ground covers and succulents do fine at a more shallow depth – shrubs fall in between the two.
Desert Region – Where you live in the desert matters when it comes to water and your plants. The differences include rainfall amounts, when the rain falls, high and low temps, and more. Residents of low-desert cities like Palm Springs and Phoenix need to add water to their plants more often than those who live in higher elevation regions such as Tucson.
Irrigation System – The older your irrigation system, the less efficient it is. This is due to mineral build-up within the system, which affects the amount of water that comes out. Also, old drip irrigation systems tend to accumulate leaks. The average lifespan for a drip irrigation system is 10-15 years.
Despite these differences, what is a shared characteristic is that the vast majority of desert residents water too often and not deeply enough. This is usually due to lack of knowledge and thinking the ‘more is better,’ especially in the desert.
Landscapers are generally not a reliable source when it comes to scheduling irrigation – most recommend irrigating far too often.
So what is a desert dweller to do?
Thankfully, there is very useful information available for homeowners to help them figure out when and how much water their landscape needs.
Major metropolitan areas throughout the Southwest have excellent watering guidelines available for residents. The guidelines include the regional variables we have discussed so far.
Here are helpful links based on major desert cities (click the link for the city closest to you):
Watering guidelines are just that – guidelines. Circumstances may mean that you need to water more or less often, but these guides are a useful baseline to work from.
*One final note – before you implement a new irrigation schedule, it’s important to gradually wean your plants to the new one over several weeks. The reason for this is that it allows plants to become accustomed to the new schedule.
Yes, it does take a little work to figure out how much and often to water your plants, but these guides are incredibly helpful and will guide you along the way.
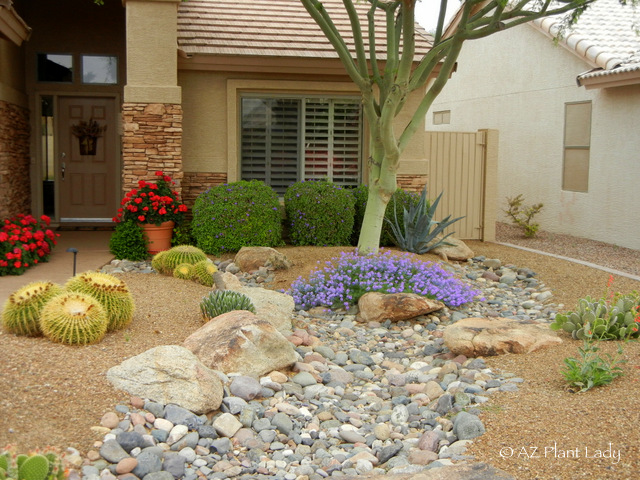
https://www.azplantlady.com/wp-content/uploads/2013/06/Arizona-front-yard-landscape-design.jpg480640arizonaplantlady@gmail.comhttps://www.azplantlady.com/wp-content/uploads/2025/08/AZ-Plant-Lady-Logo-small.jpgarizonaplantlady@gmail.com2019-06-04 13:30:002020-12-16 09:23:29How Much Water Do My Plants Need?
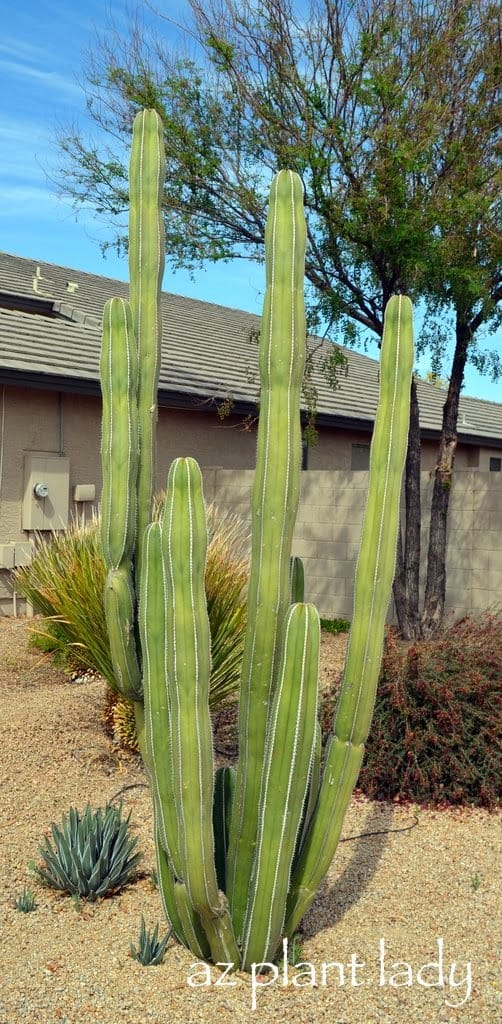
A Tale of New Beginnings: The Mexican Fence Post Cactus and Rachele’s Journey
This is a story about new beginnings – one for a new cactus and another beginning for my second-oldest daughter, Rachele.
Believe me when I say that both stories are connected in a way.
The Connection Between a Mexican Fence Post Cactus and a Daughter’s Departure
This cactus, above, is a Mexican Fence Post (Pachycereus marinatus), which has been happily growing in my front garden.
What may not be initially obvious is that 11 years ago, I started this cactus from a 2 ft. piece of one (called a ‘cutting’) given to me by a client from their large Mexican Fence Post cactus.
Well, exactly 1 year ago, I repeated the favor for our neighbors.
Sharing the Beauty: Providing a Piece of the Mexican Fence Post Cactus to Neighbors
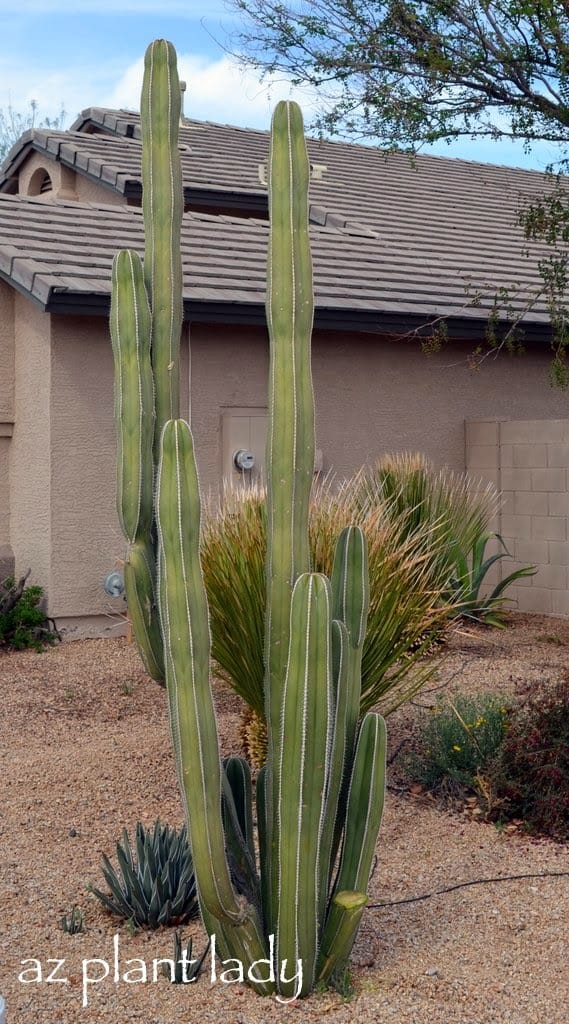
Look carefully at the photo above and compare it with the first one. Can you see where we cut off a piece of the cactus?
Our neighbors had recently re-landscaped their front yard and wanted a cactus like ours. Of course, they knew that they would have to start out with a much smaller one – but they were unprepared for how expensive it would be to buy one at the nursery.
Our cactus had been growing so well, we decided to offer them a piece (cutting) off of our Mexican Fence Post. So, my husband, daughter and I gathered together to take a cutting from our cactus.
Here is how we did it…
How to Properly Take a Cutting from a Cactus
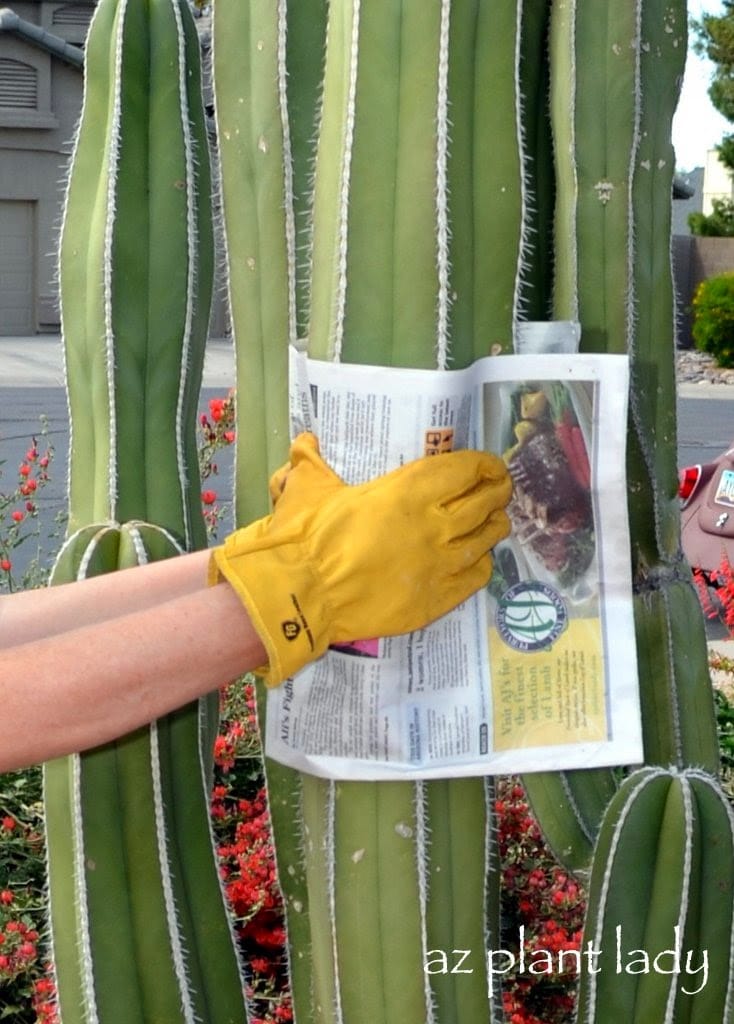
We selected a good-sized length of cactus and while I held onto it, my husband took a pruning saw and started sawing it off at the bottom.
Multiple layers of newspaper and gloves are helpful to use to grab onto cacti with short thorns. For cacti with longer thorns, you can use carpet remnants. When you cut out a piece of cactus, it will be much heavier then you are expecting – so be prepared.
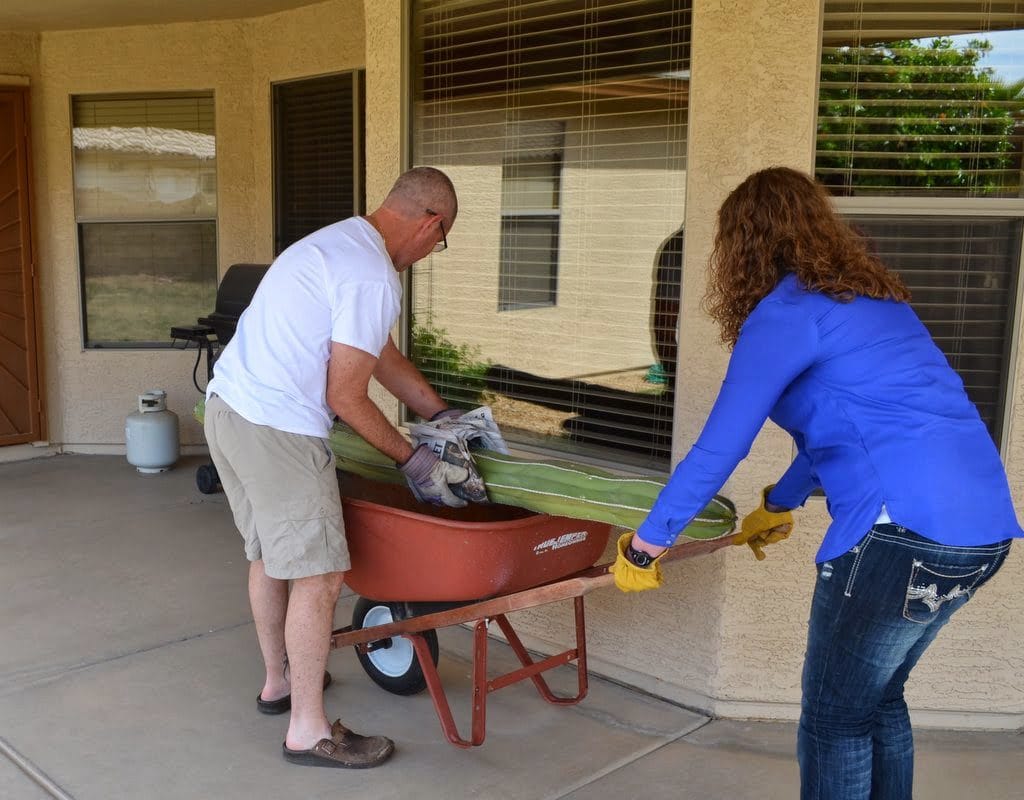
My husband and daughter wheeled the cactus cutting over to our neighbor’s house using our wheelbarrow.
Preparing the Cactus Cutting for Planting
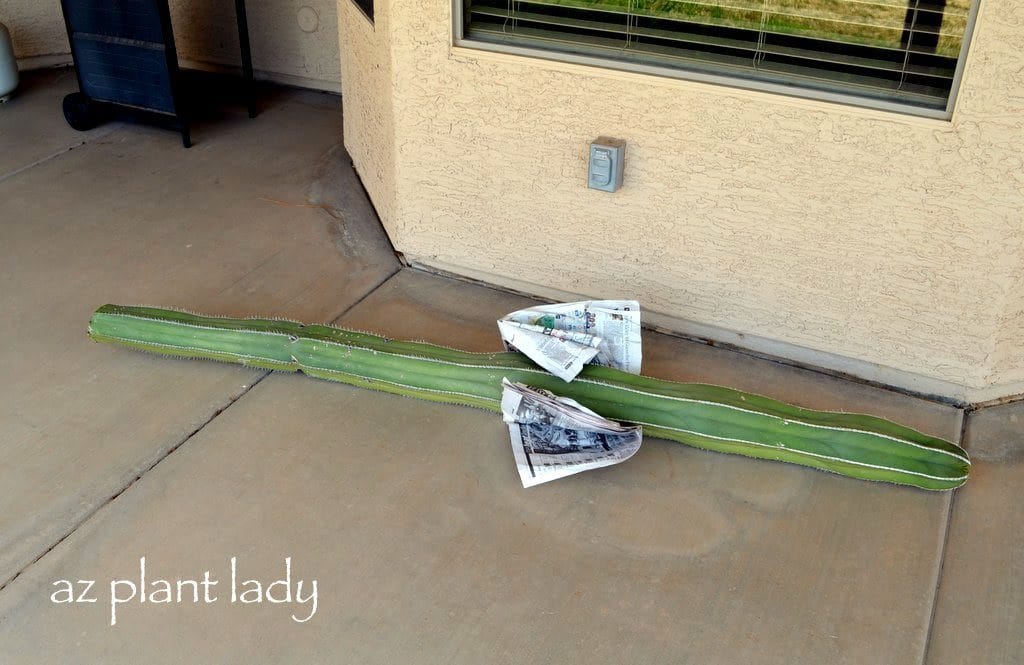
We then placed the cutting in a dry, shady spot for 2 weeks in order to allow the cut site to ‘callus’ over, which would protect the cacti from rotting when it is replanted.
*Exactly 3 days after helping us with the cactus cutting, my daughter, Rachele, left for the Navy and basic training. It was a sad goodbye for us, but a new beginning for her.
After 2 weeks had passed, the new cactus was planted in its new location with a wooden stake for support.
No water was applied for the first month after planting, in order to make sure that the entire cut end had callused over.
One month after planting, the cactus was watered deeply, monthly, until November.
*Whenever I looked at the newly-planted cactus, thoughts of my daughter and how she was doing in her new Navy life always crossed my mind.
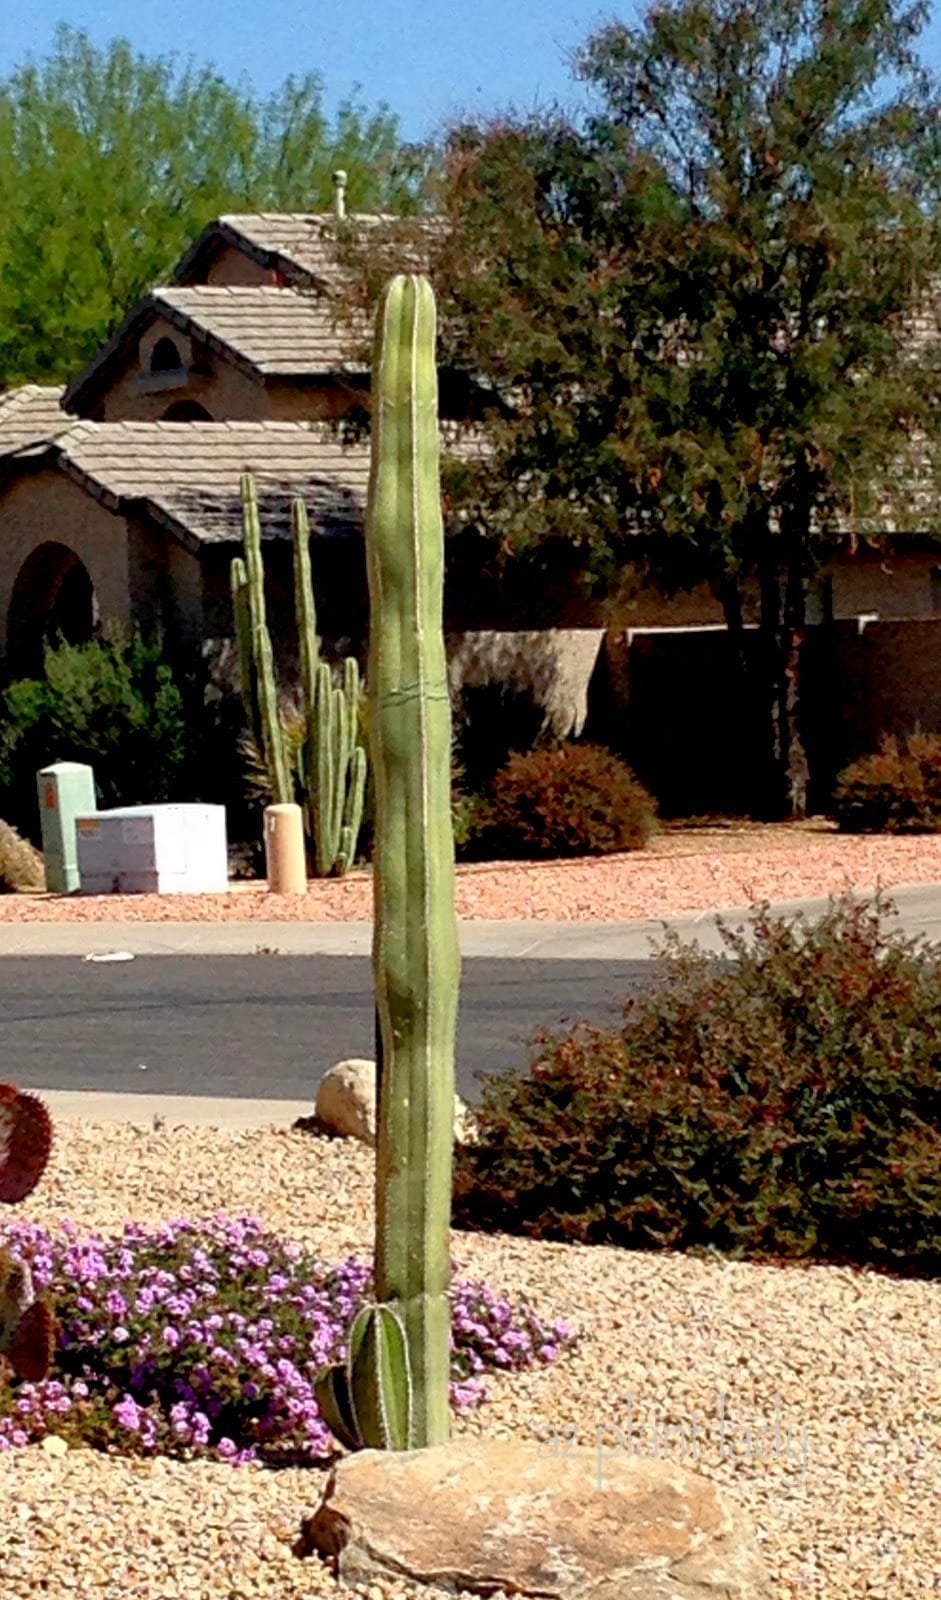
One year later, the new cutting is doing so well and has even grown two new sections.
You can see the parent cactus in the background.
Now, I may not be located as closely to my daughter as these two cacti, but like the new cactus, she is growing and doing so well in her new career with the Navy. We are so proud of her!
You can read more about Rachele’s adventures, here.
How to Propagate Cactus Via Cuttings
Propagating cactus via cuttings can be done with many species of cacti. Here are a few guidelines to follow for success:
1. Propagate cactus during the warm season, when the threat of frost is over.
2. Make the cut at the joint where the segment attaches to the parent plant. For prickly pear cacti, you can cut a segment that consists of 1 – 3 pads.
3. Place the new cutting in a dry, shady spot for 2 weeks to allow the cut site to ‘callus’, which protects the cacti from rot when it is replanted.
4. Plant your new cactus in full sun with well-drained soil.
5. Don’t water for a month after planting. Then water deeply, monthly until fall.
6. Provide temporary shade for the first summer. You can do this by placing a plastic patio chair over the top or using shade cloth.
Soon, you will begin to see new growth on your cactus.
https://www.azplantlady.com/wp-content/uploads/2014/03/5454.jpg1024502arizonaplantlady@gmail.comhttps://www.azplantlady.com/wp-content/uploads/2025/08/AZ-Plant-Lady-Logo-small.jpgarizonaplantlady@gmail.com2014-03-31 13:30:002023-09-04 10:56:56New Beginnings For a Cactus and a Daughter
We use cookies on our website to give you the most relevant experience by remembering your preferences and repeat visits. By clicking “Accept All”, you consent to the use of ALL the cookies. However, you may visit "Cookie Settings" to provide a controlled consent.
This website uses cookies to improve your experience while you navigate through the website. Out of these, the cookies that are categorized as necessary are stored on your browser as they are essential for the working of basic functionalities of the website. We also use third-party cookies that help us analyze and understand how you use this website. These cookies will be stored in your browser only with your consent. You also have the option to opt-out of these cookies. But opting out of some of these cookies may affect your browsing experience.
Necessary cookies are absolutely essential for the website to function properly. These cookies ensure basic functionalities and security features of the website, anonymously.
Cookie
Duration
Description
cookielawinfo-checkbox-analytics
11 months
This cookie is set by GDPR Cookie Consent plugin. The cookie is used to store the user consent for the cookies in the category "Analytics".
cookielawinfo-checkbox-functional
11 months
The cookie is set by GDPR cookie consent to record the user consent for the cookies in the category "Functional".
cookielawinfo-checkbox-necessary
11 months
This cookie is set by GDPR Cookie Consent plugin. The cookies is used to store the user consent for the cookies in the category "Necessary".
cookielawinfo-checkbox-others
11 months
This cookie is set by GDPR Cookie Consent plugin. The cookie is used to store the user consent for the cookies in the category "Other.
cookielawinfo-checkbox-performance
11 months
This cookie is set by GDPR Cookie Consent plugin. The cookie is used to store the user consent for the cookies in the category "Performance".
viewed_cookie_policy
11 months
The cookie is set by the GDPR Cookie Consent plugin and is used to store whether or not user has consented to the use of cookies. It does not store any personal data.
Functional cookies help to perform certain functionalities like sharing the content of the website on social media platforms, collect feedbacks, and other third-party features.
Performance cookies are used to understand and analyze the key performance indexes of the website which helps in delivering a better user experience for the visitors.
Analytical cookies are used to understand how visitors interact with the website. These cookies help provide information on metrics the number of visitors, bounce rate, traffic source, etc.
Advertisement cookies are used to provide visitors with relevant ads and marketing campaigns. These cookies track visitors across websites and collect information to provide customized ads.