Purple lilac vine in the garden

Purple lilac vine

Discovering the Beauty of the Purple Lilac Vine (Hardenbergia violacea)

In the midst of a colorless winter garden, a burst of vibrant beauty can be a delightful surprise. Explore the wonders of this wonderful purple vine, a lesser-known gem that thrives in the desert garden.

Embracing the Lilac Vine’s Versatility

Welcome to the world of the purple lilac vine (Hardenbergia violacea), an Australian native cherished for its unique charm. While it’s not a true lilac, it serves as a wonderful substitute in regions like the low desert where traditional lilacs struggle to grow. Regular irrigation is important.

A Versatile Beauty

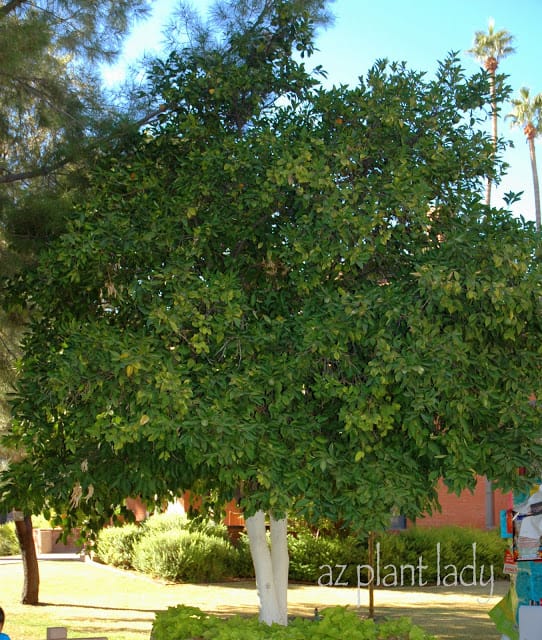
This versatile vine can be employed in various ways in your desert southwest garden. Traditionally used as a vine, it can also shine as a ground cover, as my experience from over 20 years ago demonstrated. Its adaptability is one of its key strengths.

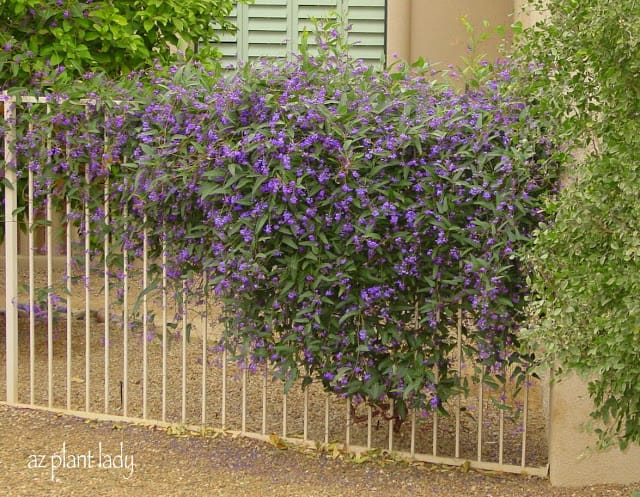
Blooming in the Heart of Winter

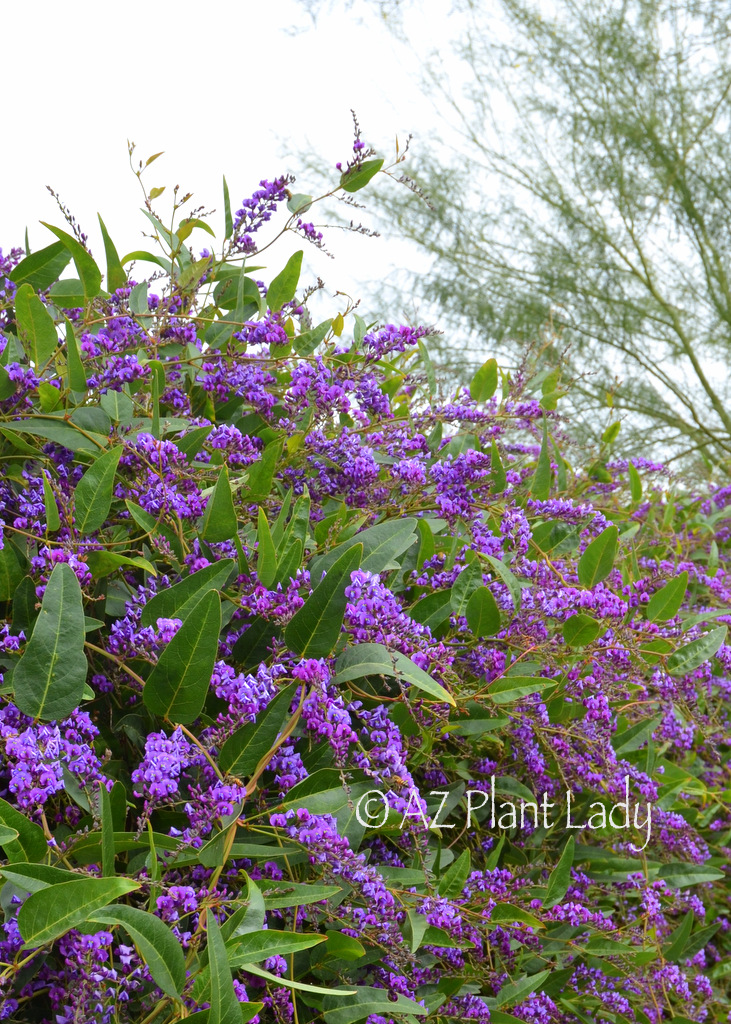
One of the most remarkable attributes of the lilac vine is its winter bloom. In zone 9 gardens, February brings forth a profusion of gorgeous purple flowers, adding a touch of elegance when little else is in bloom.

Purple lilac vine in full bloom

Isn’t it beautiful?

This Australian native is known by different common names with lilac vine (Hardenbergia violacea) being commonly used in our area of the Southwest.

It is not actually a lilac, but because we cannot grow lilacs in the low desert, this is a wonderful substitute.

Purple lilac vine flowers up close

My first experience using Purple Lilac was over 20 years ago when I used it in a feature area on one of the golf courses I worked for.

Although traditionally used as a vine, I used it as a ground cover; believe it or not, it did beautifully.

One of the best attributes of this vine is that it blooms during the winter month of February in our zone 9 gardens.

Now be honest, there is not much going on in your garden in winter, is there? Wouldn’t it be great to have gorgeous purple flowers blooming when little else is?

Purple lilac vine on a fence

Reasons to Welcome this Winter Vine

Here are more reasons to consider introducing this lovely vine into your garden:

  • Winter Blossoms: Brighten up your garden during the colder months.
  • Year-Round Attractiveness: Even when not in bloom, the vine boasts appealing foliage.
  • Low Maintenance: Minimal care required; occasional pruning for size control and little need for supplemental fertilizer.
  • Vertical Growth: It thrives when provided with a trellis or support structure.
  • Ideal Placement: East or south-facing areas are especially suitable for this vine.
  • Hardiness: Hardy to USDA Zone 9, it withstands typical winter temperatures but may suffer frost damage in the upper 20s°F.

Under normal winter temperatures, it doesn’t suffer frost damage.

Purple Lilac Vine Has Useful Appeal

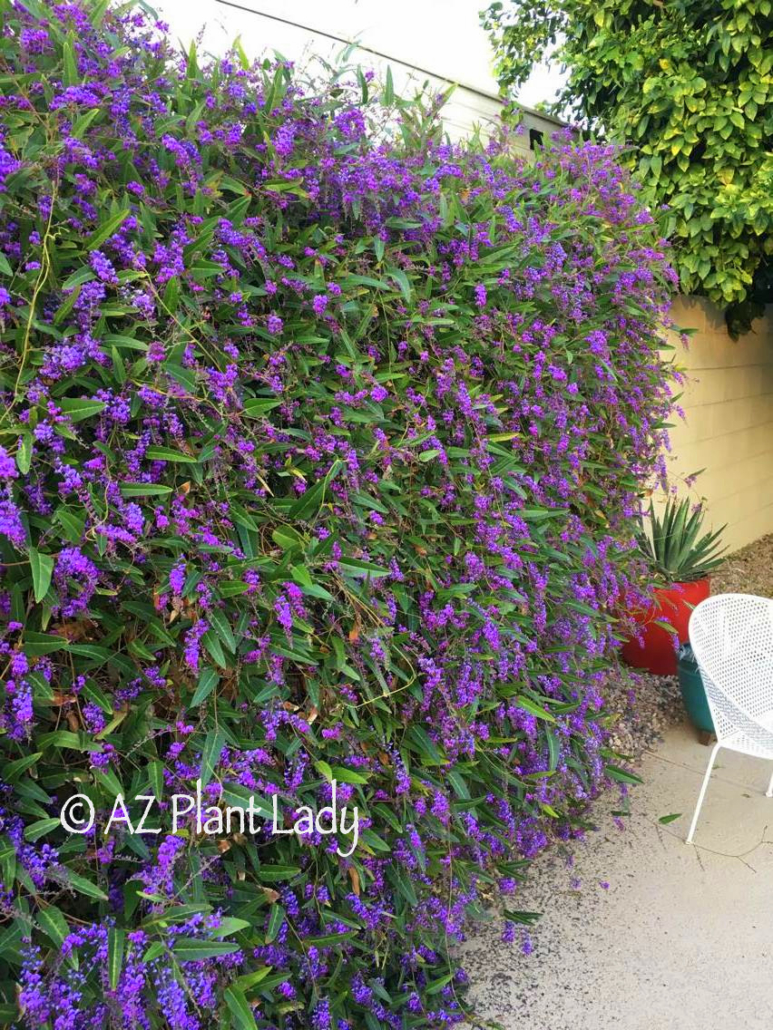
The vine isn’t just about looks. It can serve as a decorative asset, transforming bare walls and concealing unattractive views with its lush foliage and vibrant blooms.

Purple lilac vine leaf view

When people ask me if I recommend a particular plant, I tell them that the highest recommendation that I can give is is if I have that plant growing in my garden.

I do not have the patience to grow a plant that struggles and/or takes too much maintenance.  It also has to look beautiful most of the year.

So if you ask me if I truly like this vine, I answer by saying that I have four growing in my backyard 🙂

Sourcing Your Purple Lilac Vine

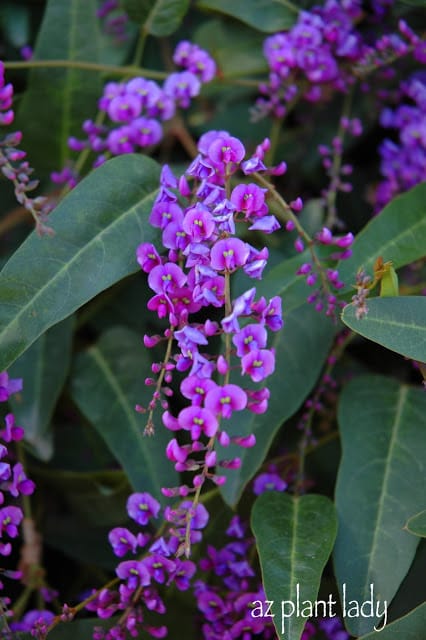
While some may struggle to find this vine in local nurseries, fret not. Most nurseries typically stock them when they’re in full flower during the winter. It’s important to note that while the flowers resemble lilacs, they may not be strongly fragrant. However, their sheer beauty makes up for any lack of fragrance.

Discover the magic of this wonderful vine and infuse your winter garden with a burst of captivating color and charm. Happy gardening!


purple lilac vine at the garden center

Understanding the Mystery of Dead Plants

I’m pretty sure I know the answer to the dead plant mystery.

We have all likely experienced the death of a plant in our garden, and even though I am a horticulturist, I’m not immune.

Sometimes, plants die in my garden too.

The Perplexing Case of ‘Blue Bells’ Emu Bush

Here is a photo of my recently deceased ‘Blue Bells’ emu bush.

I was surprised to see that it had ‘kicked the bucket’ as its nearby neighbors were flourishing. Dead plants can tell a story.

So, the question I have to ask myself is, why did it die?


How to Figure Out Why a Plant Died in Your Garden

To determine why a plant died, here are some things to ascertain…

1. Recent Planting and Transplant Shock:

Was it planted recently? If so, it may not have had enough time to grow enough roots to survive summer. Transplant shock is a real thing.

2. Watering Issues Are a Concern:

Did it get enough water? Was the drip emitter plugged or broken? Sometimes we need to better educate ourselves on water irrigation.

3. Sun Exposure Extremes:

Was it planted in the wrong exposure? In other words, did it get too much sun or not enough? Both of these things can cause dead plants.

4. Climate Compatibility Can Cause Dead Plants:

Does the plant do well in our hot, desert climate? Or will it end up a dead plant because it is not built for the desert climate.

5. Pest Problems:

Were there any pest problems, such as ants around the roots or other unwelcome bugs? This can weaken the plant.

6. Overall Landscape Health:

Are identical plants in your landscape struggling too? If so, they might all be struggling due to a similar issue.

7. Soil Conditions are Important:

Is there a problem with the soil? Groupings of dead plants can sometimes indicate poor soil conditions.


Using these questions as guidelines, you’ll likely have the answer to why a plant has died.

However, in my case, the plant was a few years old, always did well, and the ‘Blue Bells’ nearby were thriving.

So, why did it die?

I don’t know…

Sometimes plants die, and we don’t know why. I realize this can be hard to accept without having the answer.

That is what happens in nature – things die, and we don’t always have the answers as to why.

In my particular case, I am replanting a new “Blue Bells” because I know it grows well for me in this spot. I ensured there were no unwelcome bugs in the soil and amended the soil with 1 part compost mixed with 1 part existing soil to give it a little ‘boost.’ You might find a different plant that works well for your garden.

I hope my new plant is happy…

firecracker bush (Hamelia patens) flowering shrub

The Common Name Conundrum

Isn’t this a pretty shrub?

I saw this flowering beauty at a client’s home.

Now, when you see a plant that you like in a friend or neighbor’s yard, you probably ask them what it’s called.

My client was very proud of her shrub and called it Firecracker Bush. The problem is that two completely different plants called that name.

The Confusing Name Game

To complicate things further, this lovely shrub is also called ‘Fire Bush,’ ‘Scarlet Bush,’ and ‘Hummingbird Bush.’

Are you confused yet?

If so, you aren’t alone. Because plant names are confusing.

You see, common names for plants aren’t a reliable way to refer to plants – especially when you head out to the nursery for a particular plant. It’s a frequent mistake to come home with the wrong plant.

Embracing the Latin When Plant Names are Confusing

Botanical vs. Common Names

If you look at a plant label, you’ll notice that they come with two names – a common name and a botanical (Latin) name.

In this case, the plant’s botanical name above is Hamelia patens.

Why the Latin Matters

So, why do you need to know the Latin name of a plant? Obviously, it’s easier to pronounce the common name. But plant names are confusing, right?

Each particular plant has only ONE botanical name, unlike a common name that may refer to several different plants. Therefore, when you learn the botanical name, there won’t be any confusion about what plant it refers to.

Now, I realize it can be intimidating to try to pronounce Latin plant names. However, recognizing the botanical word for your desired plant will ensure that you are buying the right plant. Don’t worry, you don’t need to say it out loud – simply write it down.

The Beauty of Hamelia Patens

This lovely firecracker bush (Hamelia patens) has lush green foliage and produces red/orange flowers that hummingbirds love. It is cold hardy to 18 degrees F. and will suffer frost damage when temperatures dip into the 30’s, but recovers quickly in spring.

It has a naturally mounded shape and doesn’t require any shearing (no poodle-pruning). Firecracker bush grows to approximately 3-4 feet tall and wide.

In the desert garden, I find it does best in areas with filtered sunlight, making it a worthy addition to your garden.

succulent plants near a front entry in Arizona garden

Do you enjoy the summer heat?

I’m going record to state that I’m not a huge fan. I prefer to endure the intense heat indoors in the comfort of air-conditioning.

However, the plants in my garden don’t have that option. They are stuck outside no matter how hot it gets.

I always feel sad when I see plants struggle in the heat of summer. If I could bring them indoors to cool off I would 😉. But, let’s face it, that isn’t realistic or really what is best for plants.

For that reason, you will find the plants around my home are fairly heat-tolerant.

If you think that heat-proof plants are boring (and if I’m being honest, some are), many are attractive and beautiful.

One of my clients has a great example of an eye-catching entry that is fuss-free and shrugs off the heat of summer.

Artichoke agave (Agave parryi v. truncata), golden barrel cacti (Echinocactus grusonii), and lady’s slipper (Euphorbia lomelii), and yucca create a living sculptural landscape with their unique shapes.

As you can see, you don’t have to settle for a blah garden or one filled with heat-stressed plants. In fact, I loved this example so much that I featured it in my book, “Dry Climate Gardening” which is available for pre-order.

You know that I don’t care for fussy plants – I prefer plants that look great with little effort on my part and this succulent garden is a great example, don’t you agree?

I invite you to take a walk through your garden to see what plants may be stressed from the heat. It may be time for you to switch them out for more heat-tolerant ones.

The dog days of summer…

By the time midpoint of summer heat arrives, I am firmly in ‘summer hibernation’ mode. I have past all the garden needs in hot early summer and moved on to trying to find a cool spot with a nice glass of lemonade.

Why Summer Hibernation Mode in the Desert

While much of the country stays indoors during the cold of winter, we desert dwellers flip that and spend the hottest days of summer safely ensconced indoors in the comfort of A/C.

Of course, cabin fever can hit, making us venture outside of our homes. That’s where summer getaways come into play.

I’m fortunate that there are many spots in Arizona (where I live) that are just a few hours from my house where the summer temperatures are blessedly cooler.

When my husband and I were young, we couldn’t afford to stay overnight in out-of-town destinations. But, we could go for the day. We would pack up our two young daughters and go on day-long adventures to the cool mountains and pack a picnic lunch. Oh, what fun we had!

Nowadays my husband and I travel to cooler spots and spend a few days. One of our favorite places is the town of Bisbee in southeastern Arizona.

There is a lot of history in there and we love to explore while enjoying the cooler temps. The photo above is a part of Bisbee called Lowell, which is preserved in time from the 1950s.

Garden Concerns for Extreme Southwest Heat

Speaking about the heat, I’ve heard from a number of people in my membership club who are worried about the lack of flowers they see on their shrubs and groundcovers.

Perhaps you have similar worries…

I want to assure you that this is normal in summer – particularly when monsoon rains have been sporadic and not regular.

Intense heat and dryness tend to make flowering plants slow down and a heatwave can burn flowers of certain plants. There are also a lot of fuss-free plants you can choose for the summer garden that bloom and look beautiful all season long.

Rest assured that they will come back by summer’s end to provide beauty to your outdoor space.

flowering groundcovers and a cactus desert adapted plants landscape


Embracing the Desert Heat: Landscaping with Desert-Adapted Plants

Surviving the Summer Scorch with Desert Adapted Plants

Let’s face it…summer can be brutal.

I tend to spend as little time outdoors as possible when temperatures soar above normal ranges. It’s times like this that I praise the inventor of air-conditioning.

While we can escape record-breaking temperatures, our heat-stressed plants can’t.

Beauty in the Heat: Desert-Adapted Plant Landscaping

However, you can create a landscape filled that thrives in the heat by using native or desert-adapted plants. And you know what? Most are very pretty!

Last weekend, I saw a great illustration of this…

Hospital vs. Church Landscaping: Lessons in Adaptation

Our church recently opened up a new campus, filled with new plants, but many of them were struggling to survive the intense heat, even if irrigated properly. Many were planted native to more tropical climates.

After church, my husband and I headed out to the hospital to visit a loved one. The hospital had just undergone a renovation and brand-new landscape areas surrounded the entrance.

I stopped to take a photo of one of the areas that were doing very well so I could share it with you. Full disclosure: if you hang out with me, be prepared for sudden stops to take pictures of plants.

The Secret to Thriving Landscapes

There were two main reasons that the landscape by the hospital was doing better than the one by the church:

  1. The plants by the hospital were better adapted to hot summers – desert marigold (Baileya multiradiata), gold lantana (Lantana ‘New Gold’), and Mexican fence post cactus (Pachycereus marginatus).
  2. Additionally, these plants had been installed three months earlier than the ones at the church. Yes, plants can technically be added any time of year BUT there are times that should be avoided if at all possible – specifically May and June.

Heat-Resilient Gardening

Sometimes you need to add new plants at the wrong time of year due to construction schedules, etc. In that case, I advise the use of shade cloth on a temporary basis for young plants through September IF you see that certain plants are struggling. This is in addition to watering them more often than existing plants in the landscape to help them establish their roots.

Use native or desert-adapted plants (those from other regions with similar weather conditions) to help your garden to be more resilient to hot, dry temperatures and they will need less help from you to beat the heat.

Stay cool friends!

The Reality of Vegetable Gardening: Unveiling the Secrets

The Pressure of Unrealistic Standards for Vegetables

Have you ever found yourself intimidated by fashion magazines filled with beautiful celebrities and models who are then photoshopped to remove every little imperfection? Or perhaps an Instagram account where the home is filled with natural light, dust-free, and no mislaid items anywhere?

I must admit that I don’t like to follow accounts like that as they promote an unrealistic view and leaves me feeling like something is wrong with me when I don’t look perfect and my house doesn’t either.

Escaping Unreal Expectations

This type of unreal perfection extends to the garden too! Just between you and me, I’ve been to many gardens that are highlighted on social media and they never look quite as good in person.

Believe it or not, vegetables also fall into this unrealistic realm when shown in magazines and online. Articles filled with photographs of perfectly-sized vegetables without a speck of dirt on them can be intimidating to the average vegetable gardener.

Unearthing the Dirty Secret of Vegetable Gardening

dirty secrets of vegetable gardening

Well, I’m here to tell you the truth and reveal two dirty secrets of vegetable gardening with some assistance from my little helper. 

My granddaughter, Lily

Meet Lily: A Gardening Companion

This is my granddaughter Lily who loved to help me in the garden when she was little. She was always a willing helper when it came time to harvest vegetables from my garden.

Toward the end of spring, it was time to harvest the last head of broccoli, pick the carrots, pull the garlic, cut parsley, and harvest the first of our blackberries.

The Dirty Secret of Vegetable Gardening

The Real Harvest

This is what our harvest looked like. Not particularly photo-worthy for a magazine or social media, is it? But, this is the reality of what it looks like.

'secret' about vegetable gardening.

The Dirty Secret: Vegetables Grow in Dirt

If you haven’t guessed the secret about vegetable gardening – it’s that it is DIRTY!

The Dirty Secret of Vegetable Gardening

Think about it – vegetables grow in the dirt.  They don’t come out clean.  In fact, it can take a while to clean the dirt away.

Lily was excited to help me clean the vegetables, so she would fill her ‘My Little Pony’ cup over and over and pour them over the carrots. 

 harvested vegetables leave

In fact, freshly harvested vegetables leave dirt behind on counters, floors too!

clean garden tools and spotless gloves

And those shiny, clean garden tools and spotless gloves? They don’t exist in a real garden.

Now, here is another secret of vegetable gardening…

The Dirty Secret of Vegetable Gardening

The Imperfect Shapes and Sizes are Normal

“Not all the vegetables are the same size and come out unblemished.”

The Dirty Secret of Vegetable Gardening

Here are four carrots that I harvested from the same garden.  As you can see, they are all different sizes.

The tiny ones, came from an area where I accidentally dropped a small pile of seeds. The large one was a result of an area in the garden that received too much water and the carrot was so big that it broke off as I attempted to pull it out.  

The Dirty Secret of Vegetable Gardening

Of course, any decent photo would display only the ‘normal-sized’ carrots – but that is not necessarily the truth of what a real garden harvest would look like.

Lily’s Tigger was excited to try some carrots.

crop of garlic

Garlic of All Sizes

Here is another example. Our crop of garlic was bountiful. But, notice that there are not all uniform sizes.

crop of garlic

While the majority of the garlic harvest is made up of normal-sized garlic heads – there are some very small and some giant heads.

The Illusion of Garden Perfection

But of course, that is not what you see when people typically show off their garden harvest – especially when they are to be photographed.

First, only the most attractive vegetables are shown – ones with no blemishes and uniform size. Second, all the dirt is removed. And finally, the decorative dish towels come out for an attractive background.   

The Dirty Secret of Vegetable Gardening

I have several decorative dish towels that have never seen a dish and I use them when I photograph vegetables, herbs, etc.

The Dirty Secret of Vegetable Gardening

Here is my ‘perfect’ garlic harvest. What is interesting is what you DON’T see. All of them are nicely shaped, roughly the same size, and most of the dirt is gone. This is NOT what they look like when they come in from the garden.

The Dirty Secret of Vegetable Gardening

The Best Advice is to Embrace Imperfection

So remember that vegetables aren’t perfectly clean, they may have blemishes and come in all sizes and shapes. So, when you harvest vegetables, don’t worry about perfect-looking vegetables. Remember, it’s the taste that matters!

My Secret Vegetable Gardening Tool…

Wildflowers ,  California bluebells and red flax

California bluebells and red flax

Cultivating Wildflowers: Nature’s Colorful Display

The Beauty of Spring Wildflowers

One of spring’s many joys are the fields of wildflowers that we often see growing along the side of the road.  It is one of the many miracles of nature how such lovely flowers can grow in the wild without any help from people.

I find it kind of ironic that if we want to grow these flowers of the wild in our own garden we  have to give them a little assistance to get them going.  But, the preparation is fairly simple and the rewards are definitely well worth the effort.

Wildflowers , Arroyo lupine with white gaura

Arroyo lupine with white gaura

Planting for a Spring Show

To achieve a breathtaking spring wildflower display, it’s crucial to plan ahead. When it comes to wildflowers, autumn emerges as the ideal time for sowing seeds that will later burst into vibrant spring blooms. This strategic timing allows the seeds to establish strong root systems during the cooler months, ensuring they’re well-prepared to flourish when spring’s gentle warmth and longer days arrive.

So, as summer transitions into fall, seize the opportunity to sow the seeds of nature’s beauty in your garden, and you’ll be rewarded with a picturesque wildflower spectacle come springtime.

Wildflowers in a field

Lessons from a First Wildflower Garden

I’ve planted wildflower gardens throughout my career, but I’ll never forget my first one.  It was on a golf course and I sowed quite a bit of wildflower seed in that small area – and I mean a LOT of seed.  The wildflowers were growing so thickly together and probably would have looked nicer if I had used less seed and/or thinned them out a little once they started to grow.  But, I loved that little wildflower garden.

Embrace Wildflowers in Your Garden

If you have a fondness for wildflowers and the enchanting beauty they bring, consider carving out a dedicated space within your garden to cultivate your own captivating wildflower haven. By allocating a portion of your garden to these lovely, untamed blooms, you not only embrace the allure of the wild but also foster a unique and vibrant ecosystem right in your backyard.

With some thoughtful planning and care, you can create a harmonious blend of native or adapted wildflowers that not only adds natural charm but also supports local pollinators and wildlife. So, why not embark on the journey of nurturing your personal wildflower oasis and experience the wonders of nature’s artistry up close?

purple lupines and Wildflowers

**Do you have a favorite wildflower?

Exploring the Beauty of the Desert Museum Palo Verde

Lovely flowering Desert Museum Palo Verde Tree

‘Desert Museum’ Palo Verde Trees

The Desert Museum Palo Verde (Parkinsonia ‘Desert Museum’), a beloved tree in arid climates, graces numerous residential, commercial, and community landscapes. Its striking medium-green trunk, feathery foliage, and golden late spring flowers contribute to its widespread popularity. While wind damage can be a concern, proper care and selection can ensure these trees thrive.

Avoiding Storm Damage of the Palo Verde Tree

Fallen ‘Desert Museum’ Palo Verde trees after a monsoon storm

These wonderful trees stand as a captivating addition to arid landscapes. Its medium-green trunk, delicate foliage, and vibrant late-spring blooms make it a cherished choice for many. However, understanding and addressing potential wind damage is crucial for their successful growth.

Understanding Wind Damage Concerns

One common hesitation in planting palo verde trees is their perceived susceptibility to wind damage. However, most issues arise from improper maintenance, unsuitable locations, or the selection of the wrong tree type within the Palo Verde family.

Palo Verde Tree in full yellow bloom

Desert Museum Palo Verde tree in my backyard

Personal Success with Desert Museum Palo Verde

I have three of these Palo Verdes around my house. They range in age from 10 to 20 years old. In all that time, I have not lost a single one. While minor branch breakage occurred at times, these resilient trees quickly recovered, showcasing the hardiness of this species.

So, how can you enjoy the beauty of this tree while lessening the danger of wind damage? As a retired certified arborist, I’m here to tell you that there are definitely things you can do.

5 Strategies for Structurally Healthy ‘Desert Museum’ Palo Verdes Trees

1. Water deeply to a depth of 3 feet.

Deep roots are key to the stability of a tree and also decrease the chance of uplifting roots. Apply water toward the outer reaches of the branches where the roots are concentrated. As a tree grows, its roots move outward, so move your drip emitters or hose as needed.

Be sure to plant in an area where there is adequate area for root growth. Parking lot islands and narrow areas don’t allow enough room for roots to anchor the tree.

A blooming Desert Museum Palo Verde Tree

‘Desert Museum’ palo verde that has grown too rapidly due to excess irrigation

2. Irrigate less frequently to avoid your tree growing too fast.

This is a big cause of wind damage with palo verde trees. It’s important to remember that they are desert trees and don’t need as much water as other plants in the landscape. But, people often overwater their desert trees, which causes them to grow too quickly. This causes the formation of weak wood because they haven’t had the time to grow strong trunks and branches. In the photo above, notice how thin the multiple trunks are.

Established native desert trees, that have been in the ground for at least 3 years, can follow these general guidelines – water 1 to 2X a month in spring/fall, 2 to 3X a month in summer, and monthly in winter. These guidelines are for our current drought situation but can be modified as needed.

Several Palo Verde Trees grouped together

Trees that have been pruned up too high (lion-tailing)

3. Prune your tree correctly.

There are examples of awful pruning. One common one is known as ‘lion-tailing’ which is when trees have been over-pruned so the majority of the tree is devoid of branches except for the very top. This pruning deprives the branches of foliage needed to produce energy for the tree and to increase tree strength. It also increases the amount of overhanging branches toward the top making the tree more likely to fall.

Many landscapers don’t know the right way to prune trees and can inadvertently cause harm to your tree. I highly recommend enlisting the services of a certified arborist to prune your tree correctly.

4. Select a multi-trunk form of Palo Verde instead of one growing on a single trunk.

Desert trees naturally in a multiple trunk form, which distributes the weight of the upper branches. Palo Verde trees that have been trained to grow on a single trunk, are under more stress from the wind with their heavy top half. The majority that you see fallen have been trained into a single-trunk tree.

a large desert museum palo verde tree

This tree needs pruning before the monsoon season to lessen the weight of the canopy

5. ‘Desert Museum’ Palo Verde trees generally need pruning at least once (sometimes twice) a year.

You want to be sure to prune them before the onset of monsoon season – removing any heavyweight or branches that are weakly attached.

Desert Museum Palo Verde Tree in the front garden

Newly-pruned ‘Desert Museum’ palo verde tree ready for the monsoon season

Ensuring the Future of Your Desert Museum Palo Verde

Desert Museum Palo Verde trees are a valuable asset to desert gardens, offering beauty and shade. By following these tips, you can safeguard your tree’s health and stability for years to come. Join me in celebrating the enduring allure of these magnificent desert trees.

Want to learn more about this and other Palo Verde tree species? Check out my previous blog post here.

The Sunburn Experience: Not Just for Humans

Have you ever had a sunburn? Maybe a better question is, “Who hasn’t?”

Well, did you know that many plants get too much as well?

Sunburned Citrus: A Common Concern

On a recent visit to a client who was worried about her newly planted citrus trees.

new citrus trees planted in pots.

Sunburned Citrus

The Leaf Yellowing Dilemma on Citrus Trees

This particular client has a large courtyard with several new citrus trees in pots. Her citrus trees, planted in spring, showed yellowing as summer progressed.

sunburned citrus leaves

Now yellow leaves can indicate a number of different problems.  In this case, the diagnosis was rather simple – her citrus tree has a case of sunburn.

Common Signs of Sunburned Citrus and Other Plants

– The areas of the leaf that are yellow are in the center and NOT along the tips or edges.

– Often, the yellow areas begin to turn brown.

– Signs normally occur in the summer months.

– The sunburned leaves are usually located on the south and west-facing parts of the plant.

– This particular citrus tree is in an area that receives reflected, afternoon sun.

Citrus-tree-in-container-ASU


How to Prevent Sunburned Citrus

In this case, the solution is simple. Move the citrus tree to another part of the courtyard that receives afternoon shade is all that is needed to prevent further sunburn damage. Another choice is to put 50% shade cloth on from mid-May through September.

Citrus do best when planted at least 10 – 15 ft. away from walls. Unfortunately walls absorb the heat of the day and re-radiate it out.

Avoid planting where they get the full force of afternoon sun.