Elevate Your Culinary Creations with Herb Salt

Do you like to use herbs to flavor your favorite dishes? If so, then you’ll want to try herb salt.

Unveiling Herb Salts – Nature’s Flavorful Blend

Rosemary herb salt

So what are herb salts, you may wonder?

They are a mix of the herb of your choice combined with kosher or sea salt and they add delicious flavor to food.

In short, they capture the fresh flavor of herbs and are used in place of regular salt.

Herb salts are easy to create and they make great gifts.

I like to make herb salts, which includes rosemary salt.

rosemary shrub for making herb salt

How to Make Rosemary Salt

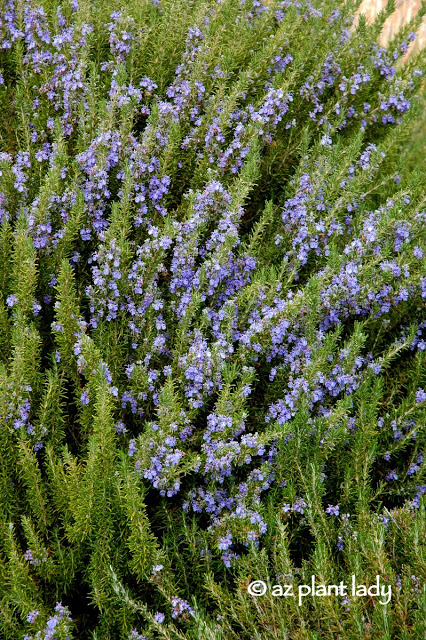
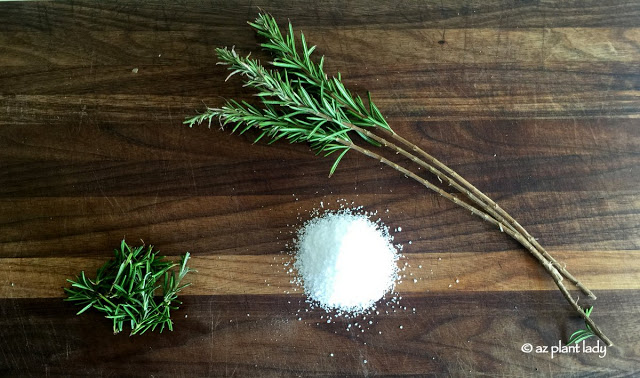
Since I don’t have a rosemary shrub in my garden, I got some from my sister’s house. All it takes are a few fresh sprigs of rosemary cut from the shrub.  (You can also use fresh rosemary from the grocery store).

rosemary shrub for making herb salt

Crafting Your Rosemary Salt

You will need 3 1/3 cups of kosher salt and 1/3 cup of fresh rosemary along with a jar to store it in.

1. Rinse the rosemary sprigs in water.

2. Remove the leaves, starting from the top downward.  

rosemary shrub for making herb salt

3. Put the rosemary and salt in your food processor and pulse until the rosemary leaves are approximately 1/8 of an inch long.

4. Place the rosemary salt onto a baking sheet and put in an oven that is heated to 200 degrees and bake for 30 minutes.

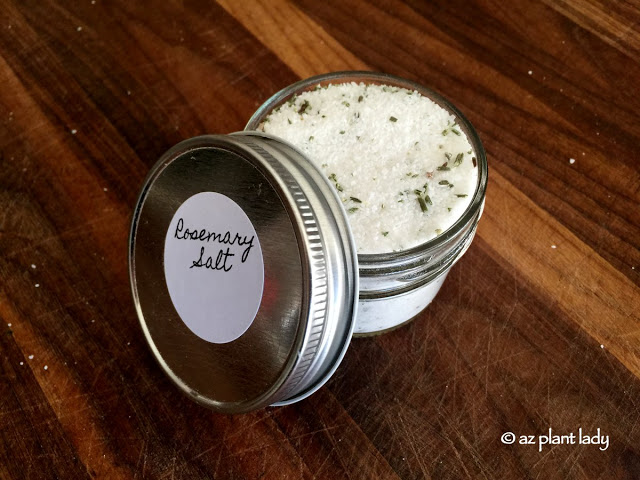
5. Let the herb salt cool and then put in jars with a lid.  

rosemary herb salt

That’s it!  I told you it was easy.

Savoring the Rosemary Salt

Rosemary salt tastes great on your favorite meat dish including beef, chicken or pork.  I also like to sprinkle it on the top of buttered rolls – yum!

basil herb salt

Exploring Herb Varieties for Herb Salt

While rosemary salt is delicious, it is just the beginning – there are other herbs that can be used to make herb salt.

Basil Salt

Basil salt is a great flavoring for Italian dishes such as marinara sauce or sprinkled on pizza.

To learn how to make basil salt, click here.
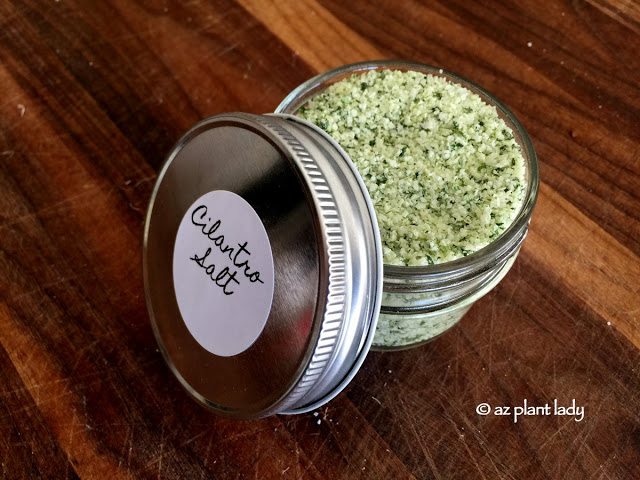
cilantro herb salt

Cilantro Salt

If you love cilantro, how about a sprinkle of cilantro salt on your favorite Mexican dish?

Cilantro is one of those herbs that many people can’t get enough of.  Click here for instructions to make your own cilantro salt.

A Tasty Gift-Giving Idea

Whether you choose to cultivate these flavorful herbs in your very own garden, peruse the vibrant offerings at your local farmers market, or simply pick them up during a routine grocery store visit, you’ll find that herb salts are an exquisite and versatile addition to your culinary arsenal. Their delightful blend of herbs and salt can transform everyday meals into gourmet experiences, elevating your cooking to new heights.

Moreover, consider the pleasure of sharing these homemade herb salts with fellow food enthusiasts in your life. As thoughtful, handcrafted gifts, they’re perfect for the ‘foodie’ who values the art of gastronomy. Whether it’s a birthday, holiday, or a simple gesture of appreciation, presenting a jar of herb salt infused with your love and culinary creativity adds a personal touch that’s sure to be savored. So, explore the world of herb salts, and let their aromatic, flavorful essence enhance your dishes and brighten the palates of those you cherish.

harvested-peaches

I love peaches. Every year, I look forward to May when the peaches on my tree are ripe and ready. While May might seem a little early for peaches, in the low desert garden, this is when they are ready for being harvested. 

picking peaches from tree for Peach Vinegar

There are several things that I like to make with my peaches. Of course, peach jam, peach cobbler, and pie make the list, but also something a bit unusual.

A few years ago, I was inspired to make peach vinegar after I read the book, “The Backyard Homestead”.  So, you may be wondering why I would want to make homemade fruit vinegar? Fruit vinegars are one of my favorite ingredients in homemade salad dressing.

It is very easy to make fruit vinegar – especially when compared to making jam out of peaches.  

You will need the following:

Peaches

White wine vinegar

Glass jar with lid

Strainer

Paper towels

remove the skins from the peaches for Peach Vinegar

First, remove the skins from the peaches. If the peaches are very ripe, you can often peel them off in large sheets. Or, use a paring knife to peel them as you would an apple. 

chop the peaches for Peach Vinegar

Roughly chop the peaches into 1-inch sections. Plan on using 2 – 3 peaches per pint-sized jar.

chopped peaches and pour white wine vinegar

Add the chopped peaches and pour white wine vinegar over them until it reaches the top of your jar.

Peach Vinegar

Place the peach/vinegar mixture in a dark place for 4 weeks – I use my pantry. At least once a week, shake the jar to help mix the contents.

Peach Vinegar

After a month has passed, pour out the mixture over a strainer to remove the peaches. You can see that the white wine vinegar has taken on the beautiful color and flavor of the peaches.

Peach Vinegar

Strain the peach vinegar needs through a coffee filter (or paper towel) to remove the remaining peach solids.

Peach Vinegar

*I’ve found that paper towels work better than coffee filters.

peach vinegar pour into clean jars with lids

After straining the peach vinegar – pour into clean jars with lids. They can be stored in your pantry for 3 months.

Peach vinegar tastes wonderful when used on fruit salad and it makes a great pork glaze. It also makes a delicious vinaigrette and marinades. Some people even drizzle it over peach ice cream.

Don’t have a peach tree? No problem. You can use peaches from the grocery store or your farmers market. Just make sure they are ripe.

My favorite use for peach vinegar is for my grandmother’s famous salad dressing. This recipe has been in our family for years and I am going to break all the rules and risk being expelled from my family by sharing it with you. It’s easy to make and creates a sweet dressing that is popular with kids and adults alike.

Click the link below for the recipe. 

GRANDMA SMITH’S HOMEMADE SALAD DRESSING

I hope you enjoy it as much as my family does!

harvest vegetables

*This blog post contains affiliate links. If you click through and make a purchase, I may receive a commission (at no additional cost to you). Thanks for your support in this way.

When much of the nation is freezing their socks off, and their gardens are covered in a blanket of snow, I realize how much of a blessing it is to live in a climate where I can harvest vegetables from my garden in January.

My latest excursion out to the vegetable garden found Swiss chard, leaf lettuce, peas, spinach, broccoli, and carrots ready for picking.

Except for the broccoli (which I had other plans for), all of my freshly-picked veggies were going into our salad

harvest vegetables

One crop that I have really enjoyed growing this year, is Swiss chard.  It grows so easily and I love its rainbow-colored stems.

Believe it or not, Swiss chard tastes delicious in salads.

My lettuce had a tough start this fall with caterpillars eating much of it until I brought out the big guns – BT Bacillus thurgiensis, which is an organic control for the caterpillars.  It worked just great! I used Safer Brand 5163 Caterpillar Killer II Concentrate, 16 oz.

I won’t go into all the details of how it works, although it is quite interesting.  For those of you who would like to learn more about BT, click here.

harvest vegetables

Here is a close-up of my salad.  You can’t see the carrots too well, but they are there.

January Goodness From the Garden...

It was so refreshing and delicious, especially when dressed with my grandmother’s ‘Top Secret’ Salad Dressing.

I have recently revealed my grandmother’s secret recipe to my daughters, who now can make easily.  

January Goodness From the Garden...

So, what is in store for my vegetable gardens this month?

I have planted another crop of radishes, carrots, leaf lettuce and spinach.

Next month, will be a busy month in the garden with getting ready to plant warm-season veggies.

I can hardly wait!

Summer’s Delight: Roasted Sweet Corn and BBQ

When the sun shines brightly and the aroma of barbecue wafts through the air, you know summer has arrived. But for me, nothing quite captures the essence of this season like the taste of sweet corn. For the past three summers, I’ve reveled in the joy of growing my own sweet corn, and this year promises to be just as delightful.

Sweet Corn Harvest

A Season of Growth and Anticipation

As the days grow longer and the temperatures rise, there’s a remarkable transformation happening in my backyard. It begins with the sprouting of the corn stalks, their vibrant green leaves reaching for the sky. Then, the first delicate appearance of corn silk marks the beginning of a mouthwatering countdown to the ultimate summer treat: fresh-roasted corn on the cob.

Roasted corn recipe starts with fresh corn

Easy Cultivation, Easier Cooking

Growing sweet corn is not only a rewarding experience but also surprisingly easy. However, the real magic happens when you turn those homegrown cobs into a delectable dish. In my quest for a simpler and tastier way to cook corn, I stumbled upon a game-changing roasted corn recipe that eliminates the need for boiling water and shucking corn ahead of time. The best part? It imparts a delicious, roasted flavor that will have your taste buds dancing with joy.

Instructions:

The Roasted Corn Recipe

Let’s dive right into it – here’s how you can effortlessly prepare Oven Roasted Corn on the Cob:

Ingredients:

  • Fresh ears of corn (with husks still on)
Roasted Corn Recipe baking in the oven
  1. Preheat your oven: Begin by preheating your oven to a toasty 350 degrees Fahrenheit (175 degrees Celsius).
  2. Prepare the corn: Take your whole ears of corn, ensuring that the husks are still on, and place them directly on your oven rack. This step is a game-changer because it allows the corn to roast within its natural protective casing.
  3. Bake to perfection: Slide your corn-laden oven rack into the preheated oven and let them bake for approximately 30 minutes. You’ll be amazed at how this short time span is all it takes to fully cook your corn to perfection.
  4. Unveil the golden treasure: Once the timer goes off, carefully remove the corn from the oven. Then, with gentle hands, pull down the husks. As if by magic, the corn silk will come off easily, leaving you with pristine, golden kernels.
  5. Ready to enjoy: To add the final touch of charm to this delightful dish, use the peeled husks as convenient handles for eating your corn. It’s both practical and visually appealing, making every bite a summer sensation.

Roasted Corn Recipe

B

Roasted Corn Recipe baked and browned

Roasted Corn Recipe

There you have it – a fuss-free and incredibly satisfying way to prepare fresh-roasted corn on the cob. It doesn’t get much easier or tastier than this!

Peel down the husk and eat the corn on the cob

Roasted Corn Recipe

Summertime Roasted Corn Bliss

As you revel in the simple pleasures of summer, remember that the joy of growing your own sweet corn can be elevated to new heights with the right recipe. This Oven Roasted Corn on the Cob is not only a time-saver but also a flavor enhancer that will make your summer gatherings truly memorable.

So, fire up that oven, embrace the beauty of your homegrown corn, and savor the flavors of the season with this mouthwatering roasted corn recipe.

It doesn’t get much easier than that, does it? 


New Vegetable Garden Finally Finished!

I bet you have all been waiting with ‘baited breath’ for me to reveal our “TOP SECRET” Family Recipe, ever since I referred to it in my last post about making peach vinegar.

First, before I reveal our family recipe (and risk the wrath of my family for revealing this secret recipe 😉, I thought that I should give you a little background first….

grandmother

At this point, you are probably asking what the picture of this lady has to do with the recipe.

Well, this was her homemade salad dressing recipe. To be honest, I don’t know where she got the recipe or if she created it herself.

So, who is this woman?

grandmother

Her name was Ruth A. Smith and she was my grandmother. My dad was her only child.  At one point, their family lived in Phoenix in the 1940’s during the war and she worked in a factory that made airplane parts.  I call this photo ‘Rosie the Riveter’.

She was a wonderful grandmother and loved spending time with us…

grandmother

Yes, that is me on the far right with my ‘boy’ haircut.  My sister, Jennifer is sitting next to me and my grandmother is holding my brother, Scott (my youngest sister, Grace, hadn’t been born yet).

When we were young, we spent a couple of summers in Germany with them, where my grandfather worked. Later, they moved back to the States and settled in California where we lived. Now, my grandmother wasn’t a great cook – however, she wasn’t bad either. When we would visit them – we would have the same menu each time, which included:

– Roast Beef (it was always a bit dry) with potatoes and salad

– Ground Beef Patties with a vegetable that we hated (squash) and salad.

After dinner, we always had a VanDeKamps’ Angel Food cake with whipped chocolate frosting and vanilla ice milk.

The fact that my grandmother wasn’t a great cook makes it all the more interesting that she made fabulous homemade salad dressing. Years later, my siblings and I would reminisce about her yummy salad dressing. The only problem was that we never asked her how to make it.

A few years ago, I asked my mother if she could remember what my grand mother put in her salad dressing. Thankfully, my mother was able to remember all the ingredients – just not the proportions.  So, I set to work to figure out the recipe and I was thrilled to finally get it! Since then, it is all we use on our salads with a few different ingredients from time to time to change it up.

So, I am breaking all the family rules by sharing this with you (just kidding) – but seriously it is too good a recipe to keep to ourselves.

So here it is:

Ruth Smith’s Vinaigrette

top secret recipe

Ingredients:

2 Tablespoons Canola Oil (or other non-flavored vegetable oil – don’t use olive oil)

2 1/2 Tablespoons Sugar

1 pinch Salt3 – 4 Tablespoons Apple Cider Vinegar or other fruit-flavored vinegar

(My Homemade Peach Vinegar is pictured above) 

top secret recipe

I’ve also used Pomegranate White Balsamic vinegar too.

Directions:

In a small jar add the salt, sugar and apple cider vinegar.  Then add the oil and place the lid on the jar and shake until all ingredients are combined.

top secret recipe

Pour over your salad and enjoy!

top secret recipe

You can copy and paste the recipe below if you like:

Grandma Smith’s Vinaigrette

Ingredients:

2 Tablespoons Canola Oil (or other non-flavored vegetable oil – don’t use olive oil)

2 1/2 Tablespoons Sugar*

1 pinch Salt3

– 4 Tablespoons Apple Cider Vinegar or other fruit-flavored vinegar

Directions:

In a small jar add the salt, sugar and apple cider vinegar.  Then add the oil and place the lid on the jar and shake until all ingredients are combined.

Serve over your favorite salad!

*You can use Splenda instead of sugar if desired.

I hope you enjoy our ‘Top Secret’ salad dressing!  Grandma Smith would be thrilled to know that I’m sharing it with all of you 🙂

Earlier this week, I stepped into my new vegetable garden and was pleasantly surprised to discover that my bush beans were ready to be picked.

 bush beans

I was so excited.

You really have to look underneath the leaves to see the beans.

So, I ran into the house for a basket and got to work, picking beans.

 bush beans

This will be enough for my family for dinner.

But, instead of eating them now – I decided to blanch them and freeze them.

Why?  Well, so I could show you how to do it 🙂

You may wonder what ‘blanching’ is?

‘Blanching’ is the process of submerging your vegetables in boiling water for a short period of time.

This is important to do before freezing your vegetables because:

– it halts enzymes, which decreases the flavor and texture of your vegetables.

– it cleans the surface of your vegetables and kills any germs.

– it improves the color of your vegetables.

– it helps to retain vitamins.

So, how do you blanch vegetables?

Well, the process is pretty much the same for most vegetables with the only difference being the amount of time they need to be submerged in boiling water.

To blanch green beans:

 bush beans

Cut off the stem ends.

 bush beans

Add to a pot of boiling water and boil for 3 minutes.  This step varies depending on the type of vegetable (check here for more info).

 bush beans

Immediately scoop out your beans and submerge in ice water.

Keep in the water for 3 minutes until the beans have thoroughly cooled.

 bush beans

Drain off the water.

Aren’t they a pretty green color?

plastic freezer bag

Pack into a vacuum-sealed bag or put them in a plastic freezer bag.

It is very important to remove all the air, or your vegetables will get freezer burn.

To do this, close the zipper more then halfway and then carefully ‘roll’ your beans up, pushing out all the air and then seal the bag completely.  

plastic freezer bag

You can see all the air is gone and now my blanched beans are ready for the freezer.

They will last up to 9 months in the freezer.   But I’m so excited about my first harvest this year that I think I will serve them to my mother on Mother’s Day.

To cook, I will simply add my frozen beans to boiling water (the same way I cook frozen beans from the grocery store).

I grew Bush Blue Lake 47 Beans.  I bought the seeds from Burpee.  I planted them in late February, although you can plant them through March in our area.

***********************************************

Guess what??

Only 6 days to go before my road trip with my mother.

I’ll share our destinations next time 🙂