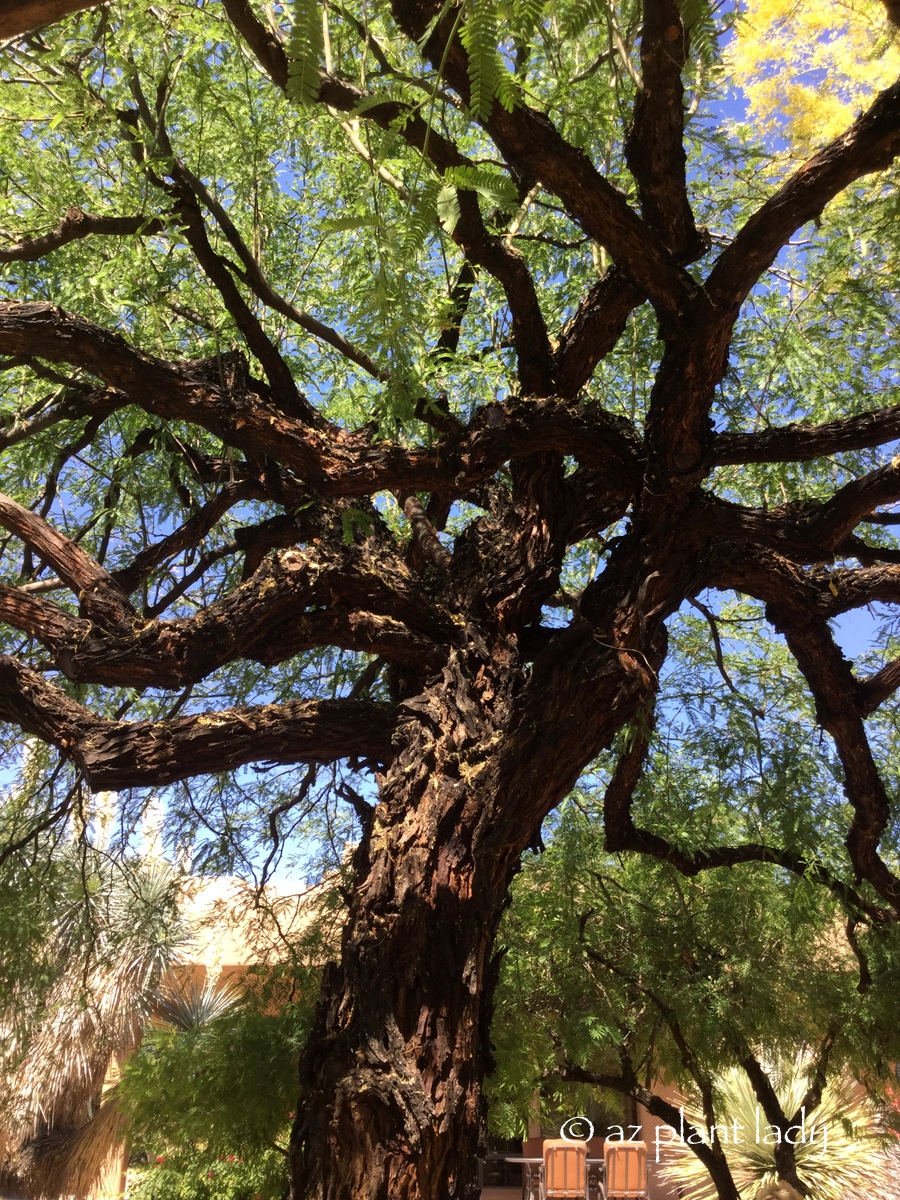
Have you ever paused in the shade of a mesquite tree(Prosopis spp.) and noticed that its branches grow every which way?
I was reminded of this when I was visiting a client earlier this week and was advising him on how to care for his mesquite tree. I looked up and saw a cluster of branches growing up, down, sideways, and in curvy pathways.
Texas Honey Mesquite (Prosopis glandulosa)
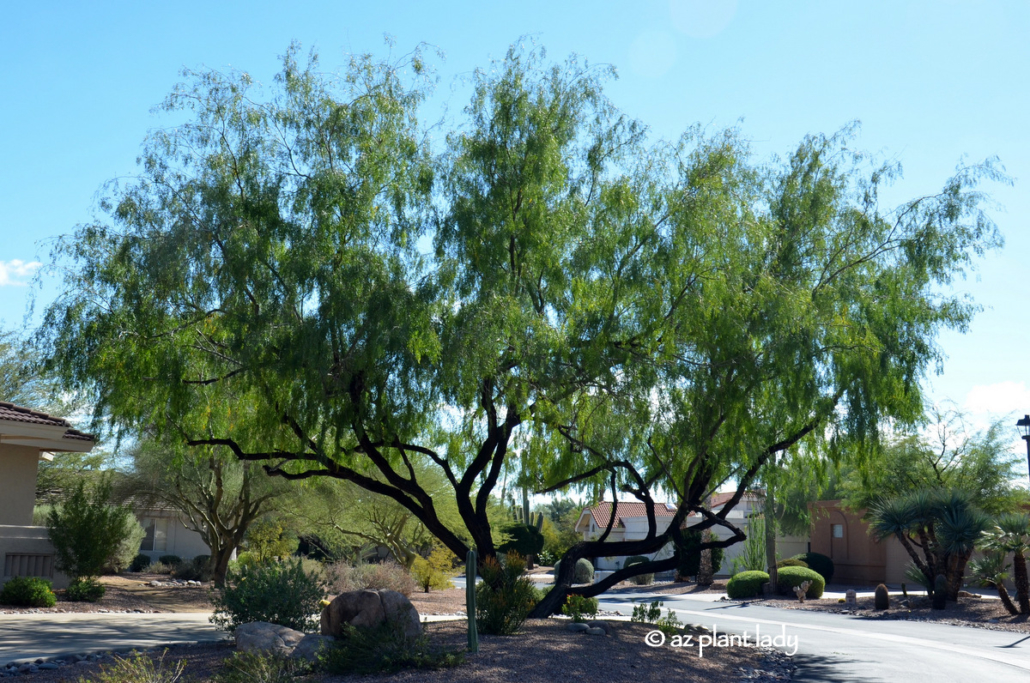
In an ideal situation, mesquite trees resemble the shape of more traditional tree species, as shown above. However, they don’t always turn out this way.
Have you ever wondered why mesquite trees grow in such crazy ways?
The answer is quite simple – in nature, mesquites grow as large shrubs. The branches of shrubs grow in all directions, up, down, sideways, etc., and so do mesquites.
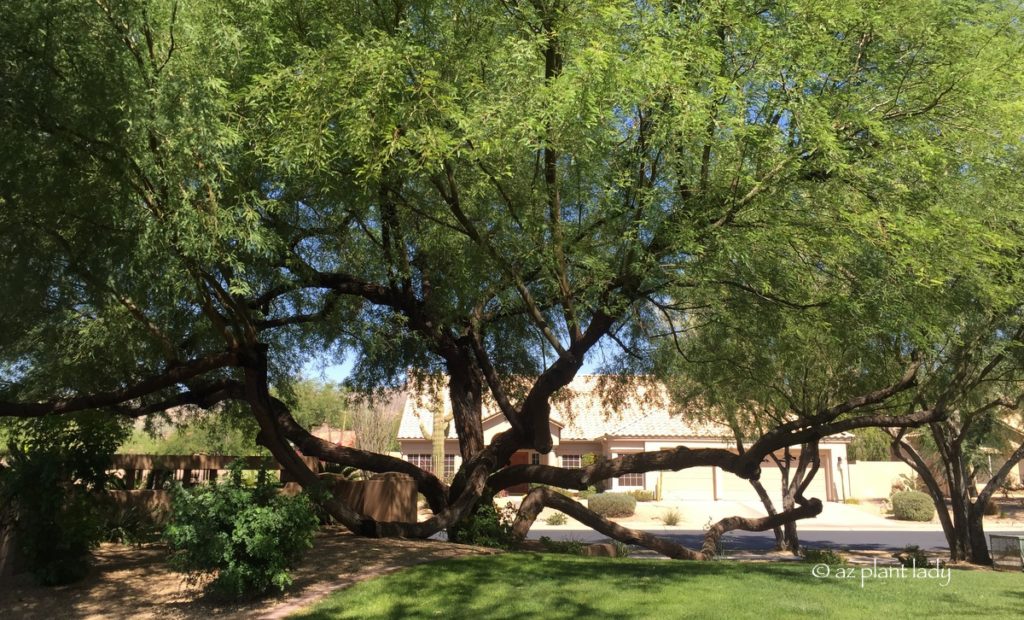
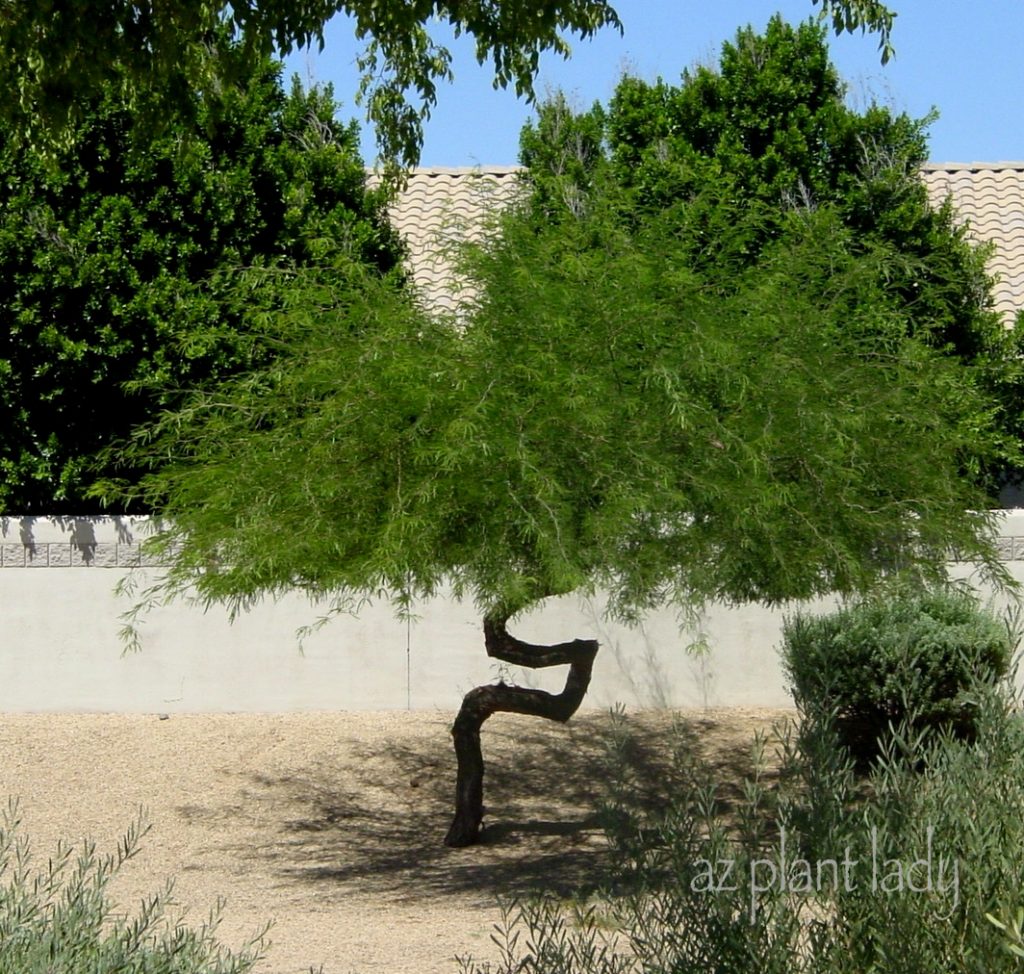
The problem arises when we train them up as trees, and their branches don’t always behave as trees do. Because of this, mesquites that have been pruned into trees, do best being pruned by a professional, particularly when they are young and certain branches are being chosen to remain while others are pruned off.
Of course, this doesn’t always happen, and you can see the results of bad pruning practices in many places.
I do love the shade that mesquite trees provide and I must admit that I enjoy a good chuckle when I see the unusual shapes that some mesquite trees have taken.
How about you? Have you ever seen a mesquite tree with crazy branches?
https://www.azplantlady.com/wp-content/uploads/2017/05/Prosopis_glandulosa_Honey_Mesquite_Southwest.jpg7961200arizonaplantlady@gmail.comhttps://www.azplantlady.com/wp-content/uploads/2025/08/AZ-Plant-Lady-Logo-small.jpgarizonaplantlady@gmail.com2020-05-14 07:00:452022-09-17 04:43:42Mesquite Trees and Crazy Branches
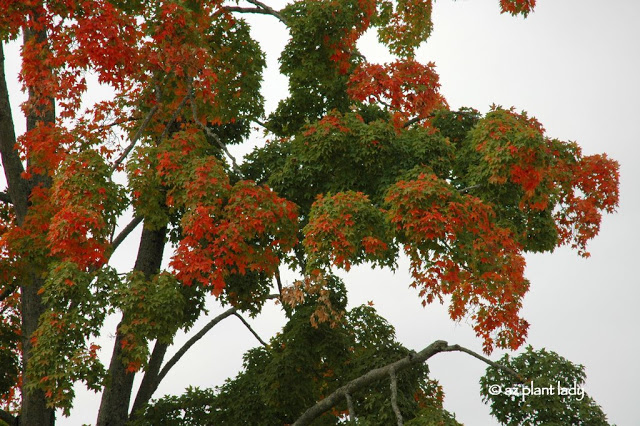
Before you lament a fall season devoid of colorful fall foliage in the arid West and Southwest regions of the U.S., here are some favorite water-wise shrubs and trees that will add glorious color in varying shades of orange, red, and burgundy to your arid autumn landscape.
we enjoyed on a trip to Williamsburg, VA several years ago.
Have you ever traveled somewhere else to find colorful fall foliage? What if you could have fall color in your own landscape?
A Splash of Fall Foliage Color in the Arid Desert
Like most water-wise plants, the following do best in well-drained soil. The watering guidelines given are approximate and may need to be adjusted in response to variables such as sun exposure, soil, and climate. In general, drought-tolerant plants do best when the soil is watered deeply and then allowed to dry out before the next watering. Plant in fall or wait until spring, and enjoy fall color for years to come.
Pink Muhly Grass (Muhlenbergia capillaris)
Autumn Pink
In spring and summer, this ornamental grass provides an attractive backdrop with its graceful green foliage. As temperatures begin to fall and days begin to shorten, burgundy-pink plumes softly wave above the green blades, and pink muhly grass takes center stage in the garden. Its color slowly fades to a lovely wheat color in winter. Plant it in groups of three, five, or seven for the greatest effect.
Growing Conditions
Where it will grow: Hardy to 0 degrees Fahrenheit, or minus 18 degrees Celsius (USDA zones 7 to 9; find your zone)
Water requirement: Low to moderate; can survive on little water, but flowering is improved with regular summer irrigation. Water every 10 to 14 days in summer, every two weeks in spring through fall, and monthly in winter for the best flowering.
Light requirement: Full, reflected sun to filtered shade
Mature size: 3 feet tall and wide
Planting notes: Plant in well-drained soil in full sun or filtered shade; cut back to the ground in late winter; apply a slow-release fertilizer in spring.
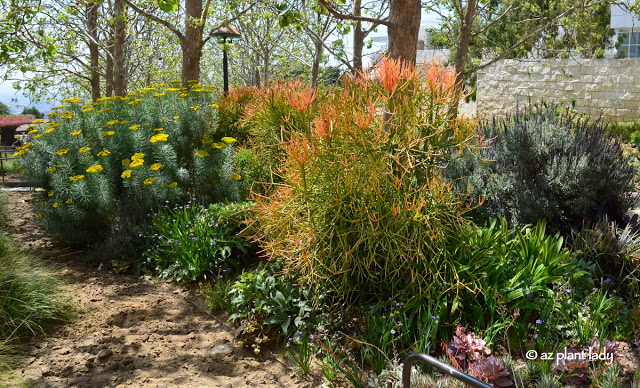
‘Sticks on Fire’ Milk Bush (Euphorbia tirucalli ‘Sticks on Fire’)
Unexpected Bursts of Orange
Orange splashes of color come from an unexpected source with this drought-tolerant succulent. ‘Sticks on Fire’ differs from the green-colored parent plant in that it is smaller and new growth has a bright orange color. The color fades to yellow and then green in summer only to turn orange again when temperatures cool. In cooler climates it can be grown in a container and brought indoors when temperatures dip below freezing. Milk bush can easily be propagated from cuttings. Be sure to wear gloves when handling this plant, as its milky sap can irritate skin and eyes.
Growing Conditions
Where it will grow: Hardy to 30 degrees Fahrenheit, or minus 1 degree Celsius (zones 9 to 11)
Water requirement: Low; water every three weeks spring through fall and monthly in winter. In the low desert, water twice a month spring through fall.
Light requirement: Full sun to filtered shade (full sun is needed for it to develop the orange color)
Mature size: 4 to 8 feet tall and 3 to 5 feet wide
Planting notes: Plant in well-drained soil in full sun.
Chinese Pistache (Pistacia chinensis)
A Burst of Fall Foliage
Chinese pistache is for those who are looking for a tree that produces colorful fall foliage and will thrive in dry, arid climates. It is widely grown throughout the Northwest and the southern half of the United States, and is a go-to tree for reliable autumn color in the Southwest. In fall, bright green leaves give way to shades of yellow followed by orange and red, providing much-desired fall color for the drought-tolerant garden. Female trees produce berries that attract birds. This tree isn’t fussy about soil, as long as it’s well-drained, but it does need room to grow to its full size.
Growing Conditions
Where it will grow: Hardy to minus 10 degrees Fahrenheit, or minus 23 degrees Celsius (zones 6 to 9)
Water requirement: Low to moderate; water to 3 feet every 10 to 14 days in summer, every three weeks in spring through fall and monthly in winter
Light requirement: Full, reflected sun to filtered shade
Mature size: 30 to 60 feet tall and 30 to 40 feet wide
Planting notes: Plant in well-drained soil in full sun or filtered shade; prune in winter to shape.
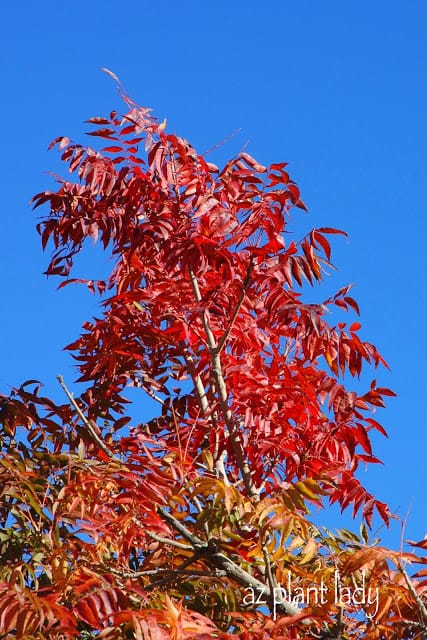
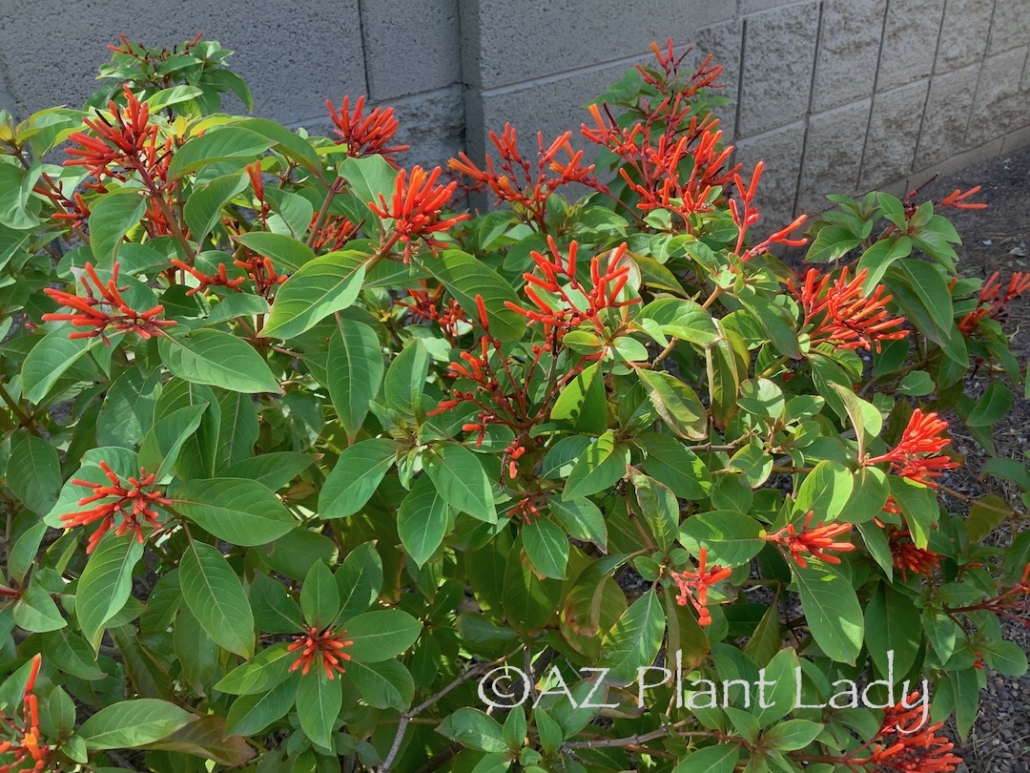
Firebush (Hamelia patens)
N
A Blaze of Color and Fall Foliage
The allure of firebush goes beyond its stunning orange-red spring and summer blooms, which are a magnet for hummingbirds. It saves its grand finale for fall when its lush foliage transforms into a vibrant shade of red, creating a fiery spectacle. In tropical climates, this heat-loving shrub can grow into a small tree, while in drought-tolerant landscapes, it remains a manageable and colorful shrub. Although it dies back when temperatures dip into the 20s, it resurfaces in spring. In zones 7 and below, it can be grown as an annual.
Growing Conditions
Where it will grow: Hardy to 10 degrees Fahrenheit (zones 7 to 11)
Water requirement: Moderate; water 18 inches to 2 feet deep weekly in summer, every 10 to 14 days in spring through fall, and every three weeks in winter
Light requirement: Full and reflected sun to filtered shade (full sun is best for flowering)
Mature size: 4 to 5 feet tall and wide
Planting notes: Plant in well-drained soil; prune back in spring, after the danger of frost has passed.
This plum tree species is renowned for its regal burgundy-purple foliage that graces the landscape from spring through fall. Despite being a plum tree, its fruits are typically small or nonexistent, as its true value lies in its captivating foliage. Pale pink springtime blossoms are soon followed by the emergence of dark-colored leaves. While several cherry plum varieties exist, ‘Krauter Vesuvius’ stands out as the most drought-tolerant, making it ideal for enduring hot, dry summers.
Growing Conditions
Where it will grow: Hardy to minus 20 degrees Fahrenheit (zones 5 to 9)
Water requirement: Moderate; water 2 to 3 feet every 10 to 14 days in summer, every two to three weeks in spring and fall, and monthly in winter. In the low desert, water weekly in summer and every 10 to 12 days in spring and fall.
Light requirement: Full sun to filtered shade (full sun is needed for maximum purple color)
Mature size: 15 to 20 feet tall and wide; smaller cultivars are available
Planting notes: Plant in well-drained soil; prune during winter dormancy.
Heavenly Bamboo (Nandina domestica)
A Bamboo-Like Marvel with Radiant Red Fall Foliage
Heavenly bamboo, often likened to true bamboo due to its fine-textured leaves and upright stems, unveils a delightful transformation in fall and winter. The new growth takes on a charming burgundy tint before transitioning to a bright spring and summer green. As cooler temperatures grace the landscape, the foliage transitions into enchanting shades of red. Additionally, small flowers give way to clusters of red berries in autumn. While moderately drought-tolerant, it thrives in arid regions, maintaining its vigorous growth in controlled environments.
Caution: Heavenly bamboo can become invasive in regions with abundant rainfall, especially in the eastern U.S., and all parts of this shrub are toxic.
Growing Conditions
Where it will grow: Hardy to minus 10 degrees Fahrenheit (zones 6 to 9)
Water requirement: Low to moderate; water 18 inches to 2 feet twice a month in summer, every three weeks in spring and fall, and monthly in winter. In the low desert, water weekly in summer and twice a month in spring and fall.
Light requirement: Full sun to filtered shade (prefers filtered to full shade in the low desert)
Mature size: 4 to 6 feet tall and 3 feet wide; smaller cultivars are available
Planting notes: Plant in well-drained soil; selectively prune older branches at the base in late winter or early spring.
Do you have a favorite plant that gives you fall color?
https://www.azplantlady.com/wp-content/uploads/2015/10/fall_foliage.jpg426640arizonaplantlady@gmail.comhttps://www.azplantlady.com/wp-content/uploads/2025/08/AZ-Plant-Lady-Logo-small.jpgarizonaplantlady@gmail.com2019-10-23 07:00:002023-10-02 15:24:22Fall Foliage for the Southwestern Garden
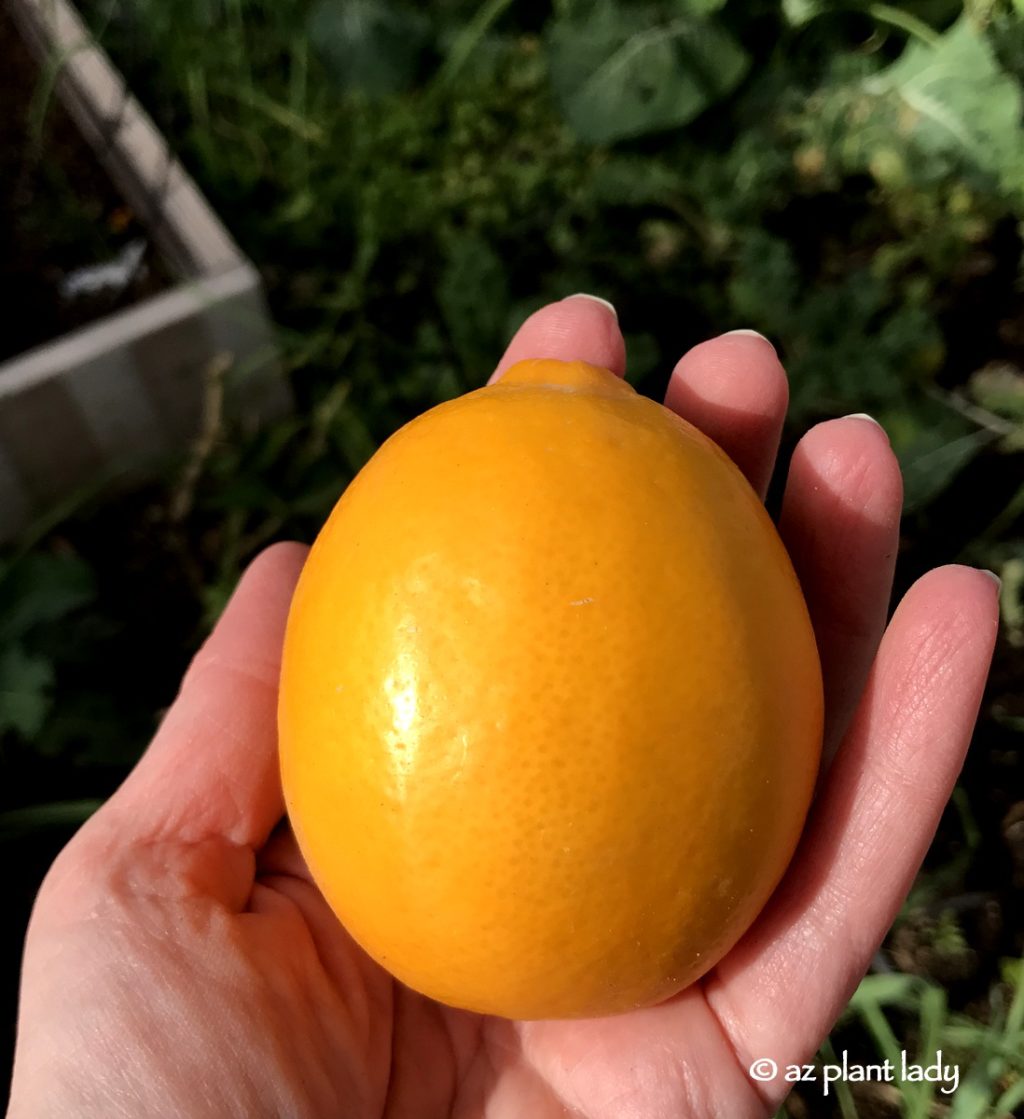
I have two trees – a Meyer lemon and a brand new ‘Trovita’ orange tree. I use the citrus in all kinds of fun ways and the trees have become a family pleasure.
Nostalgic Citrus Memories
As a child in California, we always had citrus trees in our backyard. I would pick lemons from my favorite tree just off the back patio. Later, we moved to a larger ranch-style home that had several citrus. I honestly never paid much attention to them, because as a teenager I had more important things to think about – like boys and how to get perfect-perm for my hair (it was the 80’s).
Embracing Citrus Trees After the Bloom
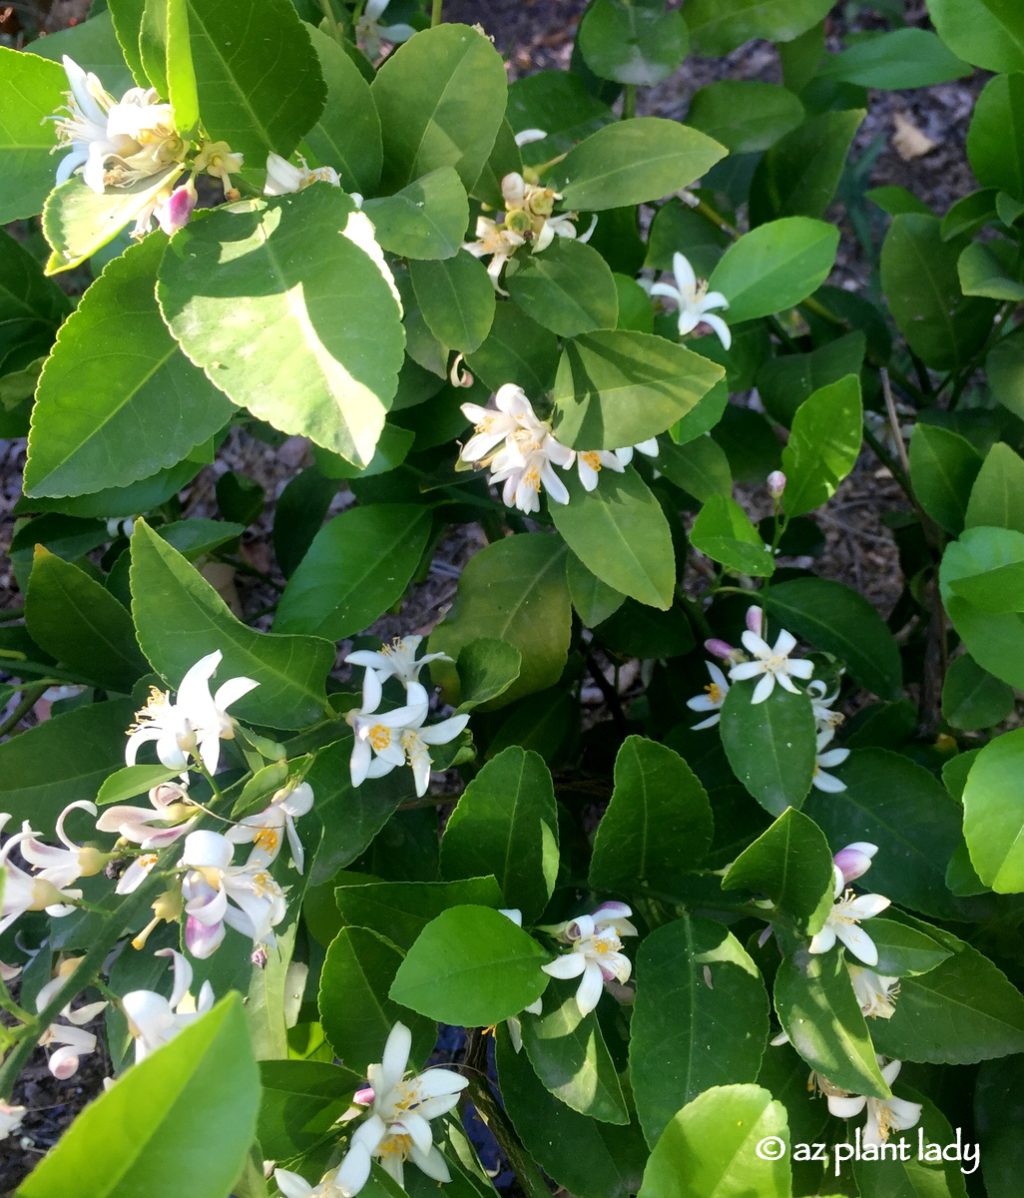
Now as an adult (with permed hair thankfully in my past), I do pay attention to my trees. Consequently, I look forward to the fragrant blossoms that cover citrus trees in mid-winter.
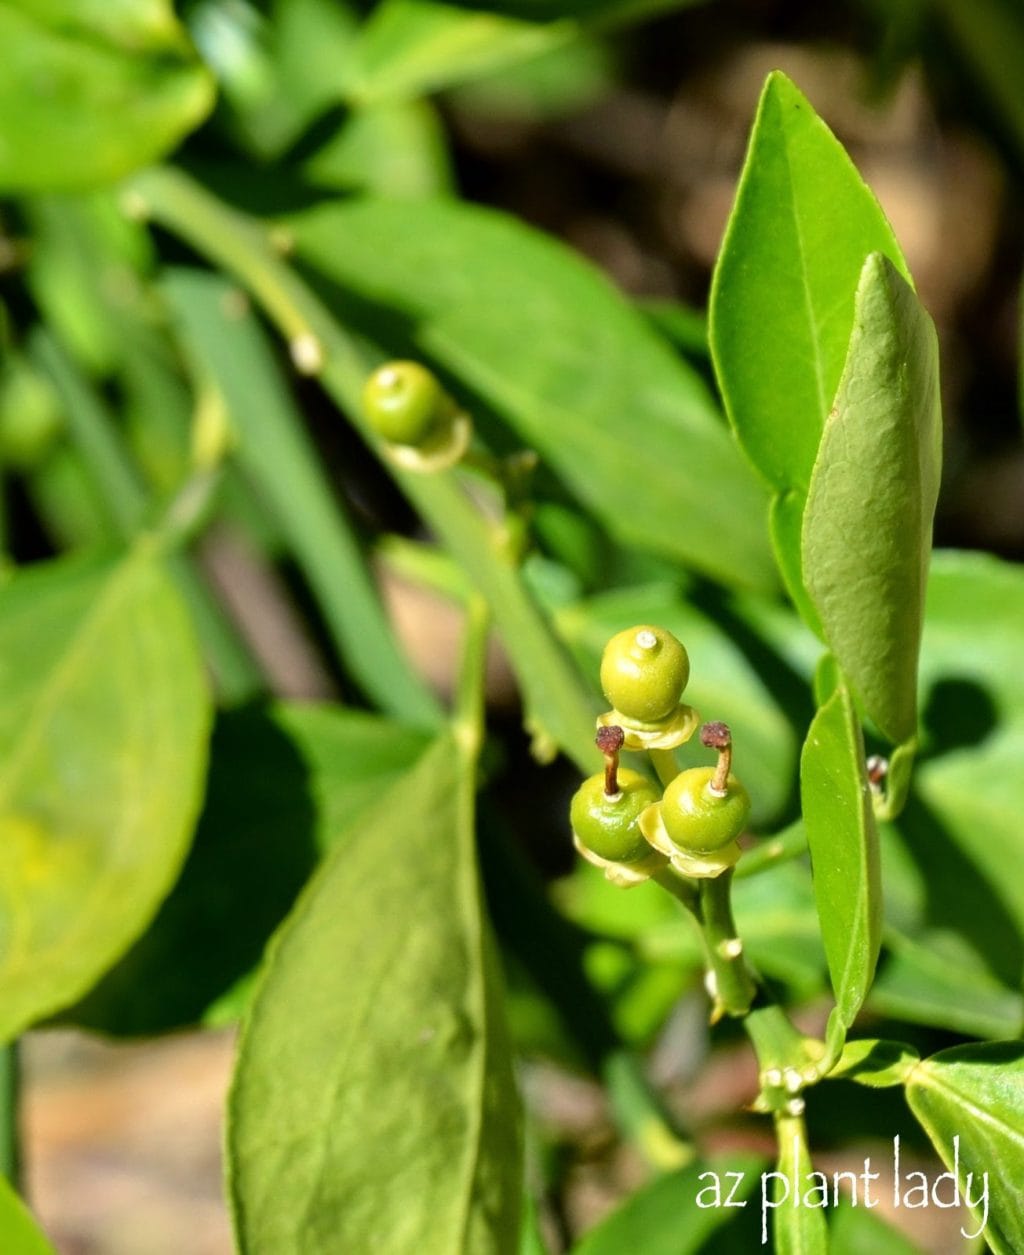
As the blooms fade, tiny green fruit is left behind, which are baby citrus fruit. When spring progresses, some of the small, green fruit drop to the ground. Not surprisingly, this concerns gardeners who don’t understand why.
Understanding Citrus Tree Behavior
The Natural Process of Citrus Fruit Drop
Well, let me put all your worries to rest. This is a normal occurrence and not a citrus disease. Citrus trees produce more blossoms than it can grow into mature fruit. They do this in order to attract the most pollinators and after the flower petals drop, little green fruit is left behind, which ideally grow into large delicious fruit ready to harvest in winter. However, the tree cannot support that much fruit, so the tree figures out how much fruit it can grow to maturity and then drops the rest.
Managing Expectations with Young Trees
For those of you who have young citrus trees, I want to warn you that most of the little green fruit will drop. Citrus tree need a large root system and a lot of leaves to support a good amount of fruit and that only comes with age. So, if you see tiny, green citrus on the ground every spring – don’t panic. It is all part of the normal cycle of growing citrus.
https://www.azplantlady.com/wp-content/uploads/2014/05/tiny-citrus-fruit-1.jpg1024848arizonaplantlady@gmail.comhttps://www.azplantlady.com/wp-content/uploads/2025/08/AZ-Plant-Lady-Logo-small.jpgarizonaplantlady@gmail.com2019-05-21 07:25:502023-09-18 16:01:42Citrus Trees Dropping Tiny, Green Fruit
I’m back with design notes from the field, where I share observations and recommendations from my work as a landscape consultant. This edition features a new build, metal art, weeds, and shade. I hope that you can pick out helpful tips that you can use in your landscape.
Designing a Modern Landscape for a New Build
Up first, is a new house that is being constructed in east-central Phoenix. The home that used to stand on this lot was taken down to the foundation. An energy-efficient home is coming up in its place. I was hired by the architect to design a landscape that will fit its clean, modern lines.
Adding Artistic Flair with Metal Garden Art
Several years ago, I solely worked as a landscape designer. I worked with homebuilders, creating new landscapes from scratch with a blank palette. Nowadays, as a landscape consultant, design is just one aspect of what I do. I have an overall plan within an existing landscape, which also includes maintenance recommendations. Now and then, I create one for new homes, and this one has some fun challenges.
The look the architect wants is simple and uncluttered. This gives the new homeowner room to add to it if desired. So, I am concentrating on using plants to create a framework. This includes two trees in the front. Then there will be two along the west-facing side to provide screening from the road and protection from afternoon sun.
Foundation Plants and Color
Foundation plants will soften the base of the house while taller shrubs will soften the corners. Ground covers will add low-level interest along with a few agave and cactuses for an accent.
A splash of color will be added by the front entry with the placement of a large, colorful pot. Fill it with an easy to care for succulent.
Design Notes Landscape Barbecue Area Solutions
Often, I am asked for advice on what to do in somewhat unique situations. In this case, the homeowner needed advice for what to do for the wall behind the BBQ. It regularly turns black after grilling.
I tend to look at problems like this as opportunities for adding more interest to the outdoor space. In this case, I recommended adding garden art in the form of rusted metal botanical panels. There is a local artist in Phoenix who creates metal panels with plant shapes cut out of them. He offers standard pieces but also does custom work.
The rusted metal garden art will add welcome interest and design notes landscape touches behind the BBQ as well as disguise any blackened area on the wall.
Botanical Panels Add Beauty
Here is an example of the metal botanical panels from another client’s home. This is where I first encountered the work of this artist. You can learn more about this metal artist here.
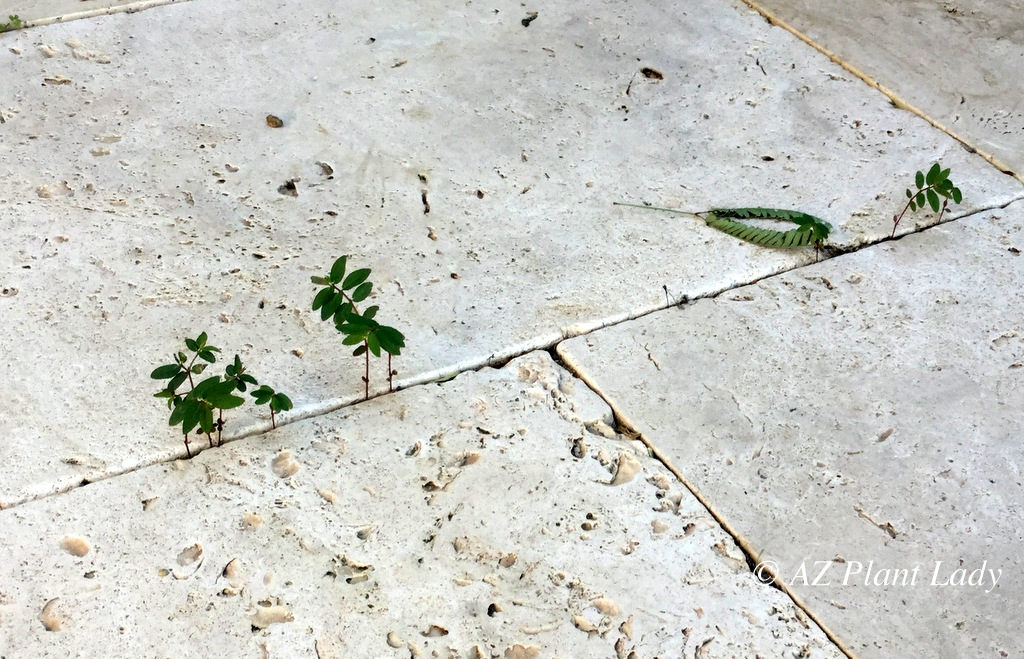
Battling Weeds and Embracing the Beauty of Shade
Weeds will always be a problem in the landscape. Like these I saw at a client’s home growing through the patio. The solution to this area is to slowly pour boiling water on weeds growing through the cracks. This will kill them. For travertine, only do this if the stone is sealed.
Leveraging Shade and Tree Patterns in Landscape Design
To wrap our design notes, here is a landscape. The homeowner wants to concentrate on plants up close to the house and not add any further out. If this front yard didn’t have any trees, the absence of plants would cause it to look barren and washed out. However, the patterns from the branches of the ‘Desert Museum’ palo verde add beautiful patterns on the ground here. So you can get away with leaving it bare, which draws attention to the lovely shadows of the branches.
I hope you have enjoyed this latest session of design notes. I’ll have more for you in the future.
**Stay tuned for a special announcement that I’ll be making the beginning of September. I’m working on a new project that will enable me to help you even more to create, grow, and maintain a beautiful outdoor space in the desert. I’ve been working on it for a while and am so excited to share it with you soon!
https://www.azplantlady.com/wp-content/uploads/2018/08/new_build_landscape_Phoenix_landscape_design.jpg6481024arizonaplantlady@gmail.comhttps://www.azplantlady.com/wp-content/uploads/2025/08/AZ-Plant-Lady-Logo-small.jpgarizonaplantlady@gmail.com2018-08-11 07:52:102023-10-09 11:30:09Design Notes From the Field: A New Build, Metal Art, Weeds, and Shade
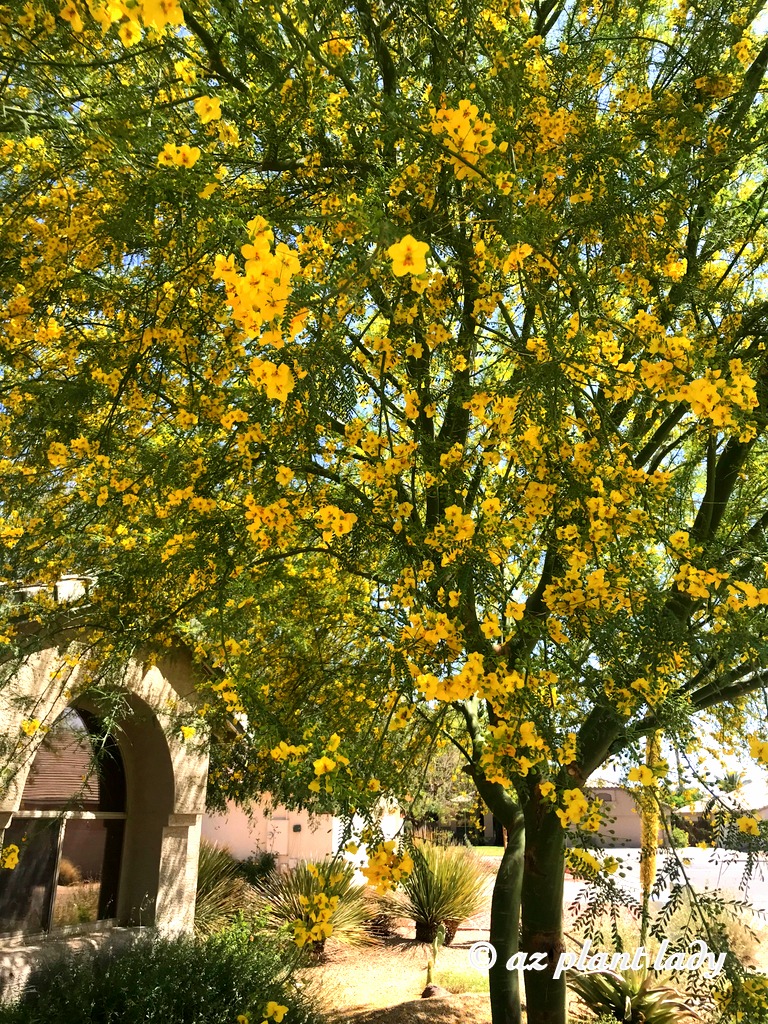
My garden has been transformed with yellow showers of flowers, courtesy of my palo verde tree. It’s a delightful time of year with warm spring temperatures and colorful landscapes filled with flowering shrub, perennials, and trees.
However, nothing heralds the arrival of spring in the desert Southwest like the golden yellow flowers of palo verde trees. I have three ‘Desert Musuem’ palo verde trees spread throughout my garden – one in the front, in the side garden (our dog run), and in the backyard.
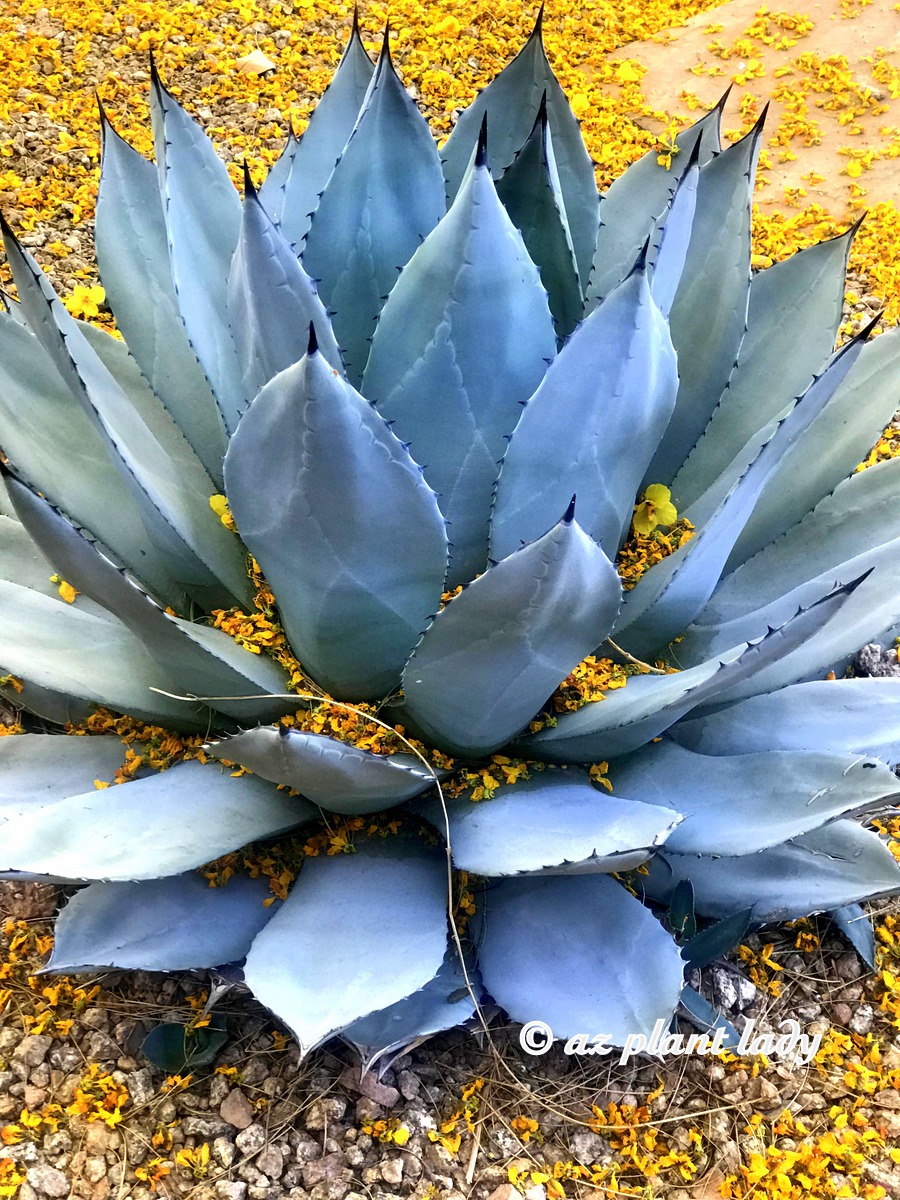
The flowers do spread everywhere, which bothers some people, but I like to focus on the lovely yellow flowers transform things in the garden, like my artichoke agave where the flowers nestle inside its rosette.
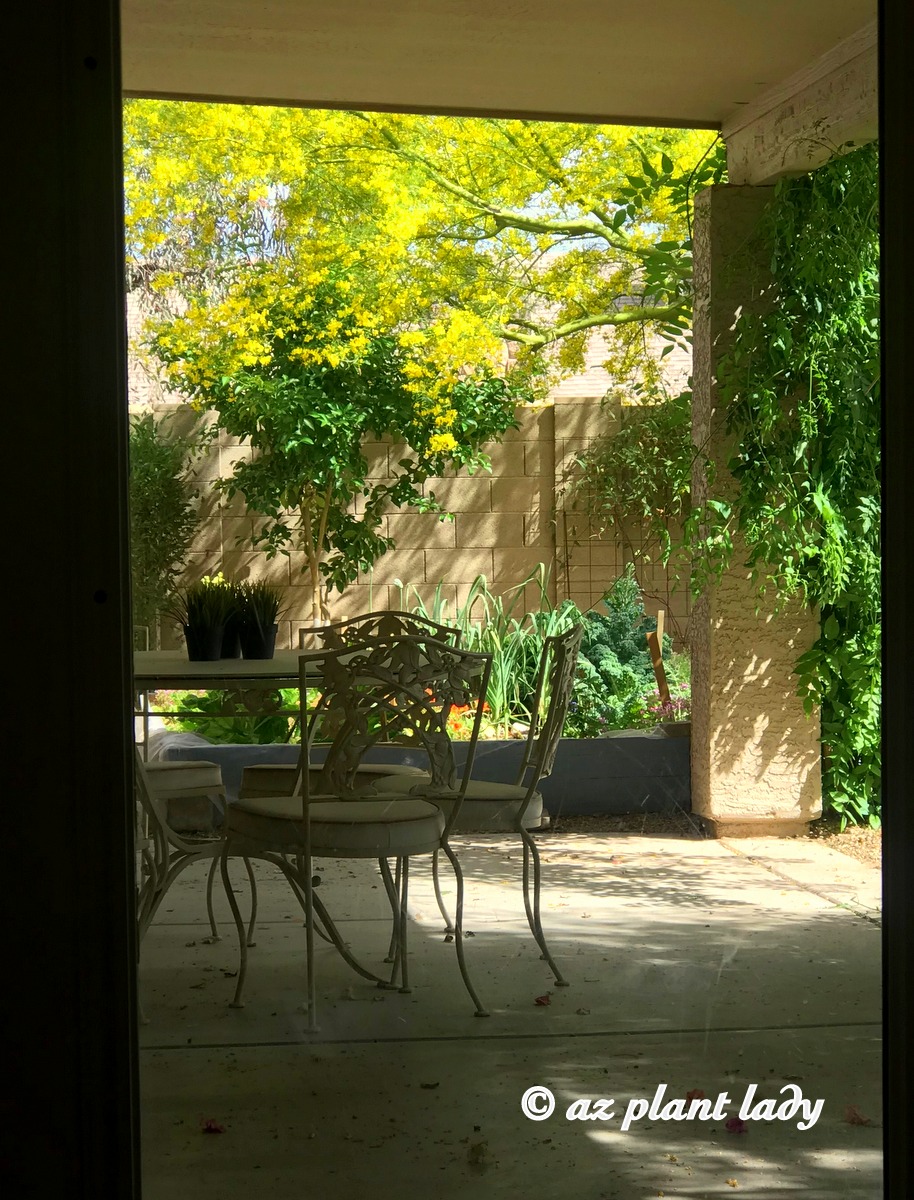
One of my favorite views of the garden is looking out the patio door to the side garden where the branches of my palo verde tree frame the view.
There are several different species of palo verde and each one has a slightly different color flower, form the pale yellow of the foothills palo verde(Parkinsonia microphylla) to the deep yellow of ‘Desert Museum’(Parkinsonia hybrid ‘Desert Museum’).
Here is more information about palo verde trees from an earlier post. Do you enjoy the blooms of palo verde trees?
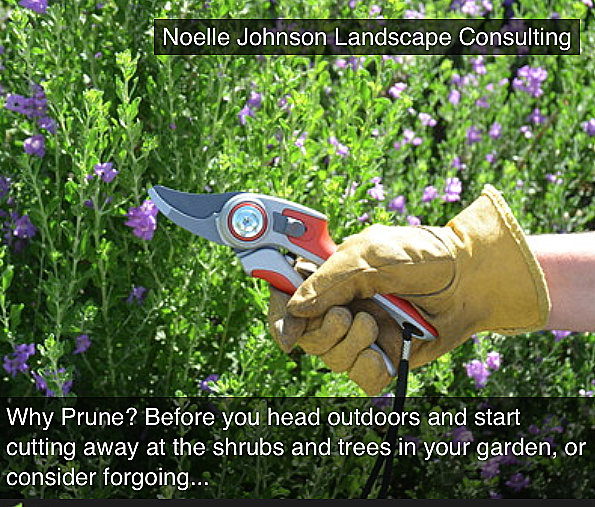
Understanding Key Pruning Terms for a Beautiful Garden
As the garden begins to awaken in spring, our thoughts turn to getting our plants ready for the growing season, which often involves pruning.
Pruning your favorite shrubs and trees is essential to maintain their health and appearance. To do this properly, you need to be familiar with common pruning terms. As a certified arborist, I’m here to help you understand these terms, so you can care for your plants effectively, whether you do it yourself or hire a professional.
5 Reasons Why Pruning Is Important
There are different types of pruning, each of which, are used to accomplish particular results, ultimately keeping your plants attractive and healthy.
Before diving into pruning terms, let’s explore why pruning matters:
Encourages Strong Branching: Pruning eliminates weak or crossing branches and promotes strong growth.
Removes Dead or Diseased Wood: It helps maintain the overall health of your plants.
Stimulates New Growth: Proper pruning encourages attractive, new growth.
Enhances Wind Resistance: It makes your trees more resistant to windy conditions.
Improves Air Circulation: Pruning promotes air circulation, reducing the risk of fungal diseases.
In short, pruning is crucial for maintaining the beauty and vitality of your garden’s trees and shrubs.
If you are learning how to prune your trees and shrubs yourself, it’s especially important to learn about the various ways of pruning to help you determine which way(s) are the best to employ.
A List of 10 Common Pruning Terms
Now, let’s dive into some of the most frequently used pruning terms:
1. Crown:
The upper part of a tree, including branches, stems, and leaves, often referred to as the “canopy.”
2. Crown Cleaning:
Pruning away dead or diseased branches and stems, including the removal of “stubs” or dead branch bases.
3. Crown Raising:
Removing lower branches to elevate the crown of a tree or shrub for clearance.
4. Crown Reduction:
The removal of part of a tree or shrub’s outer growth to prevent wind damage or excessive growth.
5. Crown Thinning:
Removing select interior branches to improve air circulation and reduce the tree’s weight while maintaining its shape.
6. Heading Back:
Pruning branches by up to half of their length to reduce outward growth and promote a natural shape.
7. Root Prune:
Trimming roots, often with a root barrier, when they pose problems to foundations, sidewalks, or walls.
8. Shearing:
Using hedge trimmers to remove a portion of a shrub’s outer growth, commonly for formal hedges or topiary.
9. Structural Pruning:
Shaping young trees by selecting branches for a strong form and better wind resistance.
10. Topping:
The harmful practice of removing the top part of a tree, which should be avoided due to its detrimental effects on the tree.
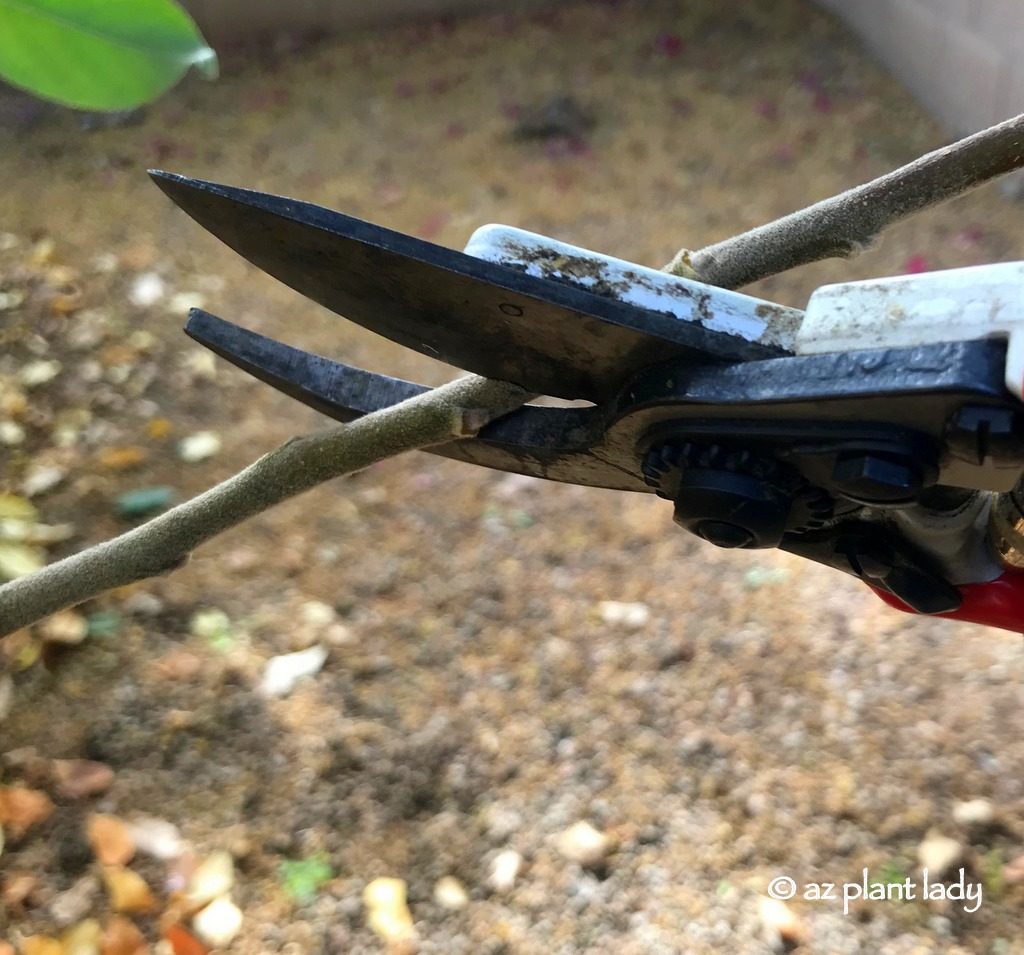
Best Garden Pruning Tools
Lastly, let’s discuss some common pruning tools:
Chainsaw: Ideal for cutting larger branches that other tools can’t handle.
Hand Pruners: Used for cuts under 1 inch in diameter; bypass pruners are recommended for clean cuts.
Hedge Trimmer: Comes in manual and power forms for shearing cuts in shrubs.
Loppers: With long handles, they cut branches up to 2 inches in diameter and are suitable for tree branches and shrub interiors.
Pole Pruner: Allows pruning high branches while staying on the ground, available in manual and power options.
Pruning Saw: Suitable for branches over 1½ inches in diameter, it’s essential for larger limbs and branches.
Understanding these pruning terms and tools will help you maintain a beautiful and healthy garden.
https://www.azplantlady.com/wp-content/uploads/2018/03/azplantlady_pruning.jpg1024668arizonaplantlady@gmail.comhttps://www.azplantlady.com/wp-content/uploads/2025/08/AZ-Plant-Lady-Logo-small.jpgarizonaplantlady@gmail.com2018-03-01 19:15:472023-10-10 13:21:13Ready to Prune? Here Are Common Pruning Terms Defined
Living in the desert southwest has its perks, I am blessed to be able to grow a variety of citrus trees in my garden and they do very well under most circumstances because I protect citrus trees during hot weather.
However, when temperatures outside of the average highs and lows occur, steps need to be taken to protect them. With this week’s record-breaking highs, my orange tree has been suffering as is evident from its sunburned leaves. So I thought, this is a great opportunity to talk about how to protect citrus trees from a heatwave.
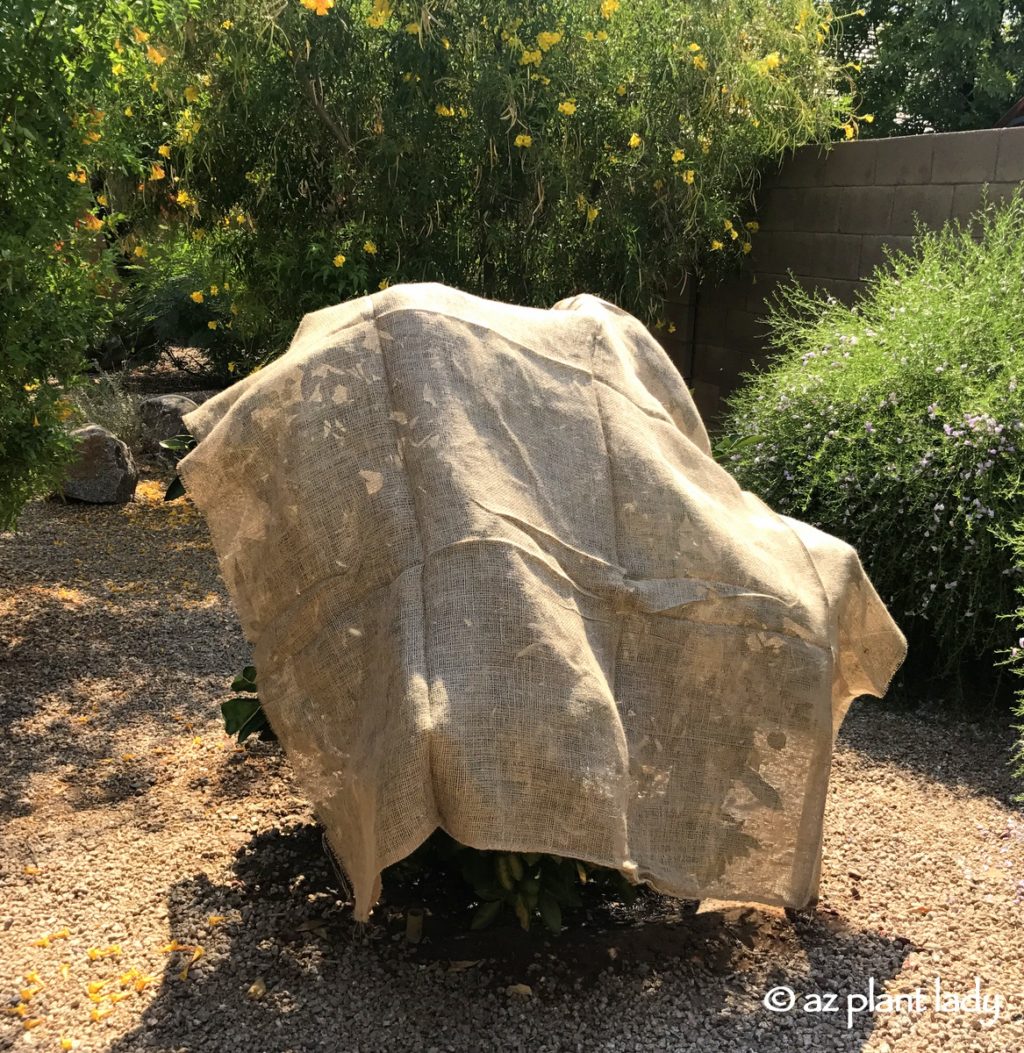
1. Protect Citrus Trees Provide Temporary Shade
Sunburn isn’t just a human woe; it affects citrus trees too. The west and south-facing sides of citrus trees are susceptible to sunburn during a heatwave. This shows up as yellowing or browning on the leaves on those sides of the tree. Sunburn can also occur on immature citrus fruit, so it’s important to protect them.
Burlap is a Great Shade Cover for Trees
While spraying citrus trees with sunscreen isn’t an option, adding temporary shade is, especially for citrus trees facing south and west that are particularly vulnerable. Put a large piece of burlap over the tree, focusing on those south and west-facing exposures. Burlap is lightweight and inexpensive. It allows some sun to penetrate, which is important, without overwhelming the tree. You can purchase burlap at your big box store, nursery, or Amazon (affiliate link below).
Shade cloth is an adaptable guardian against sunburn. Whether draped over a scaffold or enlisted to shield neighboring plants, its sun-blocking power proves invaluable during heatwaves. You can easily use a bed sheet in place of burlap for temporary shade. Another option would be to place a shade tent/canopy to help block the sun’s westerly rays.
Shade cloth is very useful as a sun shield when placed on a scaffold or other support – it also works great to help protect other plants in your garden.
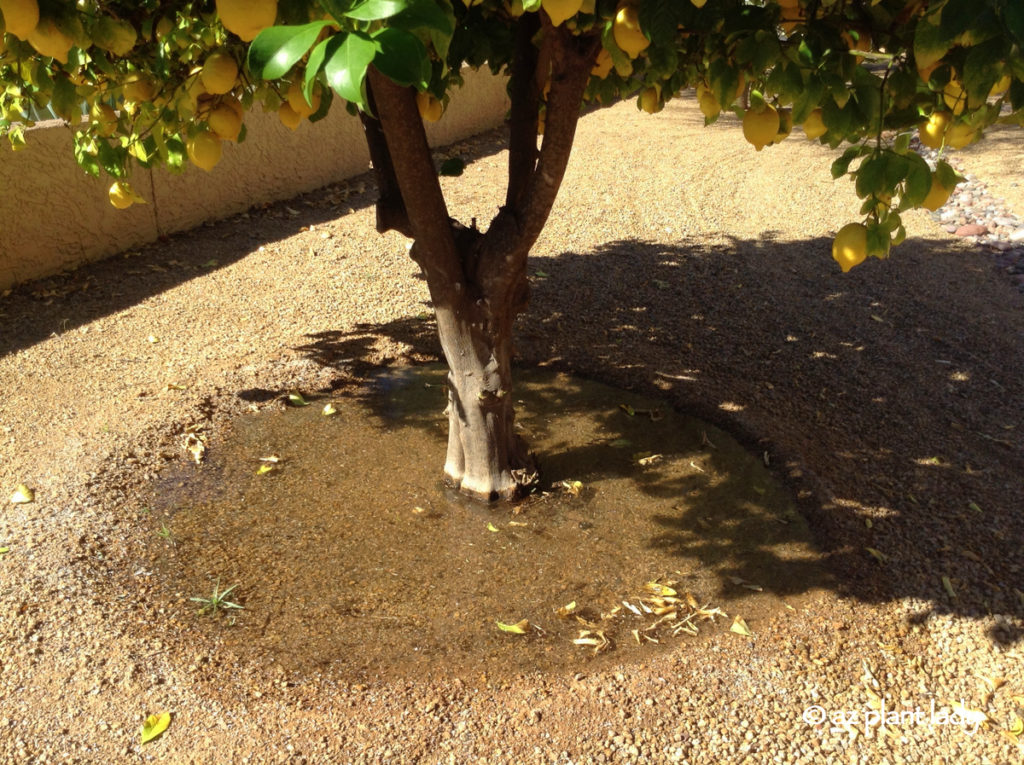
2. Increase Irrigation and Water Early to Protect Citrus Trees
When temperatures soar above normal, citrus trees, like most plants, lose more water through their leaves. As a result, their regular watering schedule isn’t enough to meet their needs, so increase the frequency of watering as long as the heat wave lasts.
The Morning Watering Advantage for Citrus
Watering isn’t just about quantity; timing matters. When you water is vital as it is difficult for plants to uptake water in the middle of the day. This is because all of their resources are dedicated to enduring the stresses of the heat and it’s hard for them to divert those to uptake water. Water in the early morning, will allow them to build up a water reserve that will help them bolster their endurance throughout the day.
Get the Desert Gardening 101 How to Guide
Want to learn basic tips for how to create, grow, and maintain beautiful desert landscapes? Click the box below and get the Desert Gardening 101 GUIDE . Imagine all that helpful information right at your fingertips!
Restoration after the Extreme Heat and Sun
When the heatwave subsides, it’s time to bid farewell to temporary shade. Remove the temporary shade in order to protect citrus trees for cooler conditions. As temperatures stabilize, return to your usual watering schedule. By implementing these two proven techniques, you’re empowering your citrus trees to defy the scorching grip of brutal summer temperatures and minimize any negative effects.
Beyond Heatwaves: Year-Round Trunk and Bark Care to Protect Citrus Trees
Remember, safeguarding citrus trees transcends seasons. Ensuring your trees’ trunks and bark receive proper sun protection is a year-long responsibility. Explore this previous blog post for insights on why and how to provide this vital shield.
https://www.azplantlady.com/wp-content/uploads/2017/06/sunburned_citrus_leaves_how_to_protect.jpg10581200arizonaplantlady@gmail.comhttps://www.azplantlady.com/wp-content/uploads/2025/08/AZ-Plant-Lady-Logo-small.jpgarizonaplantlady@gmail.com2017-06-17 11:45:442023-08-24 16:36:30How to Protect Citrus Trees from a Heatwave
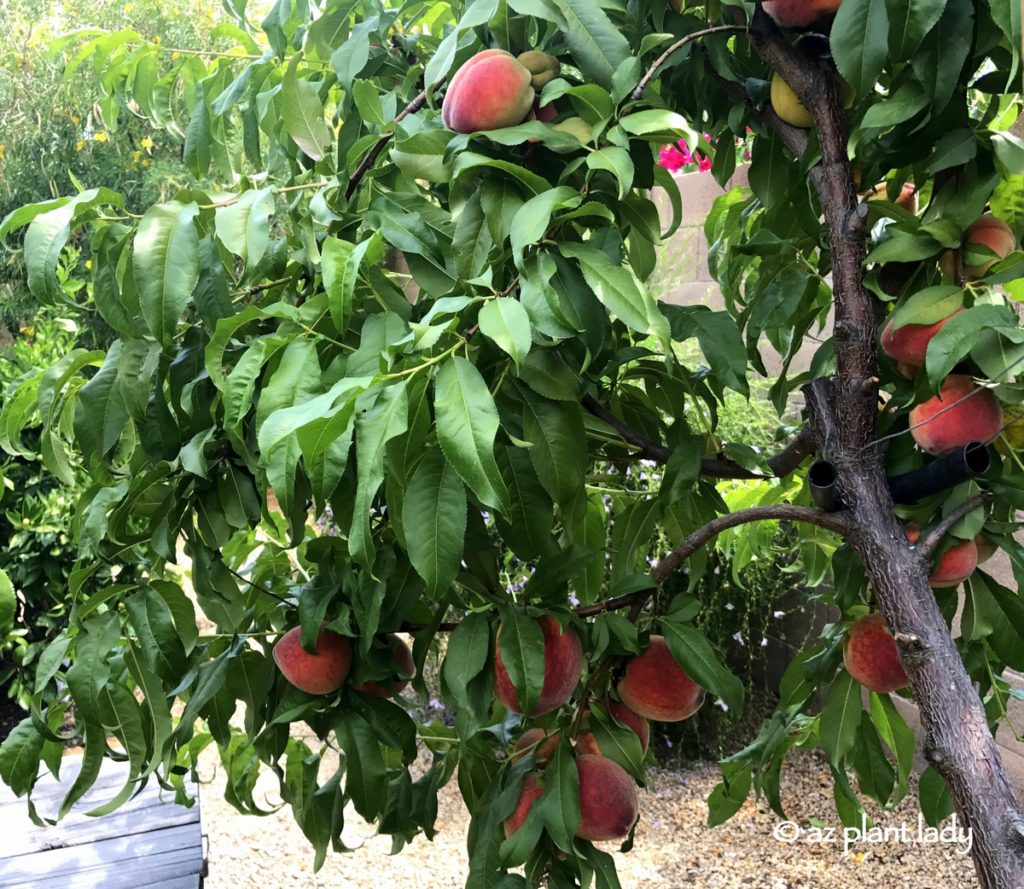
It’s one of my favorite times of year in the garden – my peach trees are heavily laden with delicious, sweet fruit ready for picking.
Many people are surprised to learn that you can grow peaches in Arizona, but they do very well. However, they do ripen earlier than in cooler climates. May is peach season here in the desert.
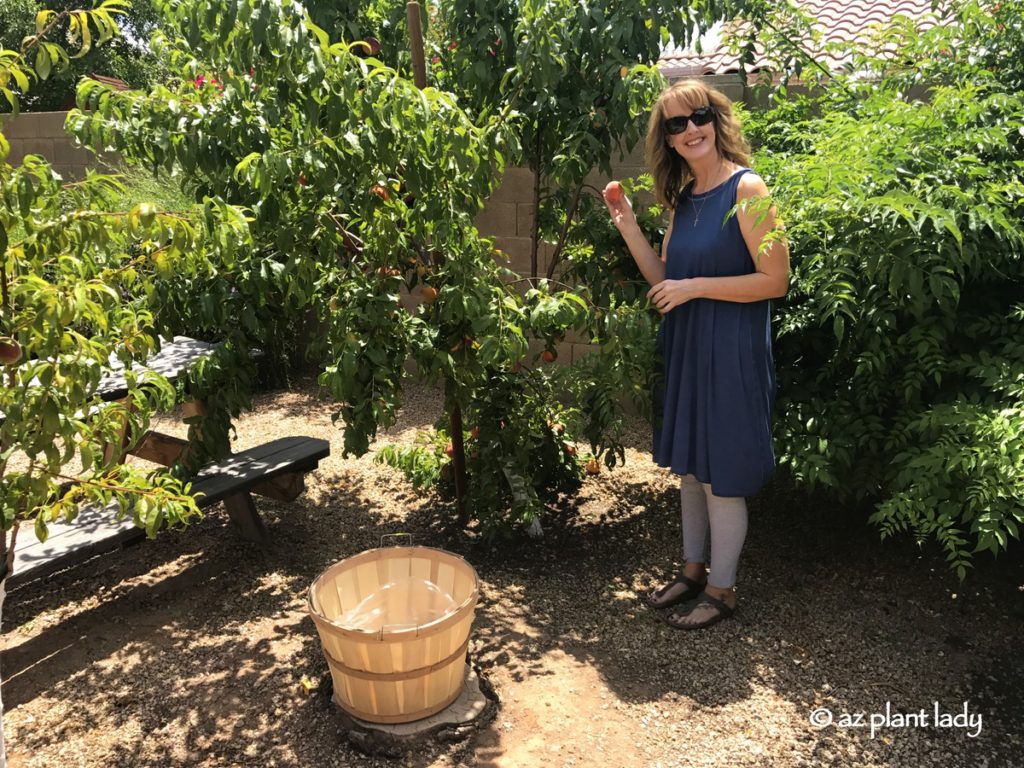
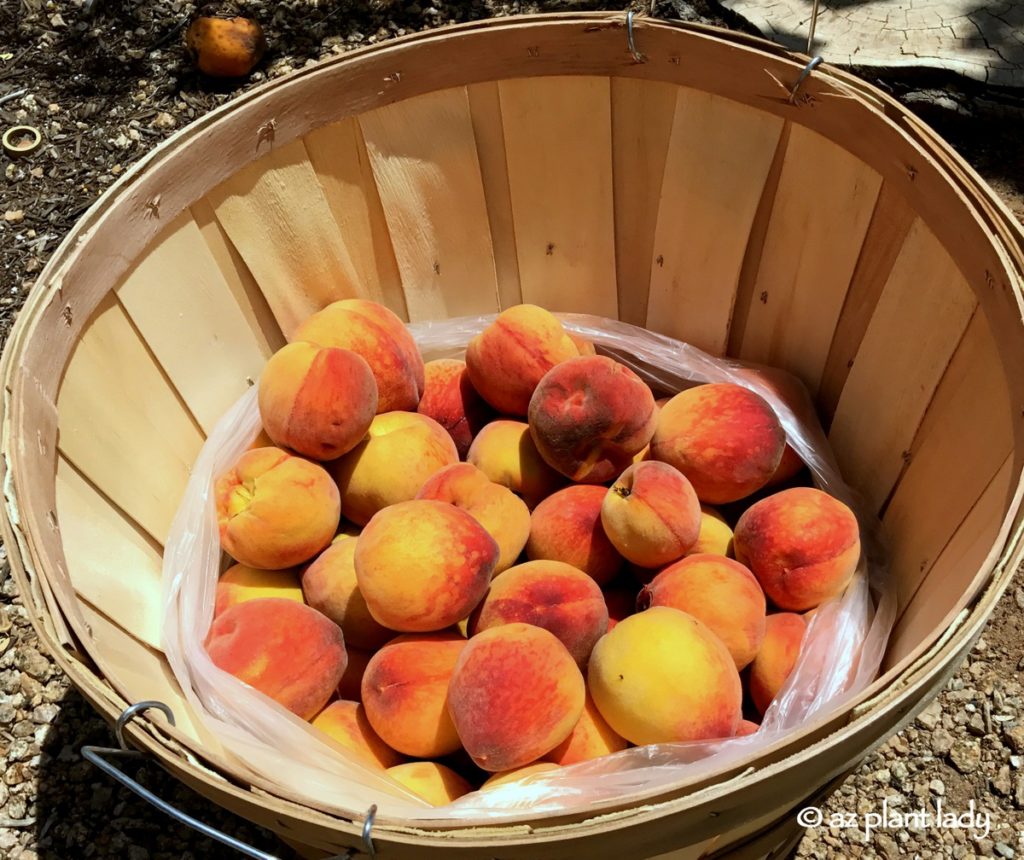
My peach trees sit outside my kitchen window, and I’ve been keeping my eye on them to see when they were ready to harvest. Finally, the day arrived, and I brought out my bushel basket and got to picking.
One peach tree can provide you with most of the peaches you need. Last year, I made peach blueberry jam, which was so good, that it didn’t last long. Today, I’m planning on making regular peach jam, but I can always buy peaches from the store at another time to make other variations if I choose to.
Every May, I haul out my water bath canner, and canning jars, and spend 2 hours making delicious peach jam.
Growing peaches and making jam isn’t difficult or expensive. Here is a link to the guidelines that I follow.
https://www.azplantlady.com/wp-content/uploads/2017/09/AZ-Plant-Lady-Graphic-Video.jpg14431442arizonaplantlady@gmail.comhttps://www.azplantlady.com/wp-content/uploads/2025/08/AZ-Plant-Lady-Logo-small.jpgarizonaplantlady@gmail.com2017-05-19 12:05:472022-10-02 04:39:14Growing Peaches and Making Jam
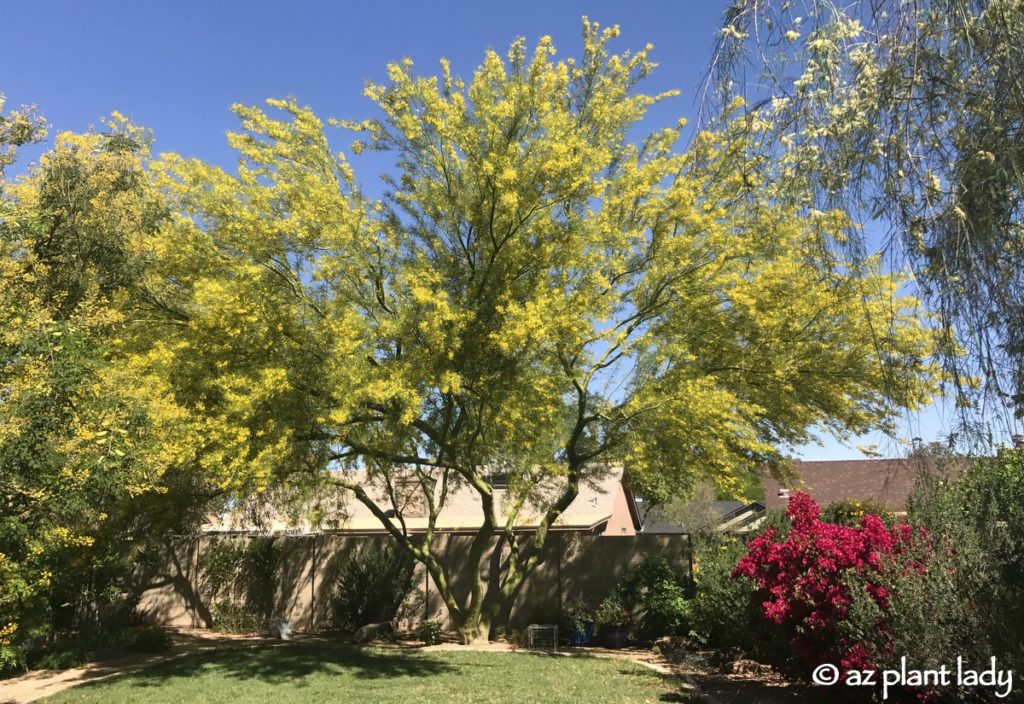
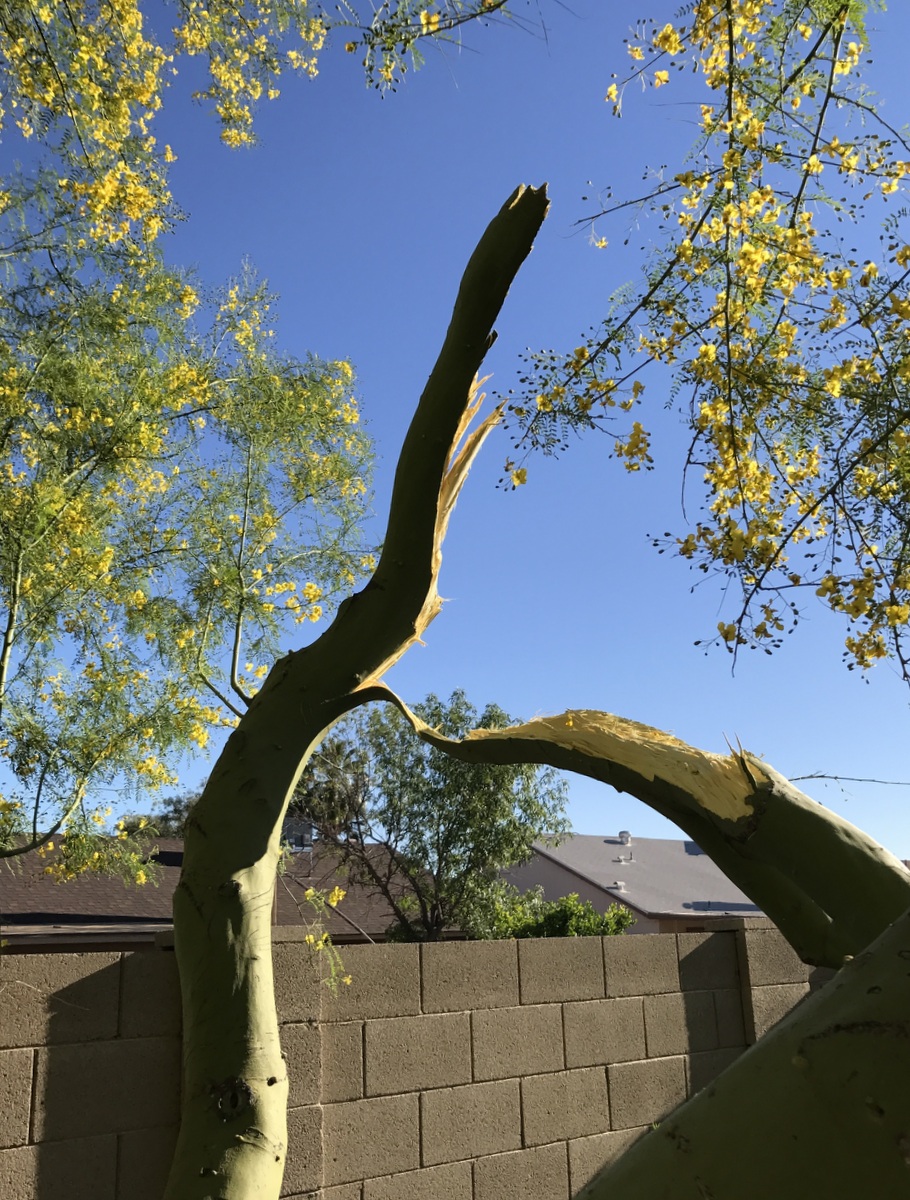
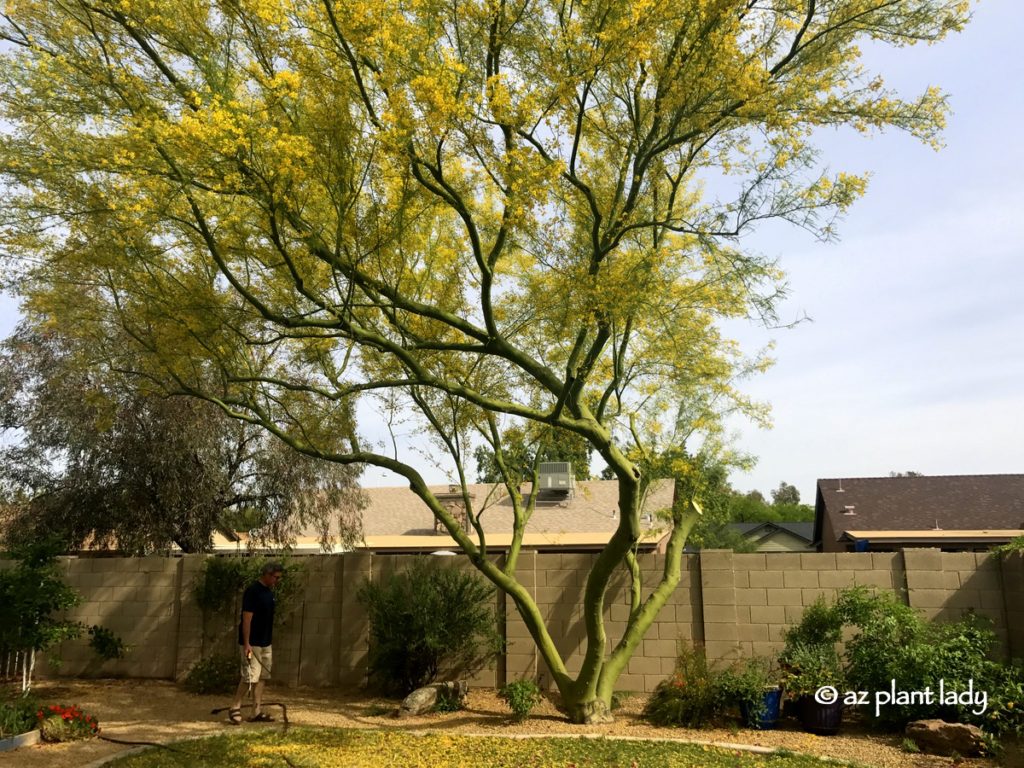
For those of you who are familiar with ‘Desert Museum’ palo verde trees, you know how their stately beauty enhances desert landscapes. The curving branches of this tree are a lovely shade of green, which reaches toward the blue sky creating welcome shade underneath.
I have three of these palo verde trees planted around my landscape, but the one in my back garden is my favorite. Its broad canopy adds welcome relief from the summer sun, and I’m able to grow flowering perennials underneath its branches that otherwise wouldn’t survive in full sun.
Two weeks ago, this ‘Desert Museum’ tree experienced an unfortunate event. It happened around 9 p.m. on a windy day was drawing to a close. I heard a sound that sounded like firecrackers and didn’t think much of it, attributing it to kids in the neighborhood.
However, once the next day dawned, my husband called me outside to view the damage to my beloved tree. A massive section had broken off.
I must admit that I was heartsick when I saw what had happened. We had had our tree pruned by an arborist last summer and wasn’t expecting any major problems like this one. That being said, the combination of the extra weight on the branches from the flowers as well as the windy conditions of the day before was simply too much for this section of the tree.
The broken branch served to illustrate something that I frequently tell my clients; properly pruned trees are much less susceptible to branches breaking off, but they aren’t immune as my tree clearly showed.
Under normal circumstances, I would have been upset about the loss of this major branch, but I felt a bit worse than that since we are hosting a wedding in our backyard in a few weeks and the ceremony was to take place underneath this lovely tree.
The affected branch was pruned back to a couple of smaller branches and the debris removed. Yes, my tree looks quite lopsided, however, ‘Desert Museum’ palo verde trees grow fairly quickly, and within a year, it should have filled in.
As for the wedding, plans for it take place underneath the tree haven’t changed. The small branches will grow more quickly in response to the pruning cut just above them, and I’ll probably notice the off-center appearance more than anyone else. It will still serve as a beautiful backdrop.
https://www.azplantlady.com/wp-content/uploads/2017/04/Desert_Museum_Palo_Verde_broken_branch-001.jpg9001200arizonaplantlady@gmail.comhttps://www.azplantlady.com/wp-content/uploads/2025/08/AZ-Plant-Lady-Logo-small.jpgarizonaplantlady@gmail.com2017-04-23 06:08:112020-12-23 08:48:32My Desert Museum Palo Verde and an Unfortunate Event
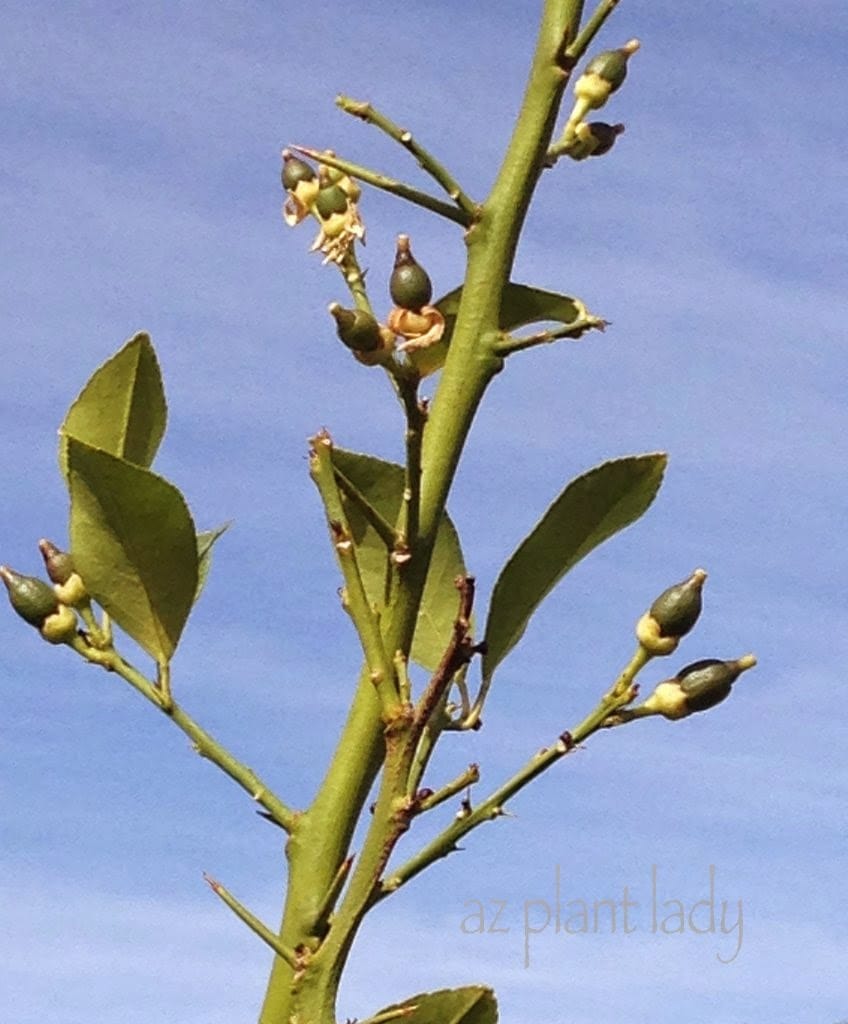
There is nothing quite so refreshing as the fragrance of lemons as you slice through their yellow skin. Lemons are a very popular fruit tree for those of us who in zones 8 and above and their lush green foliage and yellow fruit add beauty to the garden.
If you have been thinking of adding a lemon tree to your landscape, March is the best time of year to plant new citrus in the garden as it gives them time to become established before the heat of summer arrives.
I am often asked about what type of lemon is best for the garden. My personal choice is Meyer lemon for a number of reasons. You may have heard of this type of lemon tree, but what you may not know is that it isn’t a ‘true’ lemon – it’s actually a naturally occurring hybrid of a lemon and ‘Mandarin’ orange. This results in a pseudo-lemon that is sweeter and less acidic than true lemons such as ‘Eureka’ and ‘Lisbon’.
See why you should consider planting a Meyer lemon tree in your backyard in my latest article for Houzz.com. (Click on the photo below to read the article).
*What type of lemon tree to you grow?
https://www.azplantlady.com/wp-content/uploads/2017/03/Meyer_lemon_Arizona.jpg12001098arizonaplantlady@gmail.comhttps://www.azplantlady.com/wp-content/uploads/2025/08/AZ-Plant-Lady-Logo-small.jpgarizonaplantlady@gmail.com2017-03-18 13:03:322022-10-08 03:49:18March is the Perfect Time for Planting a Meyer Lemon Tree
We use cookies on our website to give you the most relevant experience by remembering your preferences and repeat visits. By clicking “Accept All”, you consent to the use of ALL the cookies. However, you may visit "Cookie Settings" to provide a controlled consent.
This website uses cookies to improve your experience while you navigate through the website. Out of these, the cookies that are categorized as necessary are stored on your browser as they are essential for the working of basic functionalities of the website. We also use third-party cookies that help us analyze and understand how you use this website. These cookies will be stored in your browser only with your consent. You also have the option to opt-out of these cookies. But opting out of some of these cookies may affect your browsing experience.
Necessary cookies are absolutely essential for the website to function properly. These cookies ensure basic functionalities and security features of the website, anonymously.
Cookie
Duration
Description
cookielawinfo-checkbox-analytics
11 months
This cookie is set by GDPR Cookie Consent plugin. The cookie is used to store the user consent for the cookies in the category "Analytics".
cookielawinfo-checkbox-functional
11 months
The cookie is set by GDPR cookie consent to record the user consent for the cookies in the category "Functional".
cookielawinfo-checkbox-necessary
11 months
This cookie is set by GDPR Cookie Consent plugin. The cookies is used to store the user consent for the cookies in the category "Necessary".
cookielawinfo-checkbox-others
11 months
This cookie is set by GDPR Cookie Consent plugin. The cookie is used to store the user consent for the cookies in the category "Other.
cookielawinfo-checkbox-performance
11 months
This cookie is set by GDPR Cookie Consent plugin. The cookie is used to store the user consent for the cookies in the category "Performance".
viewed_cookie_policy
11 months
The cookie is set by the GDPR Cookie Consent plugin and is used to store whether or not user has consented to the use of cookies. It does not store any personal data.
Functional cookies help to perform certain functionalities like sharing the content of the website on social media platforms, collect feedbacks, and other third-party features.
Performance cookies are used to understand and analyze the key performance indexes of the website which helps in delivering a better user experience for the visitors.
Analytical cookies are used to understand how visitors interact with the website. These cookies help provide information on metrics the number of visitors, bounce rate, traffic source, etc.
Advertisement cookies are used to provide visitors with relevant ads and marketing campaigns. These cookies track visitors across websites and collect information to provide customized ads.