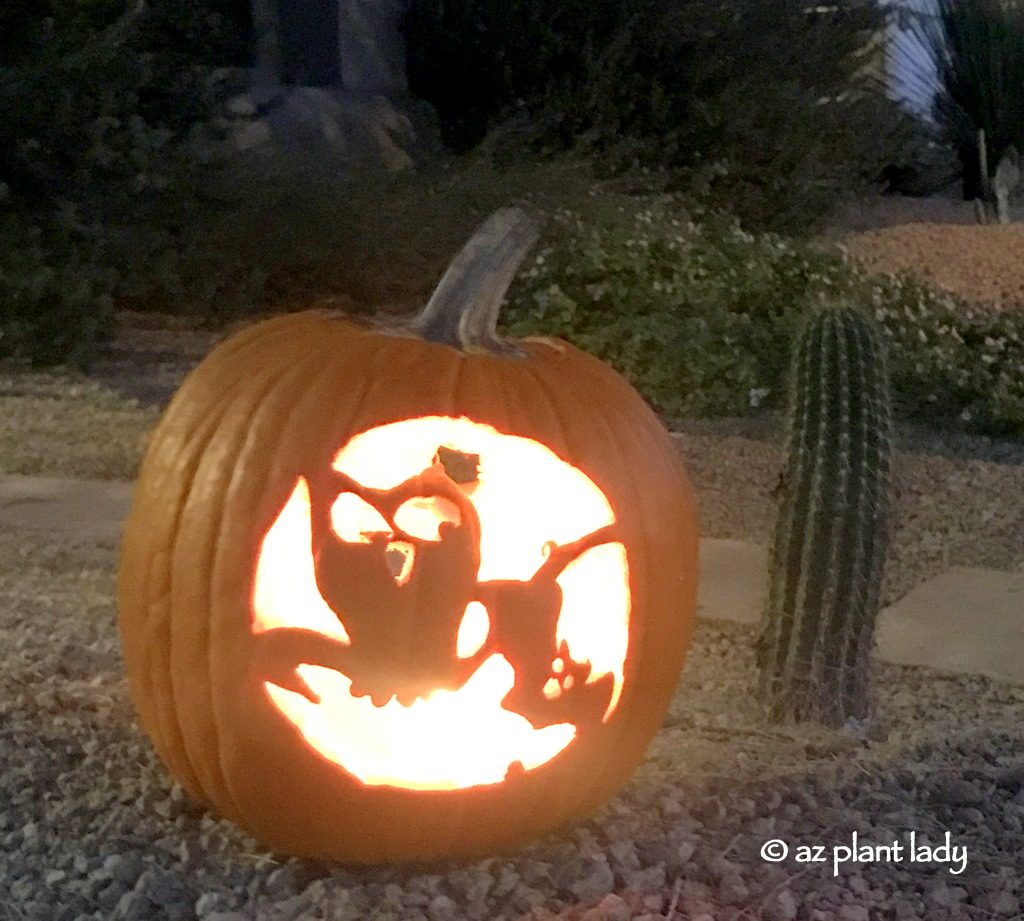
Pumpkins play a large part in our fall holiday celebrations. I remember trips to the pumpkin patch when my kids were younger and watching them choose just the ‘right’ pumpkin for our family.
A few weeks later, pumpkins take center stage on Halloween as their artfully carved faces add a festive element to costumed trick-or-treaters.
But, what do you do with them once the holiday is over? Instead of throwing them in the trash can, what if you could find new uses for your pumpkin?
Whether your pumpkin has been carved or left whole, I’ve shared 9 ways to reuse them in the garden and in the home, in my latest article for Houzz. I hope you enjoy!
https://www.azplantlady.com/wp-content/uploads/2017/11/DIY-Pumpkin-Bird-Feeder-4.jpg416628arizonaplantlady@gmail.comhttps://www.azplantlady.com/wp-content/uploads/2025/08/AZ-Plant-Lady-Logo-small.jpgarizonaplantlady@gmail.com2017-11-02 08:26:232025-07-24 02:10:49What To Do With Pumpkins Once The Holidays Are Over
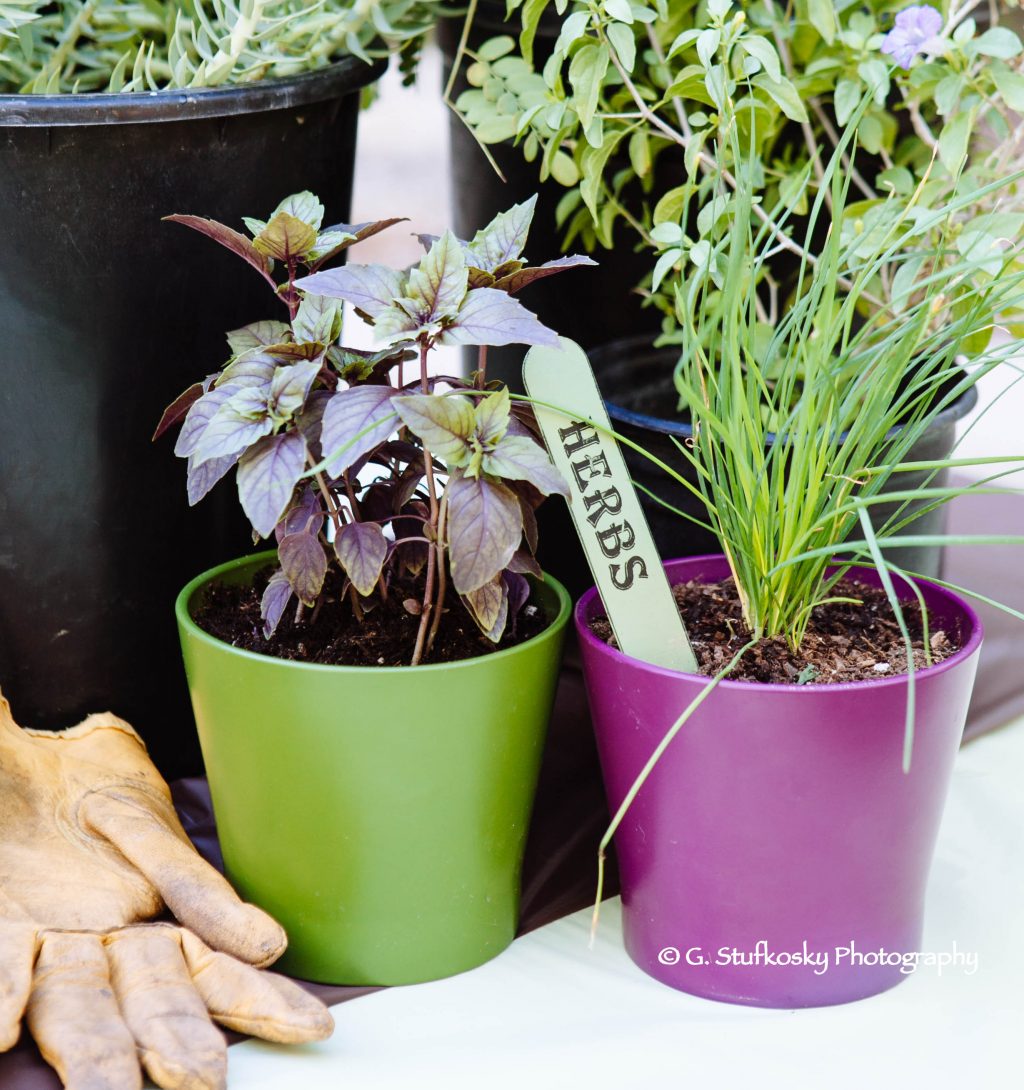
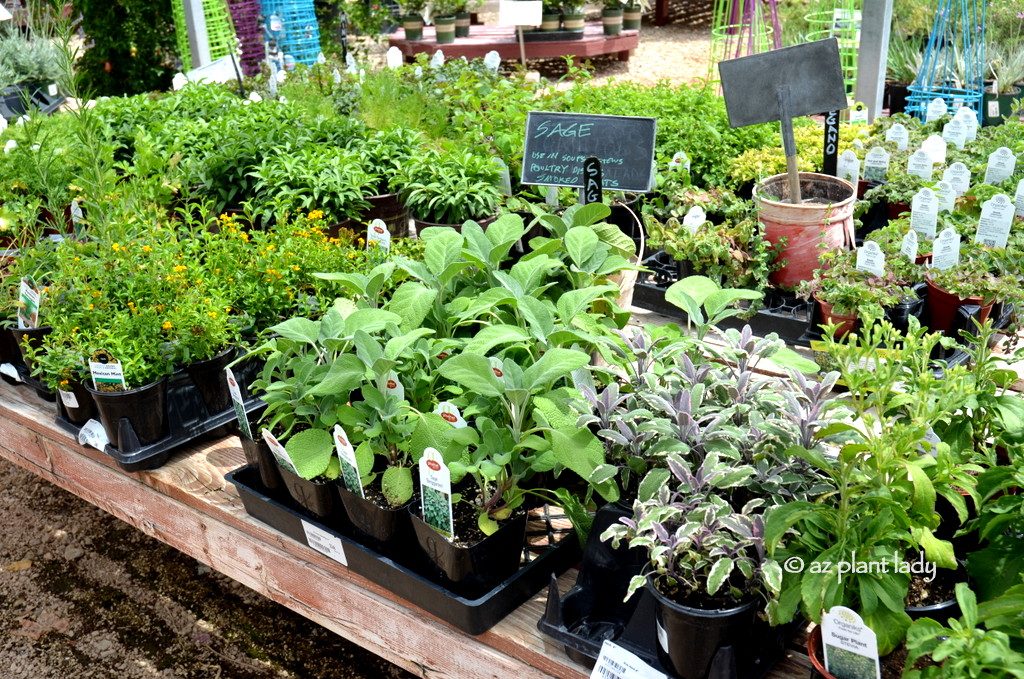
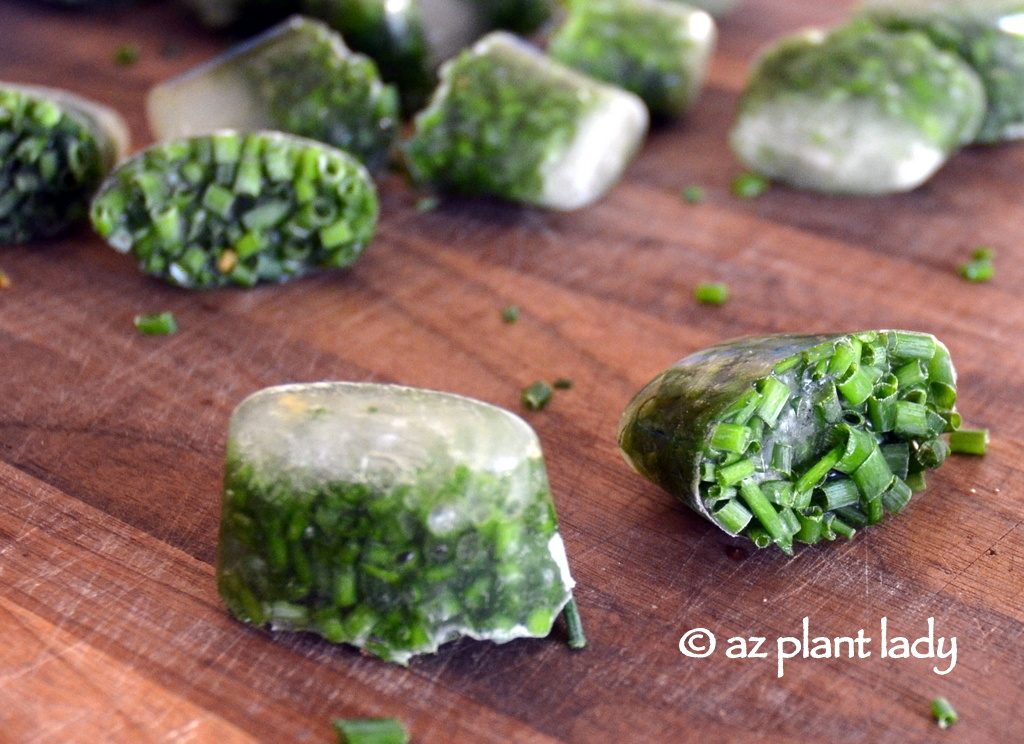
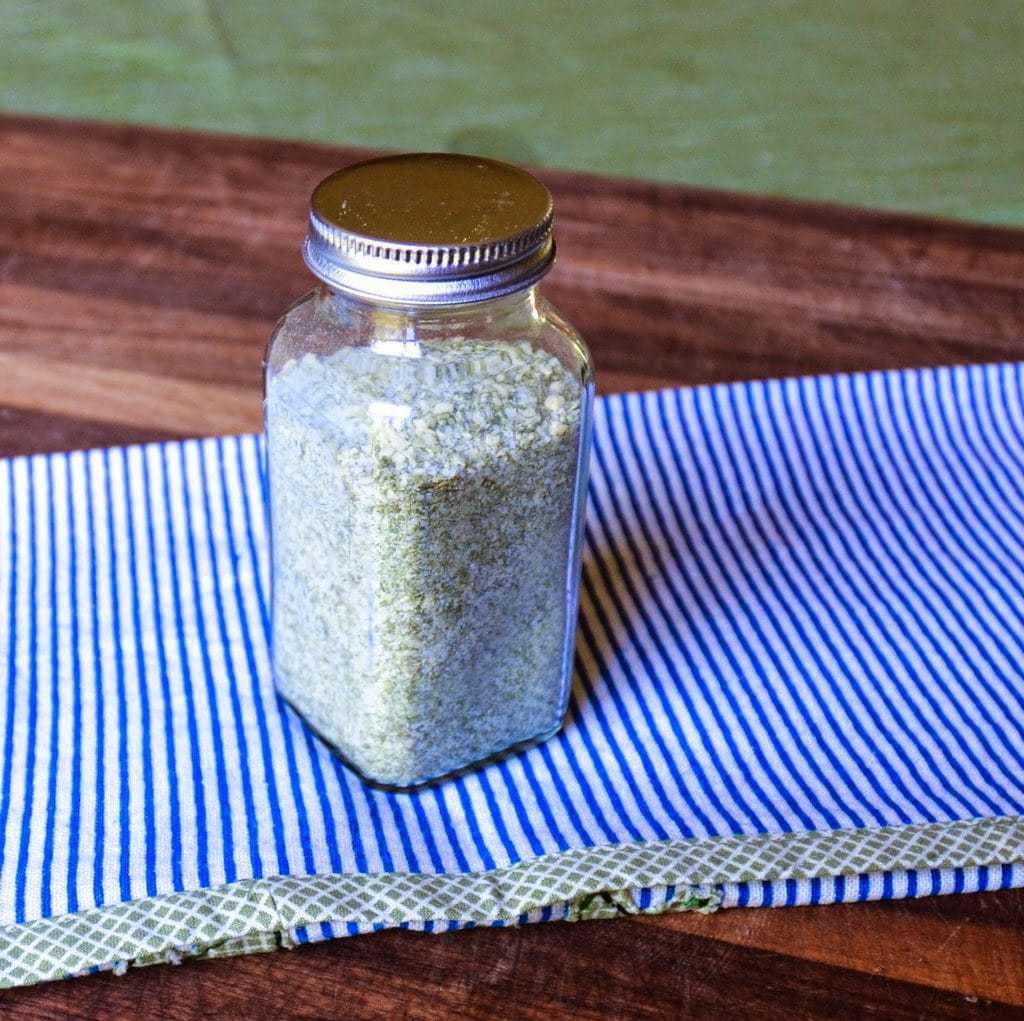
Herbs are easy to grow and thrive in arid climates and shrug off the heat. I’m the first to admit that I don’t like messing around with fussy plants and so herbs fit right in with my gardening style.
Toward the end of summer, my garden is overflowing with herbs – especially basil. I certainly have more than I can use right now, so I like to preserve my herbs in a variety of ways so that I can enjoy the fresh flavor of summer throughout the winter months.
preserving herbs
One of the easiest ways to store herbs is by freezing them using olive oil or water. You can see my post on how to freeze herbs here.
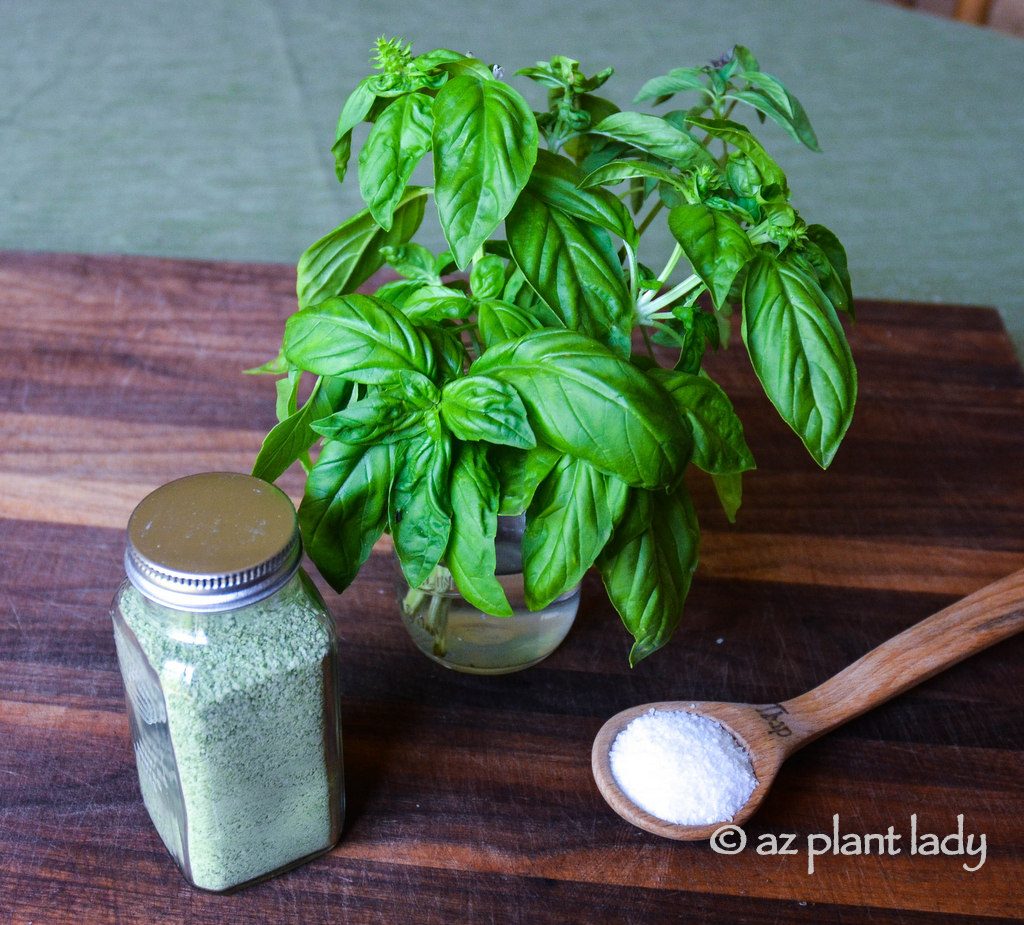
Herb salts are a newer way to keep the fresh flavor of herbs alive. The ingredients are simple, and they are a unique way to add a delicious taste to your favorite recipes. See how easy they are to make in this blog post.
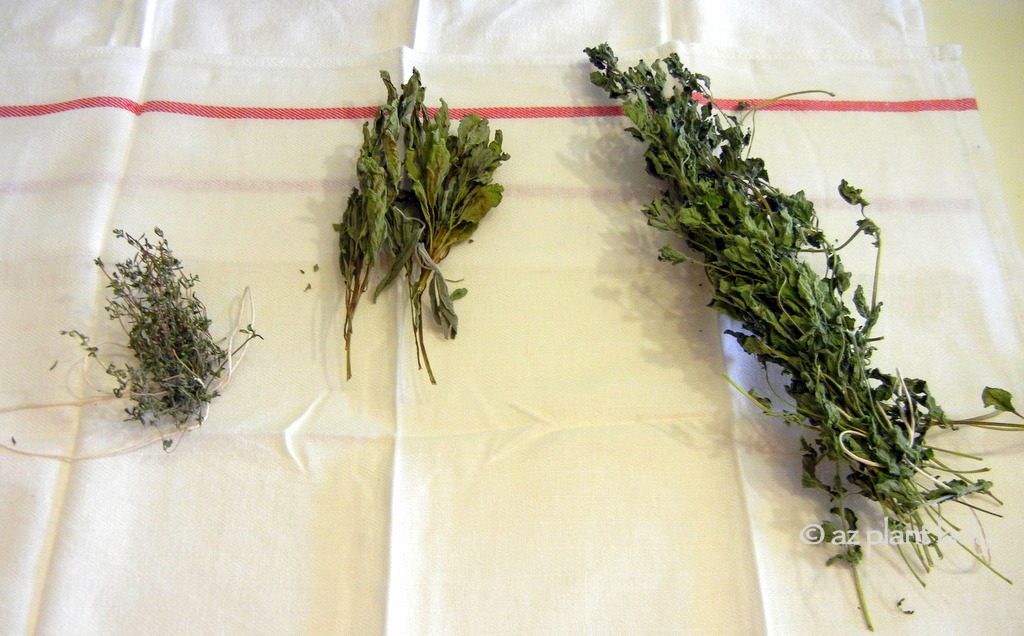
Finally, the most popular method for preserving herbs is to dry them. Some types of herbs are easier to dry than others, and there are different methods for drying herbs. I invite you to read my latest article for Houzz.com where it’s all you need to know about drying herbs. I hope you enjoy it!
Do you dry or freeze your herbs? Which herbs work best for you?
https://www.azplantlady.com/wp-content/uploads/2017/10/rosemary_sage_herbs.jpg7111024arizonaplantlady@gmail.comhttps://www.azplantlady.com/wp-content/uploads/2025/08/AZ-Plant-Lady-Logo-small.jpgarizonaplantlady@gmail.com2017-10-02 11:22:502022-10-02 01:14:493 Ways to Preserve the Flavors of Summer With Herbs
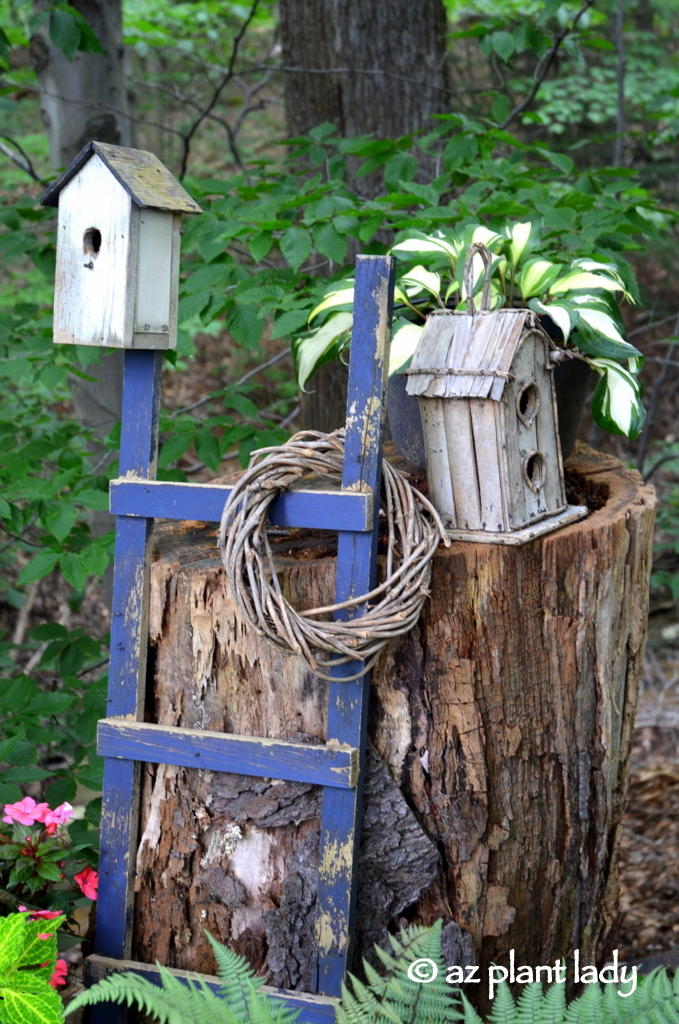
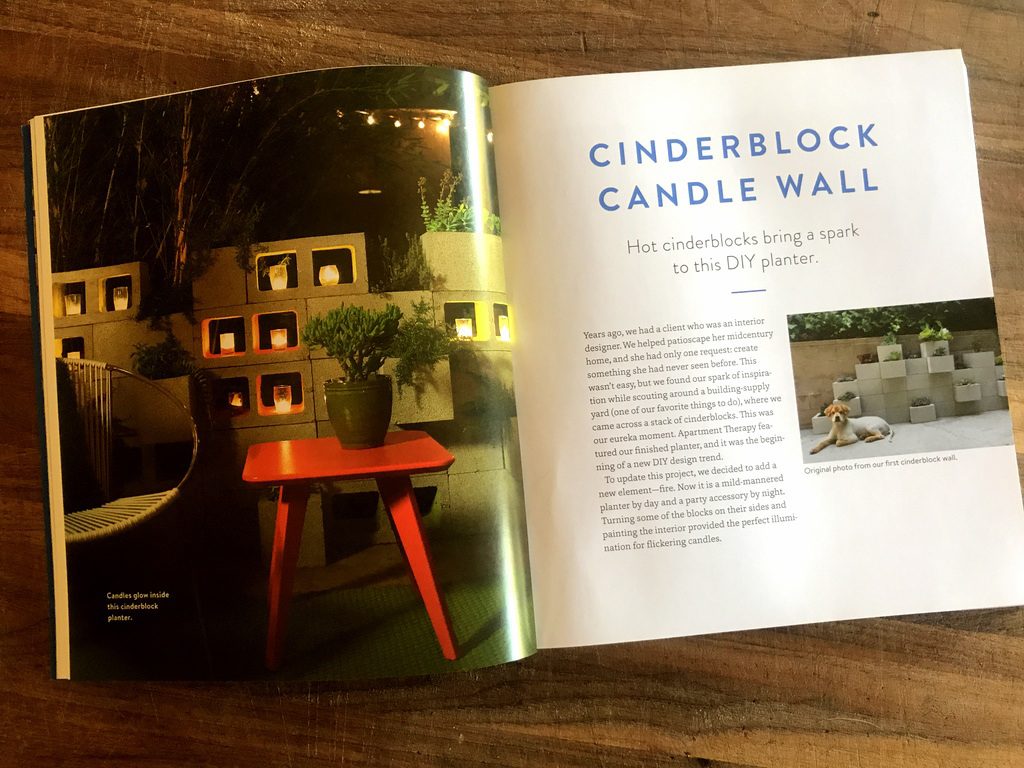
Have you ever visited a garden filled with more than just trees and plants? Different types of garden art can add welcome interest to outdoor spaces along with a touch of whimsy.
It’s the unexpected element of encountering an unusual planter, wall hanging, or recycled items throughout the garden that can add a touch of whimsy that makes a garden unforgettable.
I was inspired by the creative uses of garden decor on a recent visit to Buffalo, and while the plants may be different than what I grow in my Arizona garden, the look can be easily replicated using desert-adapted plants.
Here is a look at my favorites.
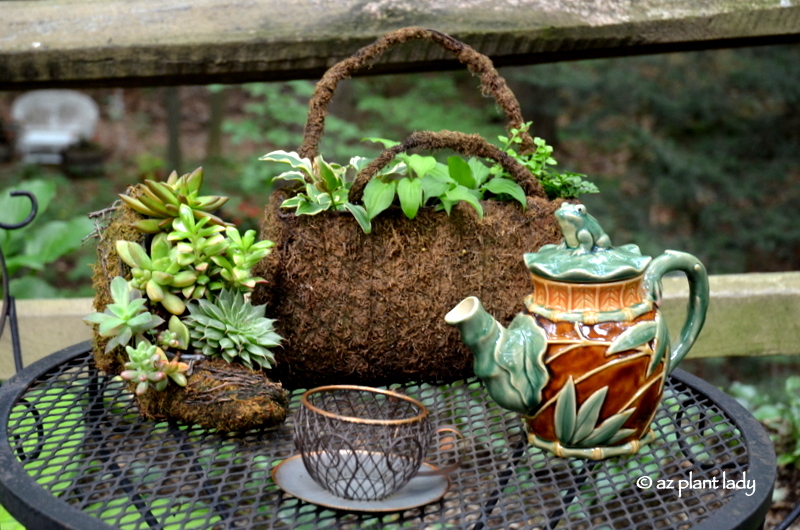
A small bistro table is all set for tea along with moss planters in the shape of a purse and high shoe.
Got a dull expanse of wooden fence? Grab some chalk and draw some flowers – this would also work for a block wall fence too.
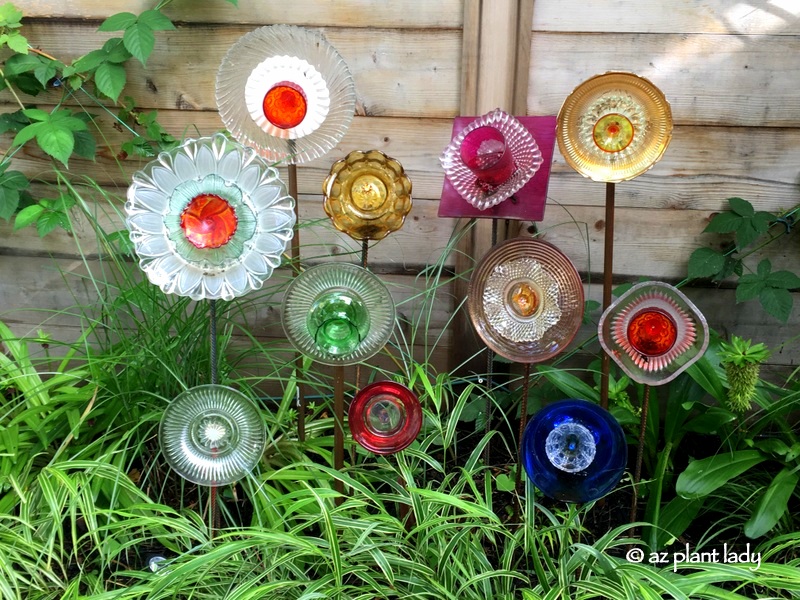
Old glass dishes make beautiful flowers, don’t you think?
Got an old portable fire pit? Dress it up by filling it with succulents.
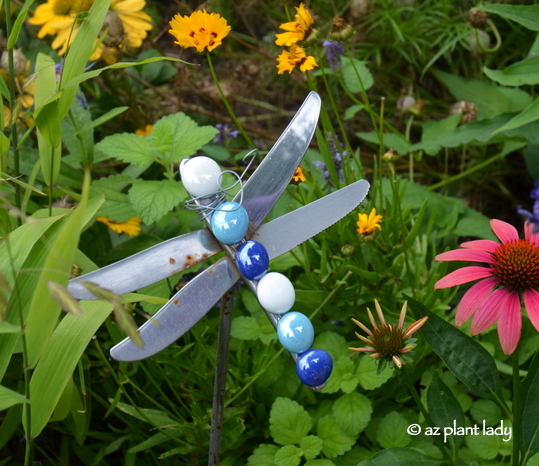
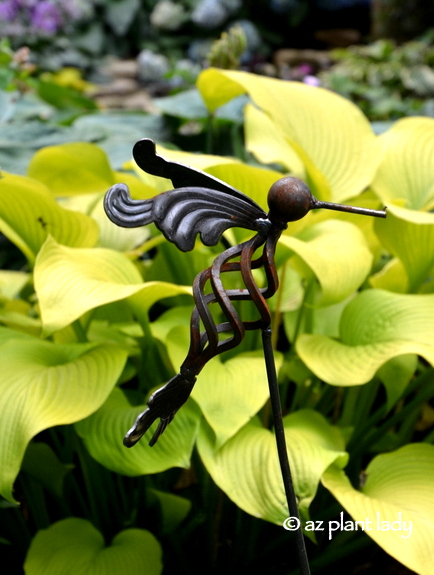
Creating artistic pieces from old silverware is quite popular and I quite like this dragonfly made out of butter knives.
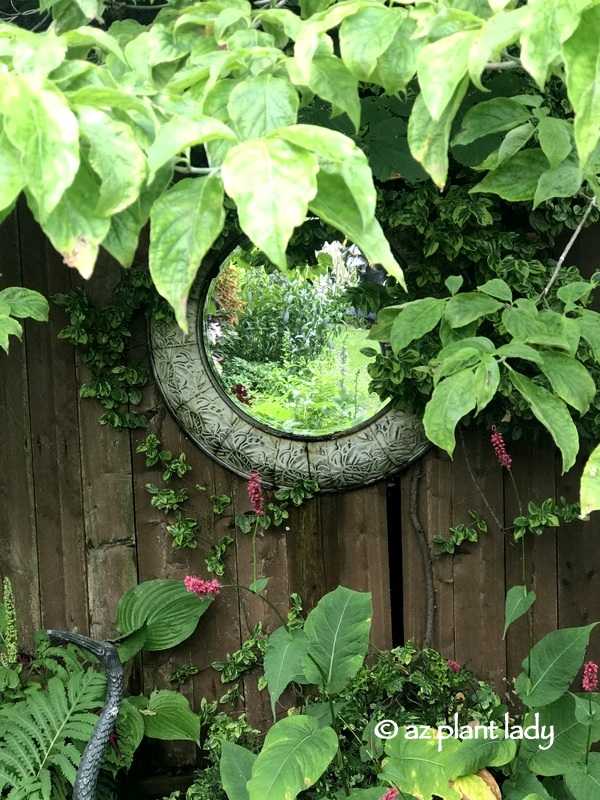
An old mirror not only makes a unique wall hanging, but it also reflects the beauty of the garden in front of it.
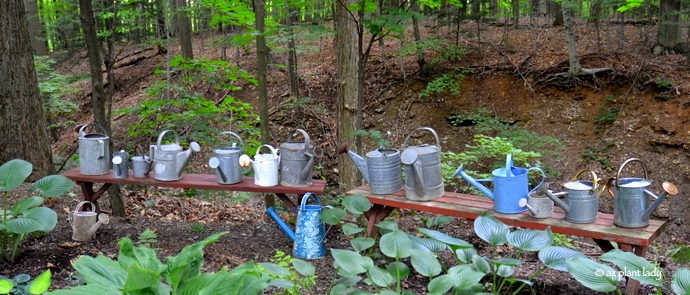
Old garden benches paired with old watering cans add a new look to this corner of a garden.
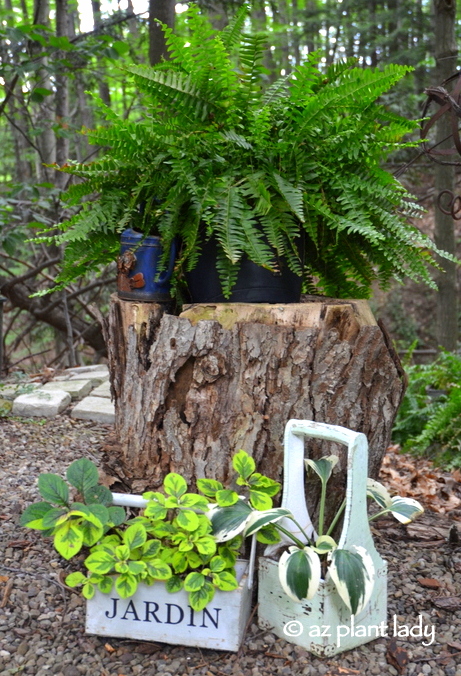
Transform an old tree stump by adding a plant on top and wooden planters below.
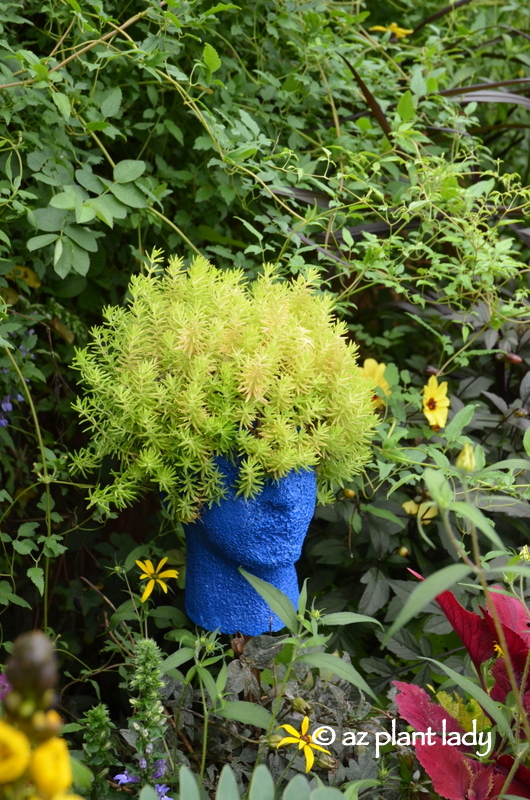
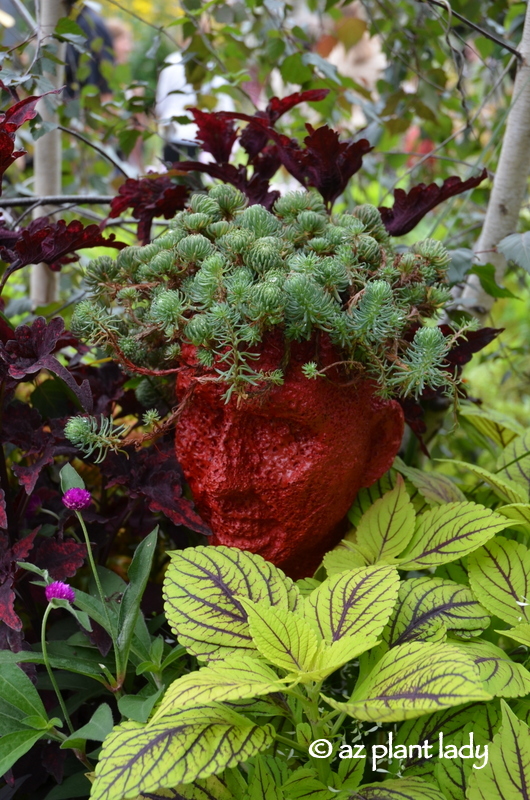
‘Head’ planters are a trendy whimsical element, and I love the extra splash of color that these add.
Elephants food (Portulacaria afra) would make an excellent ‘hairstyle’ for a head planter.
The elegant beauty of a rusted steel hummingbird.
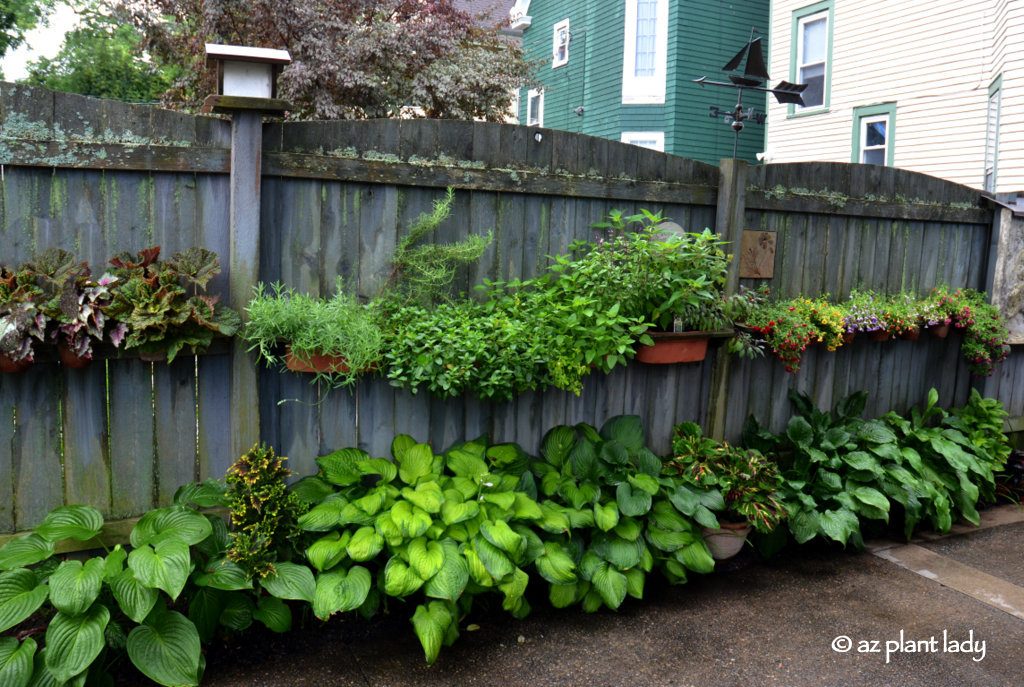
Faced with the view of an uninspiring blank wooden fence? Break up the monotony by adding planters across the base and through the middle.
Succulents would look great used this way through the middle with potted lantana at the base.
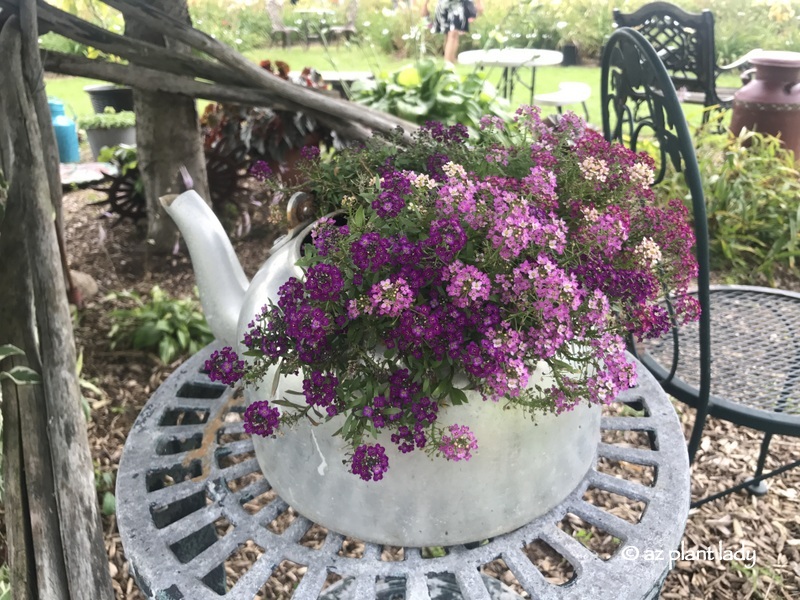
An antique store kettle finds new life as a planter for purple alyssum.
Cool season annuals such as petunias or pansies would go nicely in here. Succulents are a good choice for a year-round planting.
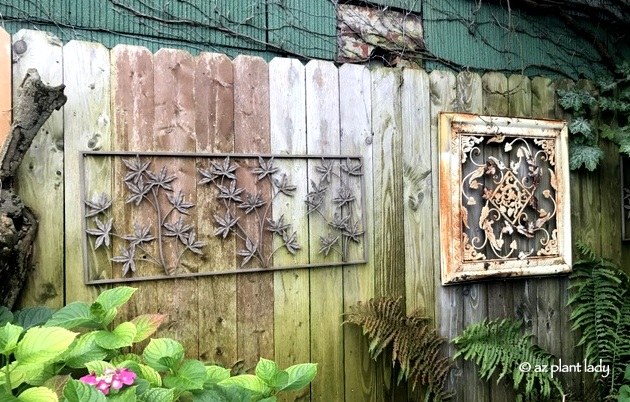
Metal wall hangings are a great way to decorate vertical spaces.
Another stump makes a suitable resting spot for a couple of birdhouses and a colorful ladder.
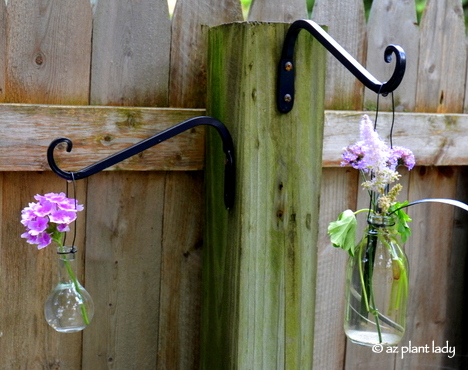
A simple, yet elegant way to display the blooms in your garden in small glass jars.
Lantana, roses, Texas sage or yellow bell blossoms would look lovely displayed like this for a party.
Are you feeling inspired? I certainly am. I invite you to stroll through an antique shop, a thrift store, or even the garage sale down the street. You never know what will catch your attention and be used to add artistic flair and whimsy to your garden.
https://www.azplantlady.com/wp-content/uploads/2017/09/garden_art_painted_flower_fence-1.jpg600800arizonaplantlady@gmail.comhttps://www.azplantlady.com/wp-content/uploads/2025/08/AZ-Plant-Lady-Logo-small.jpgarizonaplantlady@gmail.com2017-09-22 12:51:002022-10-02 01:19:55Creative Garden Art and Whimsy Add Welcome Interest
Disclosure: This blog post contains affiliate links. If you click through and make a purchase, I may receive a commission (at no additional cost to you). Thanks for your support in this way.
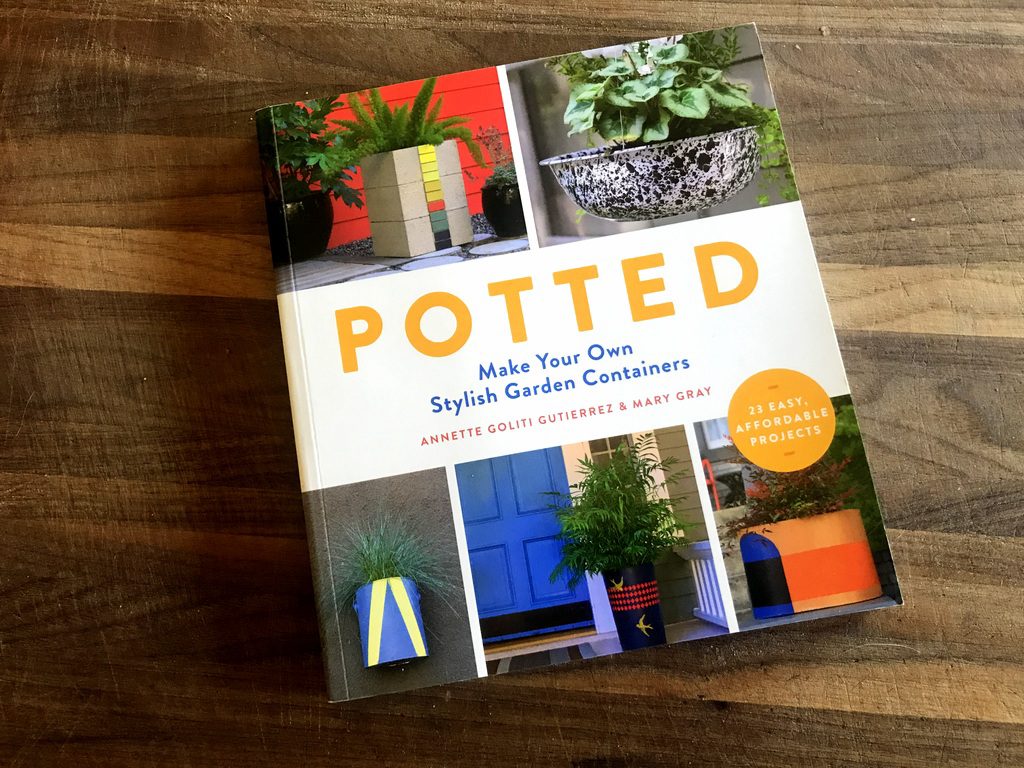
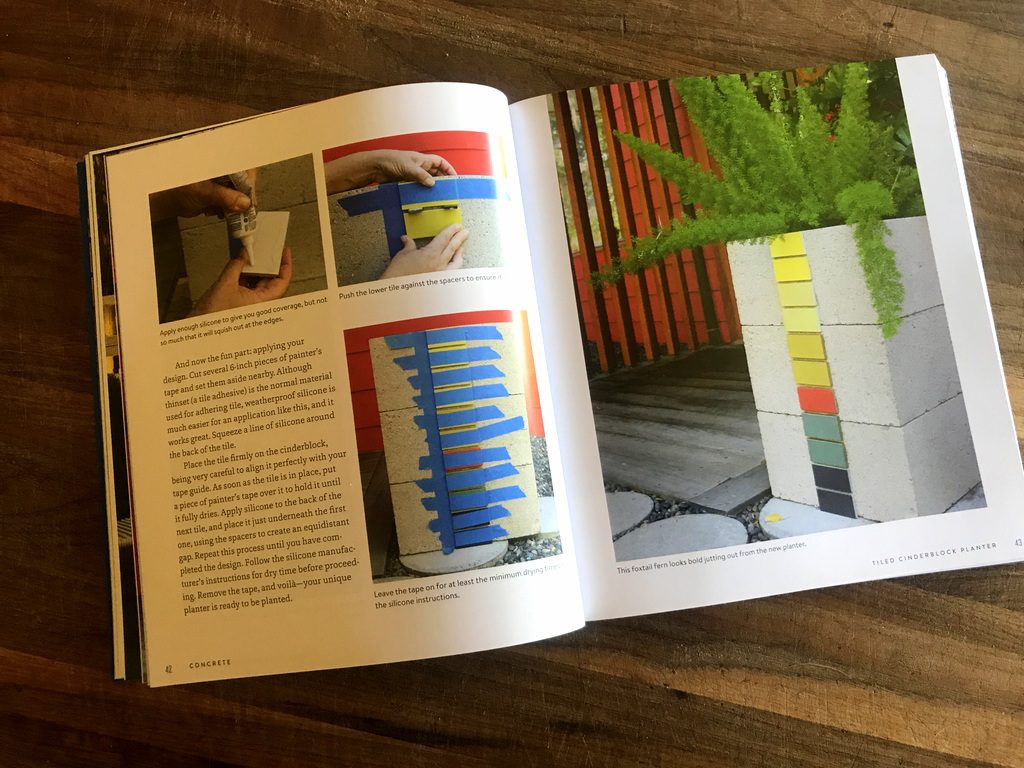
Do you have a container, or two, filled with flowers or maybe a succulent? Chances are you do. Many of us settle for the bland shades of brown or beige when choosing pots and miss out on an excellent opportunity to add interest and color to our outdoor spaces.
I am a strong proponent ditching boring neutrals in favor of colorful pots with unique shapes and textures in my ongoing attempt to encourage people to think of plant containers as outdoor decor. As a result, I was thrilled with I was contacted by Annette Gutierrez, one of the authors of Potted: Make Your Own Stylish Garden Containers and asked to review her book.
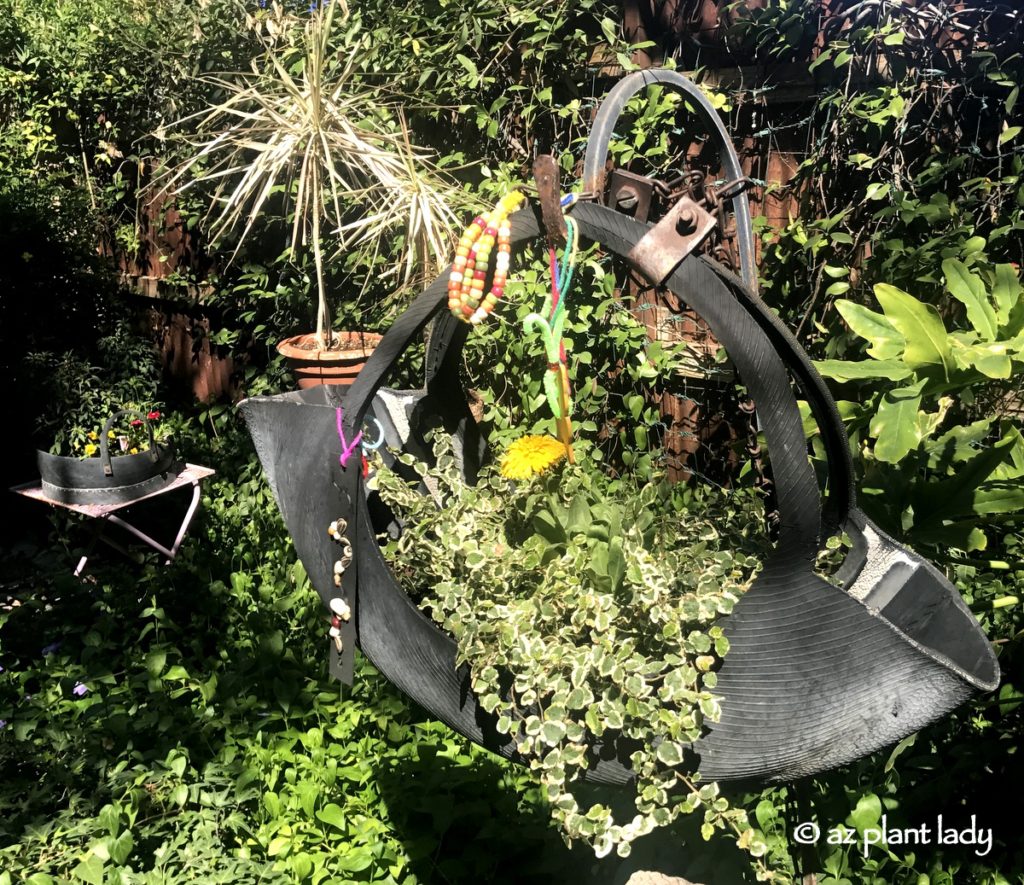
Innertube from an old tire converted into a planter at the Tucson Botanical Garden.
Within the pages of Potted, Annette and her co-author, Mary Gray, inspire as they show the reader how to create unique and unusual containers that create instant interest.
During my garden travels, I seek everyday items that are reimagined and converted into unorthodox planters such as a recycled tire innertube.
Annette and Mary refer to themselves as decorators rather than gardeners and own a store in Los Angeles, aptly named Potted where they create innovative receptacles for plants using everyday items such as cinderblock, PVC pipe, and even old wood doors to name but a few.
If you have ever shopped for colorful or unique containers, you’ve undoubtedly experienced sticker shock at the high prices and settled for a boring, but sturdy terra-cotta pot. Over twenty container ideas await the reader, each of which, meet the following criteria:
It must be affordable
Materials must be easy to find
A good DIY project for the average person
I must admit that after finishing the book, I was looking at ordinary items like paint cans and plastic garbage pails in a different light – decorated and filled with plants.
I can hardly wait to get started! How about you?
Disclosure: I received a copy of ‘Potted’ free of charge for my honest review.
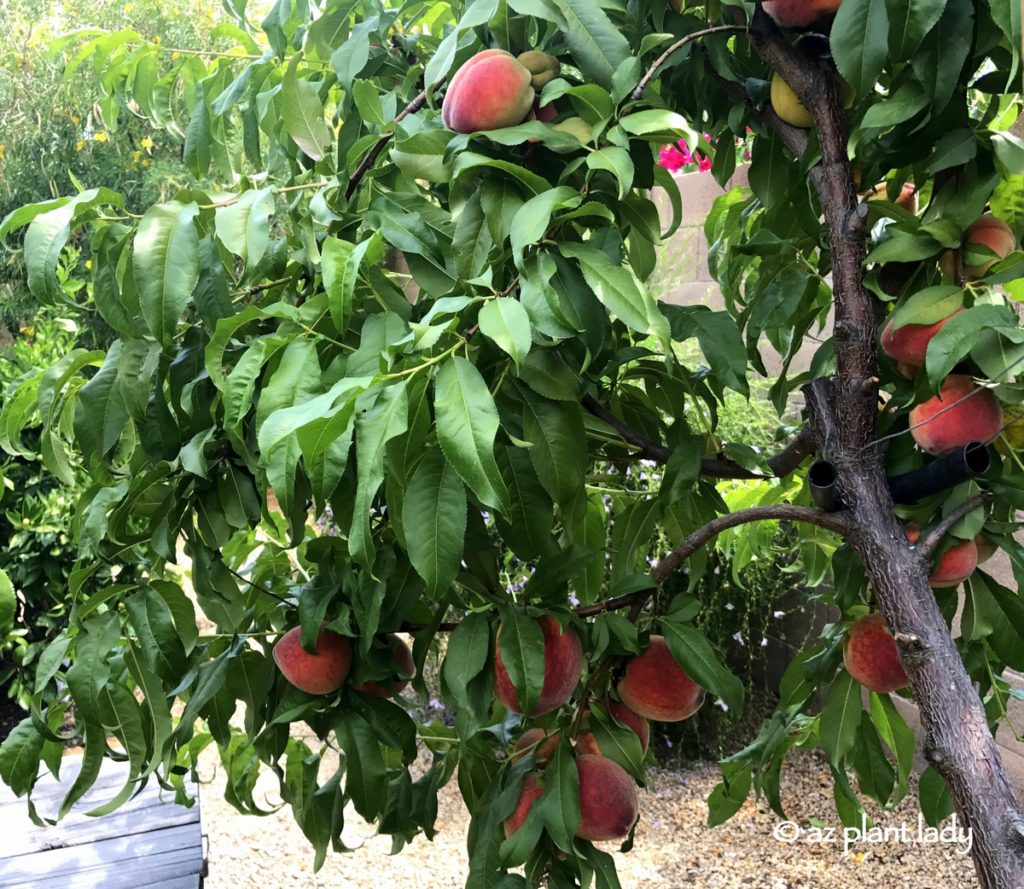
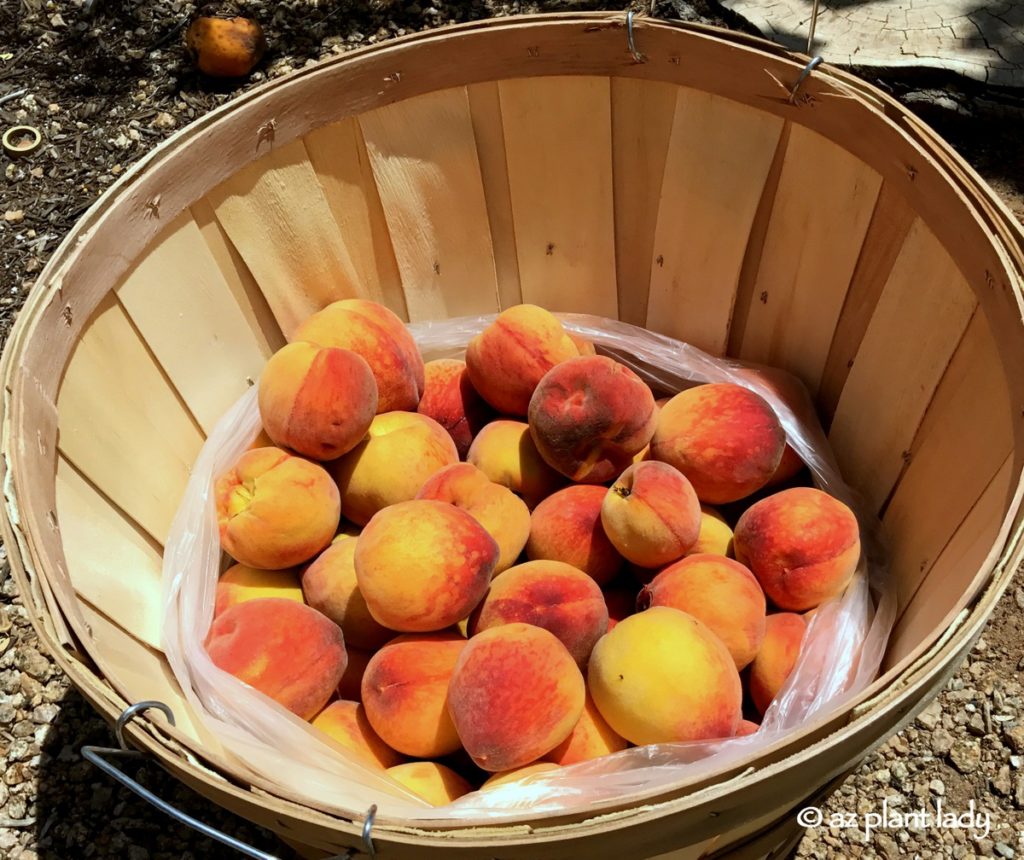
It’s one of my favorite times of year in the garden – my peach trees are heavily laden with delicious, sweet fruit ready for picking.
Many people are surprised to learn that you can grow peaches in Arizona, but they do very well. However, they do ripen earlier than in cooler climates. May is peach season here in the desert.
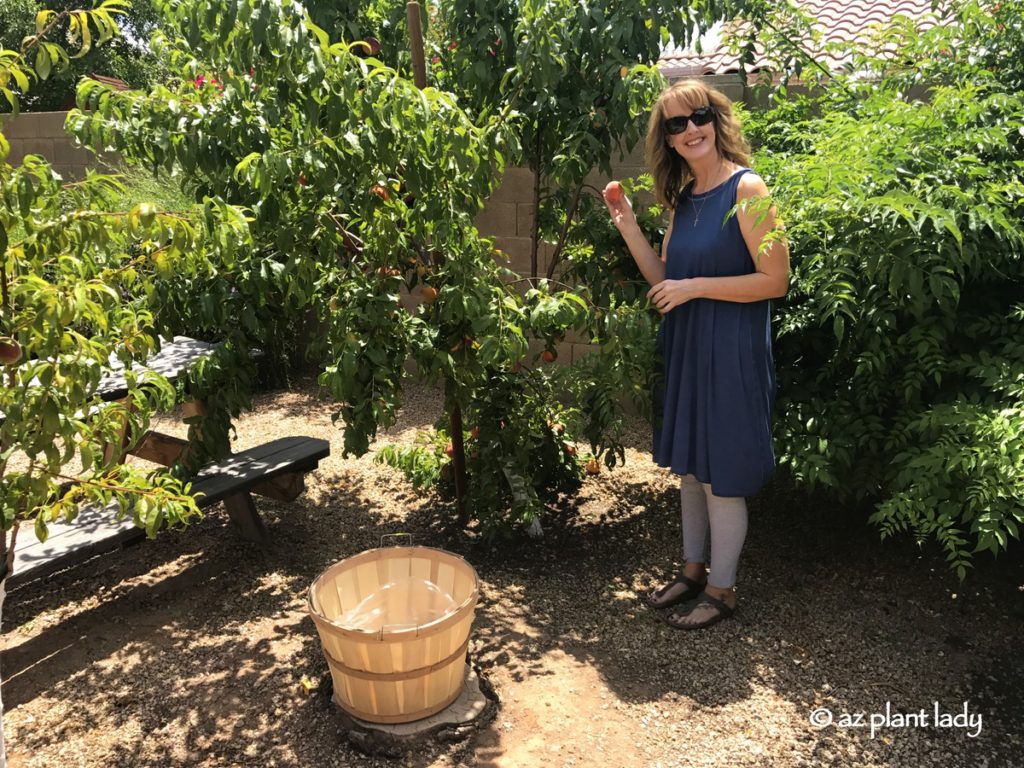
My peach trees sit outside my kitchen window, and I’ve been keeping my eye on them to see when they were ready to harvest. Finally, the day arrived, and I brought out my bushel basket and got to picking.
One peach tree can provide you with most of the peaches you need. Last year, I made peach blueberry jam, which was so good, that it didn’t last long. Today, I’m planning on making regular peach jam, but I can always buy peaches from the store at another time to make other variations if I choose to.
Every May, I haul out my water bath canner, and canning jars, and spend 2 hours making delicious peach jam.
Growing peaches and making jam isn’t difficult or expensive. Here is a link to the guidelines that I follow.
https://www.azplantlady.com/wp-content/uploads/2017/09/AZ-Plant-Lady-Graphic-Video.jpg14431442arizonaplantlady@gmail.comhttps://www.azplantlady.com/wp-content/uploads/2025/08/AZ-Plant-Lady-Logo-small.jpgarizonaplantlady@gmail.com2017-05-19 12:05:472022-10-02 04:39:14Growing Peaches and Making Jam
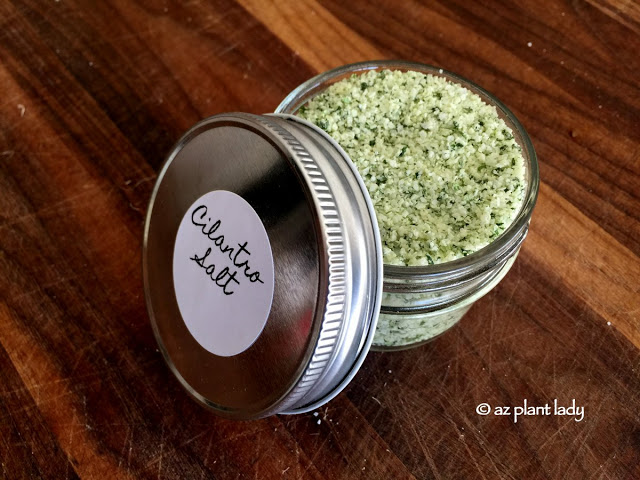
Are you someone who adores cilantro, looking for more ways to add it to their favorite Mexican food?
Here is a new use for cilantro that deserves a spot on your pantry shelf – cilantro herb salt.
Cilantro herb salt can be used to flavor food where you would normally add salt and cilantro separately. It is so easy to make, you’ll want to create a huge batch for yourself and friends and family.
Here is how to make your own:
1. Add 1 bunch of cilantro (cutting the stems off first) to your food processor.
2. Add 1 1/2 cups of kosher salt and pulse until the cilantro is mixed in and the salt turned green.
3. Place the cilantro salt mixture on a baking sheet and bake at 225 degrees for 30 minutes. Remove from the oven and lightly mix up and bake for another 30 minutes.
4. Allow to cool before putting it in an airtight glass jar.
Your cilantro herb salt will keep for a long time, but the flavor is strongest when used within 6 months.
So what are you waiting for? Grab some cilantro and kosher salt today and make some delicious salt for yourself and more for gifts.
**Cilantro herb salt is just the beginning. Learn how to make basil or rosemary herb salts too!
https://www.azplantlady.com/wp-content/uploads/2015/11/DIY_Cilantro_Salt_Herbs-1.jpg480640arizonaplantlady@gmail.comhttps://www.azplantlady.com/wp-content/uploads/2025/08/AZ-Plant-Lady-Logo-small.jpgarizonaplantlady@gmail.com2015-11-02 19:54:002022-10-22 10:11:44DIY Cilantro Herb Salt
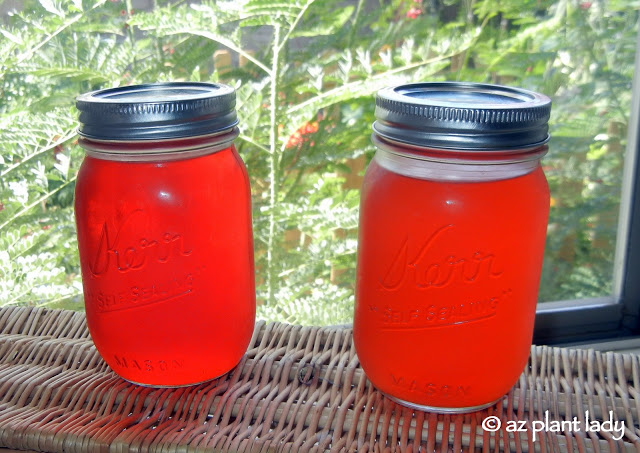
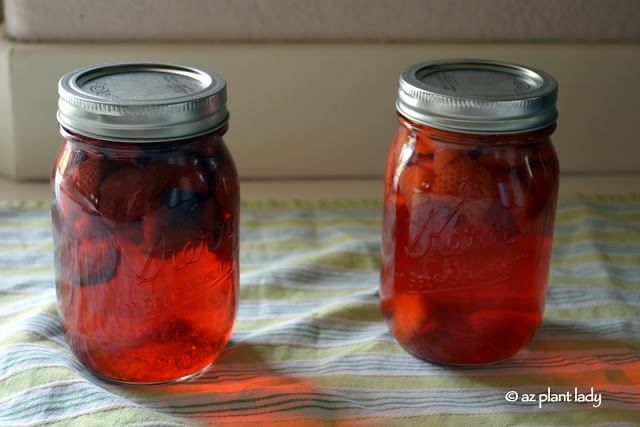
I am always looking for new ways to make things from what I grow in my garden.
Fruit vinegar is an easy and fun way to use the fruit you may have growing in the garden.
What can you use fruit vinegar for? I use them to create vinaigrettes, marinades, and glazes, which add delicious and unexpected flavor.
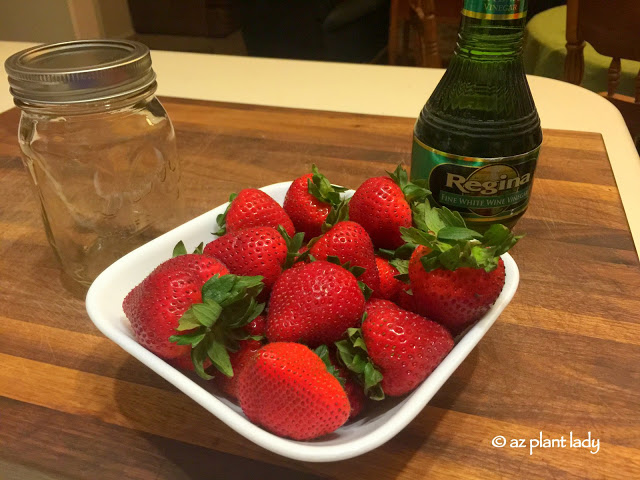
Making fruit vinegar is simple to do – all you need is the fruit of your choice (chopped) and white wine vinegar. Fruits that can be used include apples, berries, peaches, pears, plums, and strawberries.
I recently made some strawberry vinegar that is so good, my husband has been making his own salads – it tastes that good.
The process is the same for whatever type of fruit you choose. Are you ready?
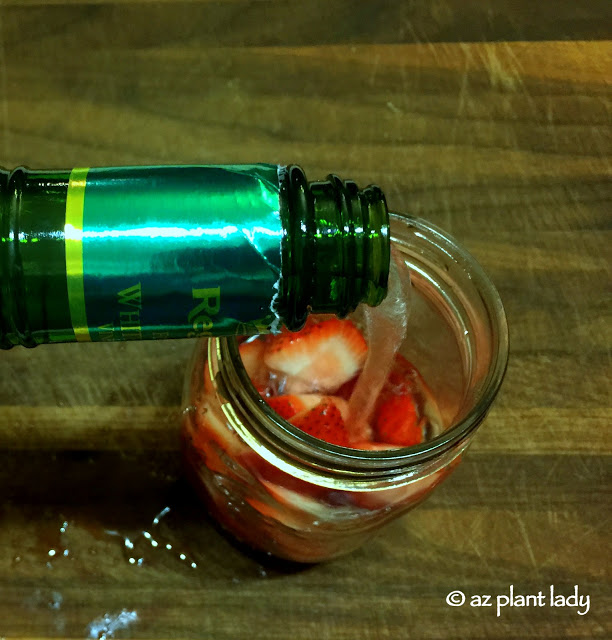
1. Dice fruit into 1-inch size pieces.
2. Fill a glass jar 1/3 of the way full of chopped fruit and then pour white wine vinegar until it reaches the top.
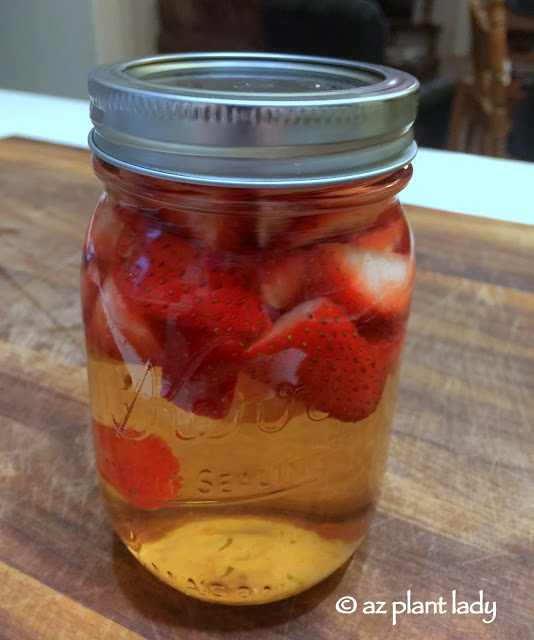
3. Store your fruit/vinegar jar in a cool, dark place such as a pantry for 4 weeks.
4. Once a week, shake the jars, to help mix up the contents.
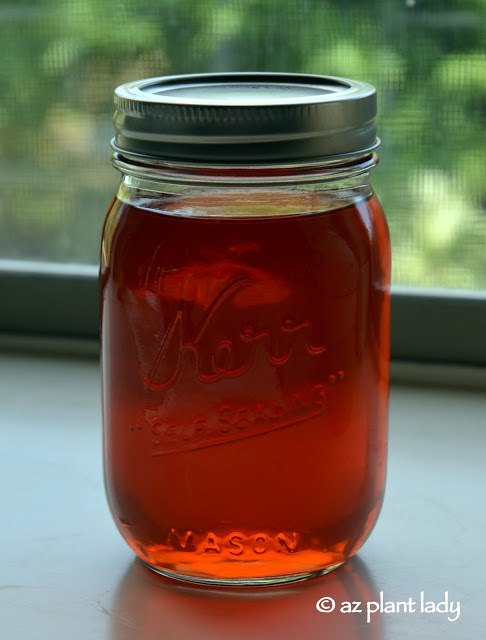
After a month has passed, your fruit will have taken on a colorless appearance while the vinegar will have beautiful, color, which means lots of delicious flavors.
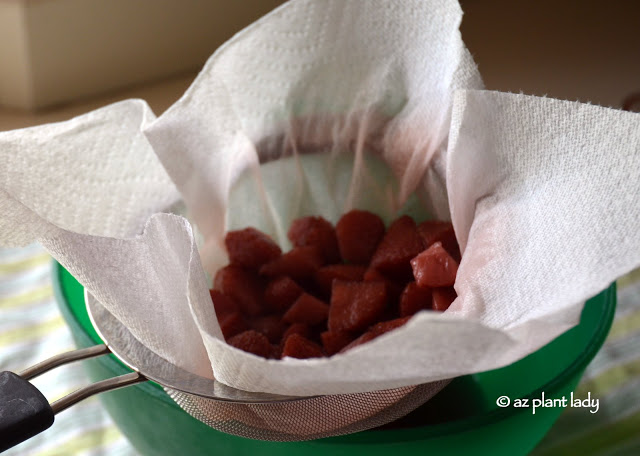
5. Place a strainer over a bowl and put a paper towel inside. Pour out the contents of the jars.
6. Pour the strained liquid into a clean jar. Store in the refrigerator for up to 3 months.
Congratulations! You now have a jar filled with delicious fruit vinegar ready to use to flavor your favorite dishes.
You may wonder how I used my latest batch of strawberry vinegar. Well, I have a top-secret family recipe for salad dressing that my kids and husband love.
It’s from my grandma, who coincidentally, was NOT a great cook – but she certainly made a delicious salad dressing.
I’m sure that she would be tickled pink to know that I am sharing it with all of you – just click the link below for the recipe.
I hope you decide to make some fruit vinegar too! In addition to strawberry vinegar, I also like to make it from peaches from our fruit trees – you can see how I made this earlier, here.
How about you? What fruit would you choose to make vinegar from?
https://www.azplantlady.com/wp-content/uploads/2015/08/DIY_Fruit_VinegarJun132C20122C10-40AM.jpg453640arizonaplantlady@gmail.comhttps://www.azplantlady.com/wp-content/uploads/2025/08/AZ-Plant-Lady-Logo-small.jpgarizonaplantlady@gmail.com2015-08-18 19:02:002025-08-12 01:39:00DIY In The Garden: Making Fruit Vinegar
For those of us who live in warm, southern climates, you’ll often see a citrus tree or two in the growing in the backyard.
While I do have a lemon and orange tree growing in my garden, that is just the beginning of my fruit crop. I also have a pair of apple and peach trees that generously provide us with fruit in late spring.
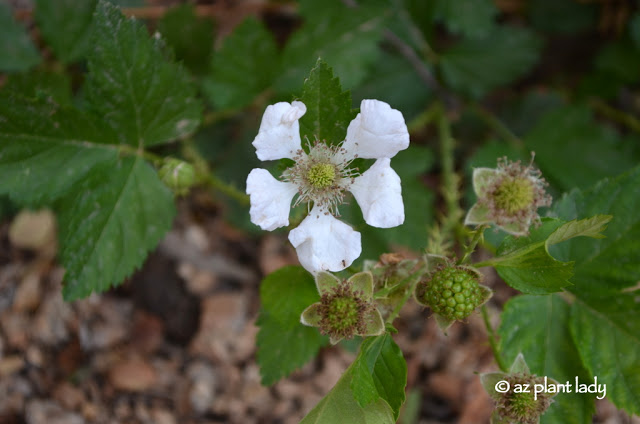
The final fruit crop that I grow isn’t found on a tree but rather on bushes.
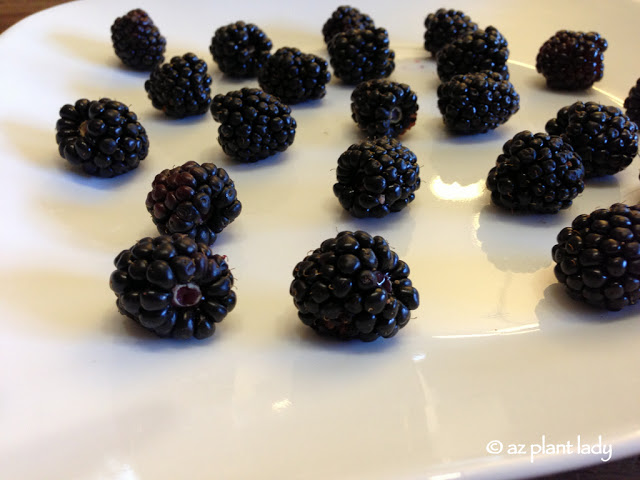
Ever since I was a child in Southern California, I have loved blackberries. We had a line of blackberry bushes growing along the back wall of our suburban home and it was often a race between us and our dog ‘Smitty’ to see who would get to them first.
Now, I have my own blackberry bushes growing in my side garden, which are located right behind my apple trees.
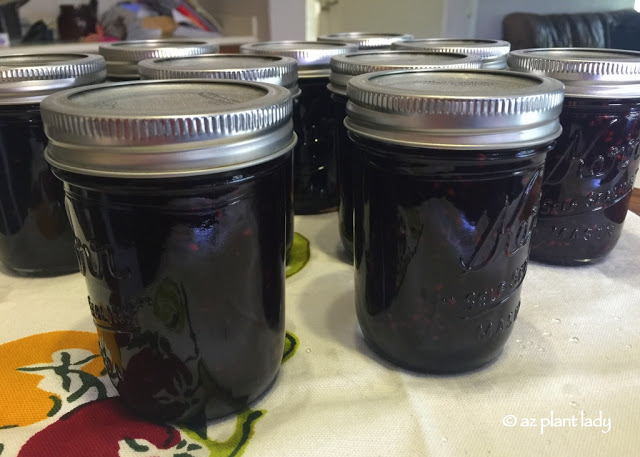
While I enjoy eating fresh fruit, I also like to make jam so that I can enjoy the fruits of my garden throughout the entire year.
Last month, I made several batches of peach jam and last week, it was time to make my first batch of blackberry jam.
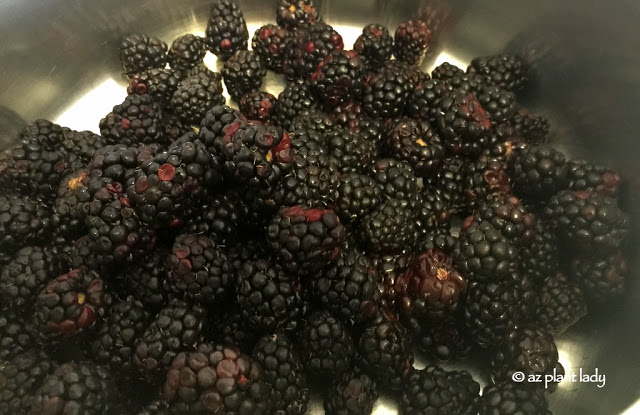
It took a few weeks to get all of the blackberries picked from the bushes. The reason for this is that not all the berries ripened at once, so we would freeze them after picking until the entire bush was clean of berries.
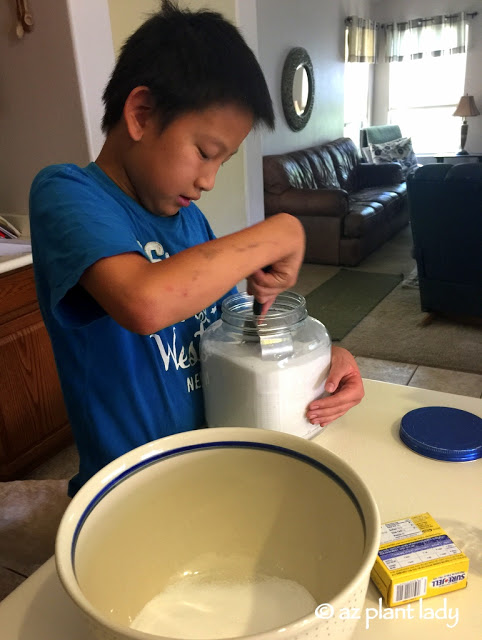
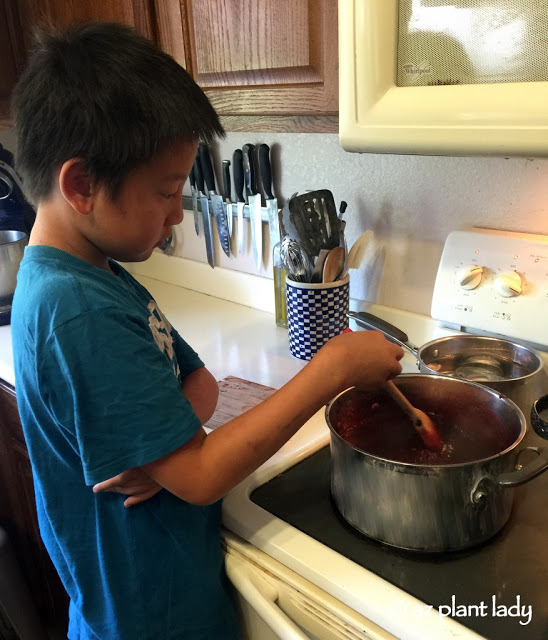
My 13-year-old son asked if he could help me make the jam. I was pleasantly surprised that he would want to help me, but I will take any opportunity I can to spend time with my son.
We gathered supplies – canning jars with lids, sugar, powdered pectin and a canner.
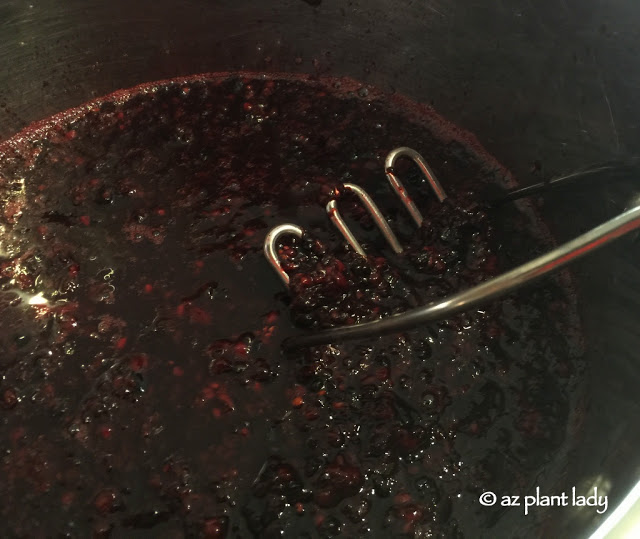
The first step involved mashing the blackberries in a large pot before adding the powdered pectin.
The blackberry mixture had to be heated to a high temperature until it began to boil.
Then it was time to add the sugar. Jam takes a lot of sugar, but I don’t like mine overly sweet, so I decreased the amount of sugar by 1 cup.
It helps to have the sugar pre-measured before boiling the fruit mixture.
After adding the sugar, we needed to heat the mixture back up to boiling. It was nice to have a helper, since you have to stir the entire time. Once it begins to boil, you have to let it continue for 1 minute before taking off the heat.
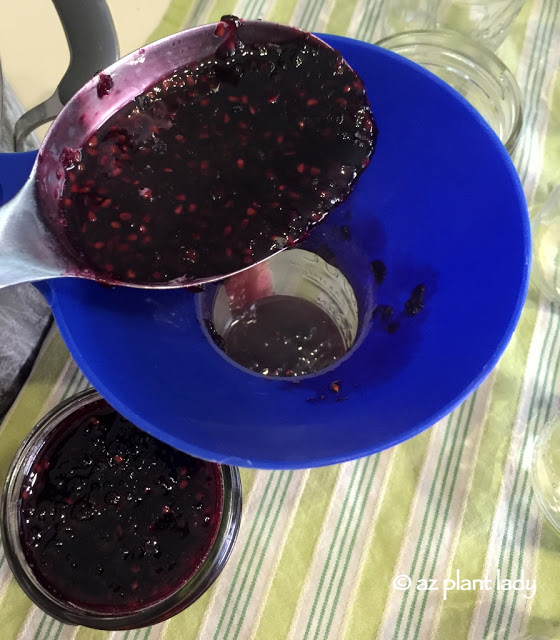
Take a couple of minutes to scoop off any foam that accumulated on the top of the blackberry jam before filling sterilized jam jars.
We carefully added the hot blackberry jam mixture into the jam jars. It smelled so good that we were tempted to try some, but decided against it since we didn’t want to burn our mouths.
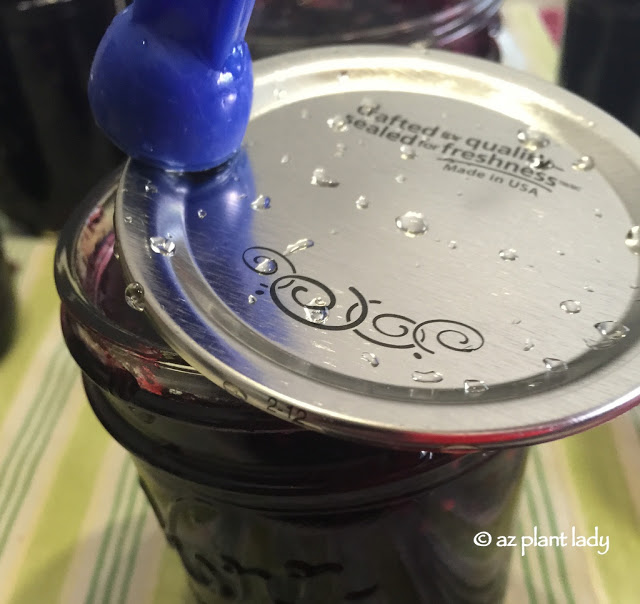
Using the handy magnet utensil that came with my canning kit, I carefully put on the lids.
At this point, you can allow the jam to cool and then enjoy it on toast or English muffin. But, you will need to refrigerate the jam unless you want to preserve it by processing it by water bath canning.
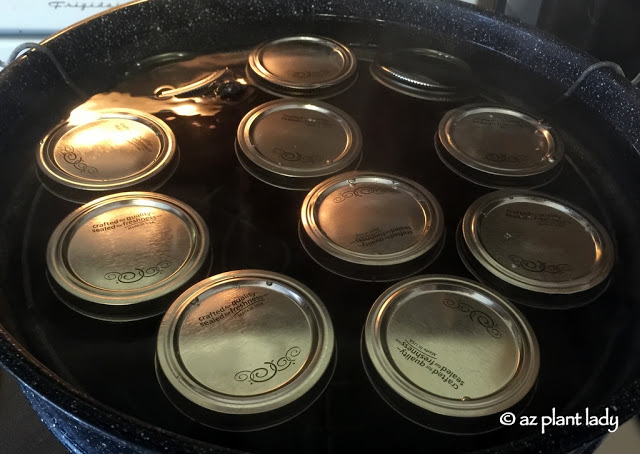
A hot water canning bath involves submerging the jars of jam in boiling water for several minutes. This will preserve the blackberry jam and allow it to last over a year on the pantry shelf.
Canning kits include a large pot, metal insert, funnel, magnet utensil for lids and tongs. They are relatively inexpensive and can be found at Walmart or Amazon. I have even seen them in my local Ace Hardware store.
After a 10-minute boiling water bath, the jam was ready to be taken out carefully with tongs.
We let them sit overnight to cool before eagerly tasting the fruits of our labors.
It is hard to compare the delicious taste of homemade jam that was made from fruit from your own garden. In fact, I find myself tempted to make a second piece of toast just so I can enjoy some more delicious blackberry jam.
Of course, you don’t have to grow your own fruit to be able to make jam – simply buy some fruit at your local grocery store or farmers market. Earlier this month, I saw 1/2 pint containers of blackberries on sale for 97¢.
While I make jam every year, this was the first time I’ve made blackberry jam and I can’t wait until next year to make some more.
Thankfully, I have eleven jars to last me through the next year.
***********************
Want to learn more about canning?
If you are lucky, maybe your grandmother, mother, or aunt can teach you. 5 years ago, my mother taught me how to make jam and I’ve never stopped.
If you don’t have anyone to teach you, a simple Google search can help you find a class offered nearby or you can learn how to online.
https://www.azplantlady.com/wp-content/uploads/2015/06/blackberry_flower.jpg424640arizonaplantlady@gmail.comhttps://www.azplantlady.com/wp-content/uploads/2025/08/AZ-Plant-Lady-Logo-small.jpgarizonaplantlady@gmail.com2015-06-02 13:00:002022-10-23 09:55:22Blackberries, Jars and a Young Helper
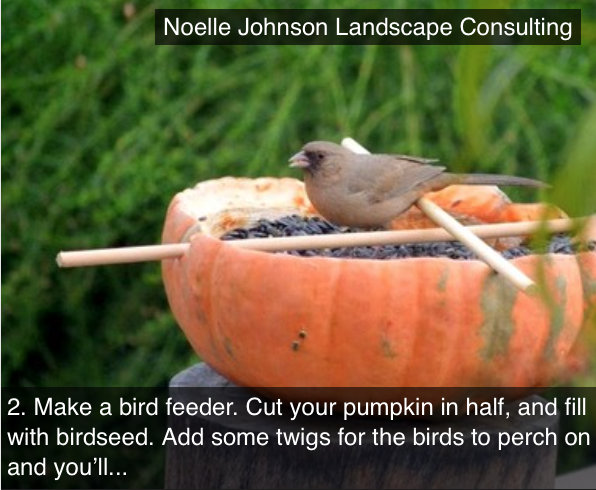
Did you enjoy your Halloween? While you may be spending your morning cleaning up small candy wrappers and trying to get your kids out of bed after they crashed after their sugar high – I’d like to ask you a question:
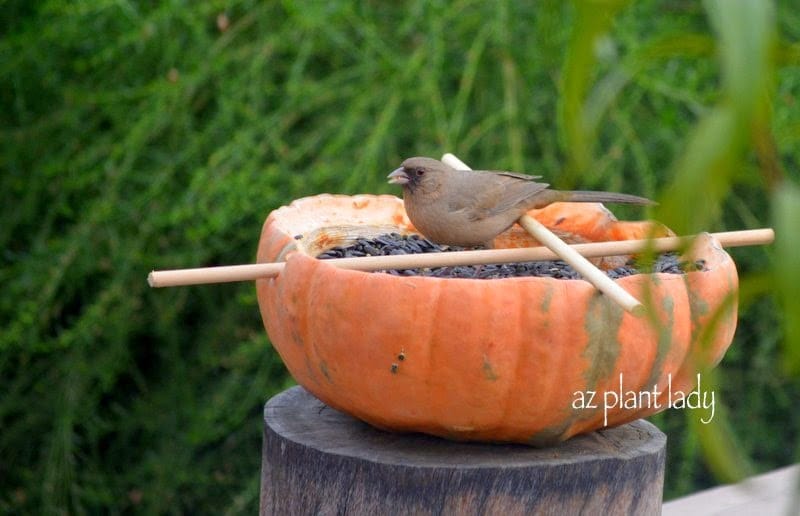
Before tossing it in the trash can (or compost pile) – how about getting a little more use out of it and creating a pumpkin bird feeder?
Last year, I took my heirloom pumpkin and transformed it into a bird feeder.
Needless to say, the birds were thrilled and my kids and I had fun seeing how many different birds visited our pumpkin feeder.
**You can make your own pumpkin feeder and I recently wrote a “how-to” post for Birds & Blooms Magazine. You can find my blog post, “Backyard Project: DIY Pumpkin Bird Feeder”.
So how about you? What do you do with your pumpkins after Halloween?
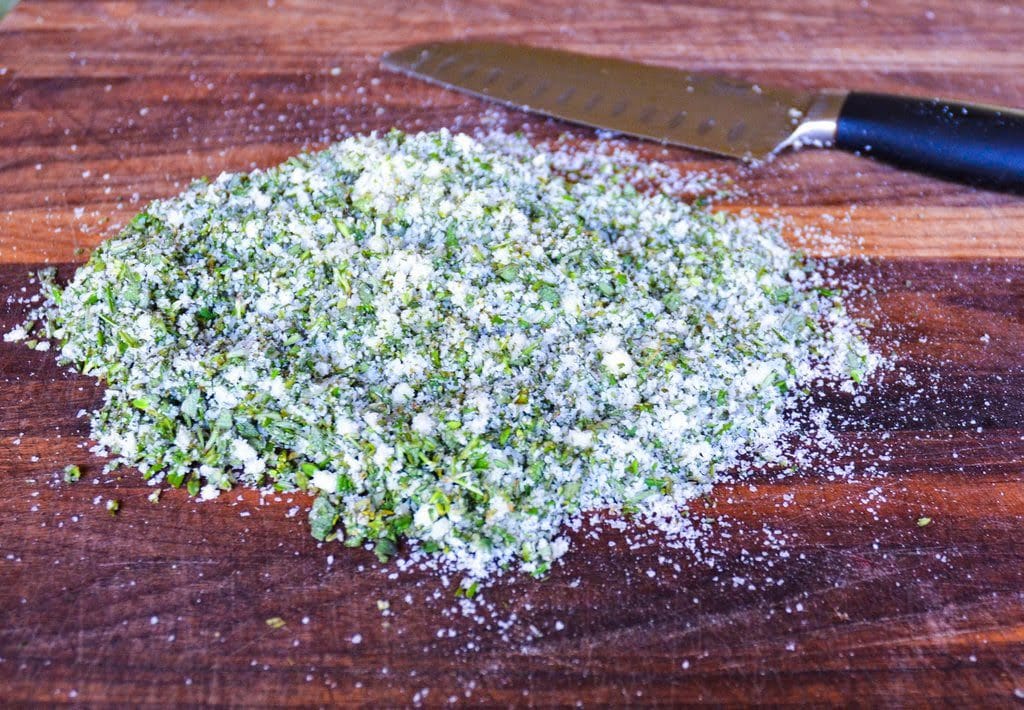
I am always on the lookout for new things to make from the garden.
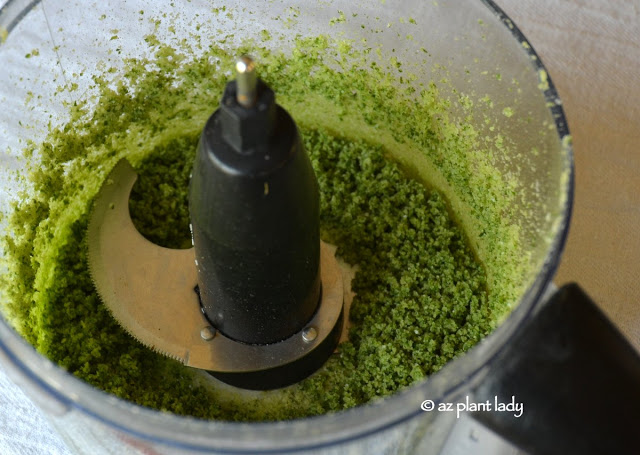
Recently I learned how to make specially flavored salts using herbs from my garden. ‘Herb salts’ have become a popular flavoring tool in the culinary community and they are very easy to make.
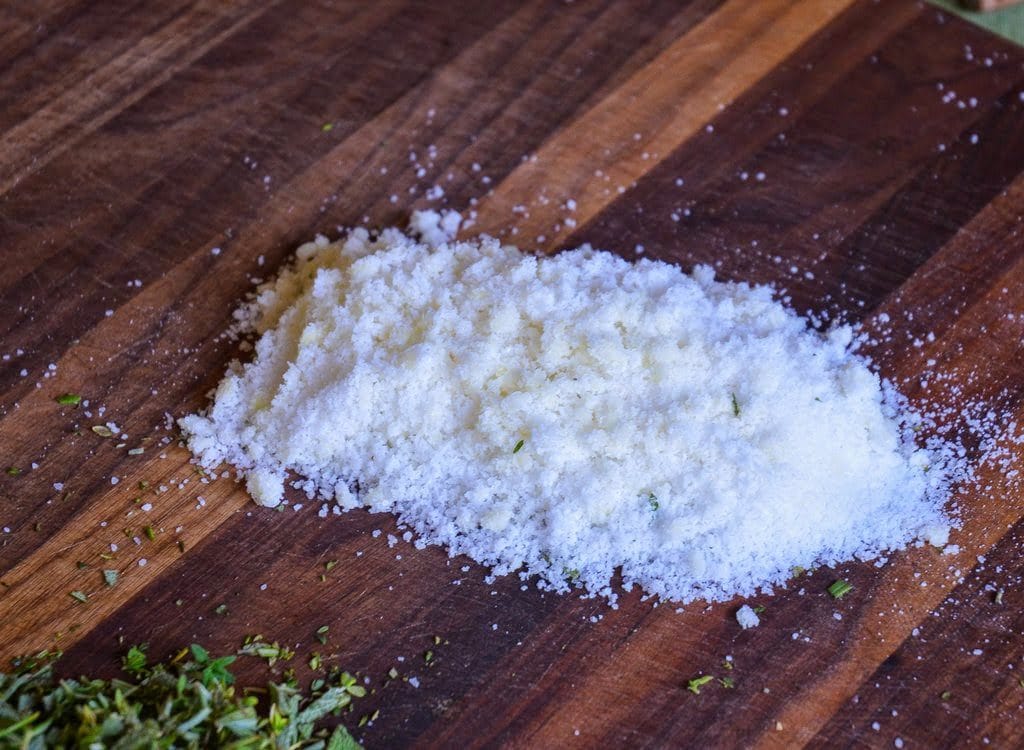
The process of making herb salts starts out looking like this…
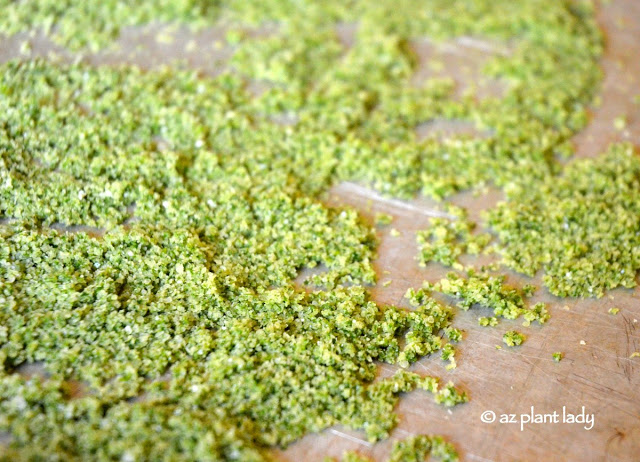
And ends up transformed into this…
Are you interested in making your own herb salts?
Summertime means that many of my herbs are actively growing and I sometimes run of ways to use all of the fragrant leaves of them.
Herb or ‘gourmet’ salts are a great way to preserve herbs while adding a new twist to flavoring my favorite foods.
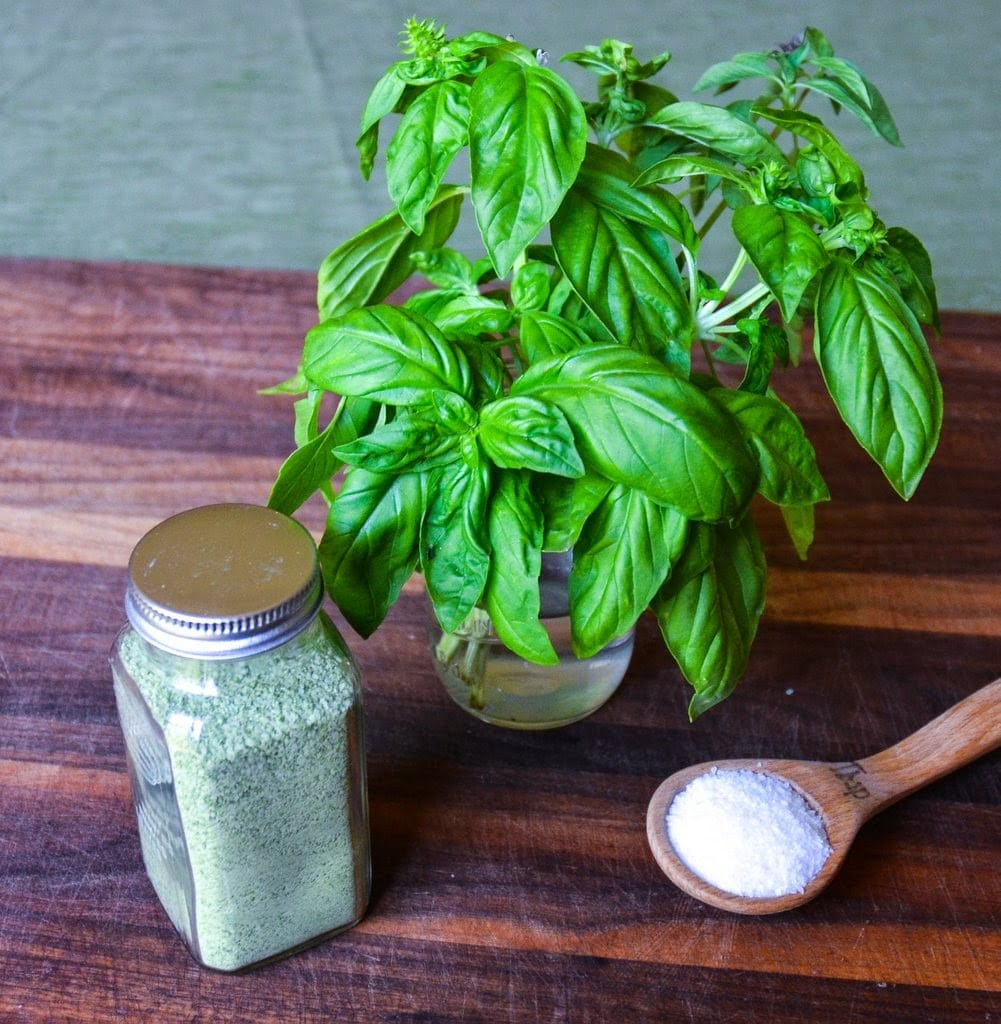
Photo: Basil Salt
In my last post, I shared how to make basil salt using two ingredients – fresh basil leaves and kosher salt.
Today, I’d love to show you how to make your own unique herb salt blend.
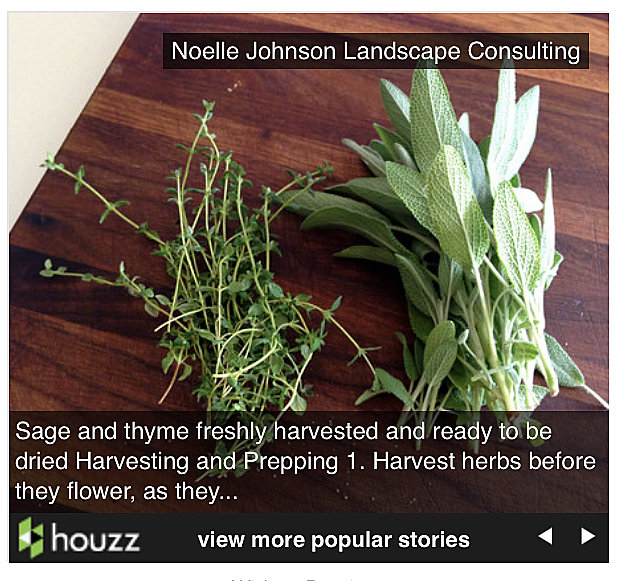
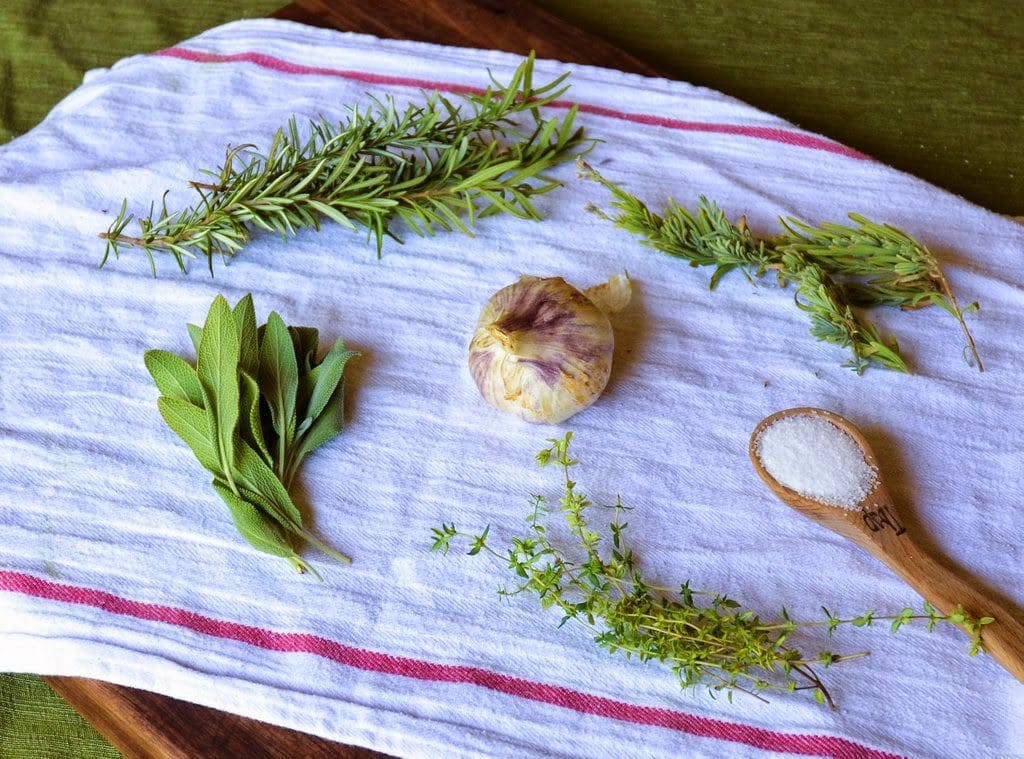
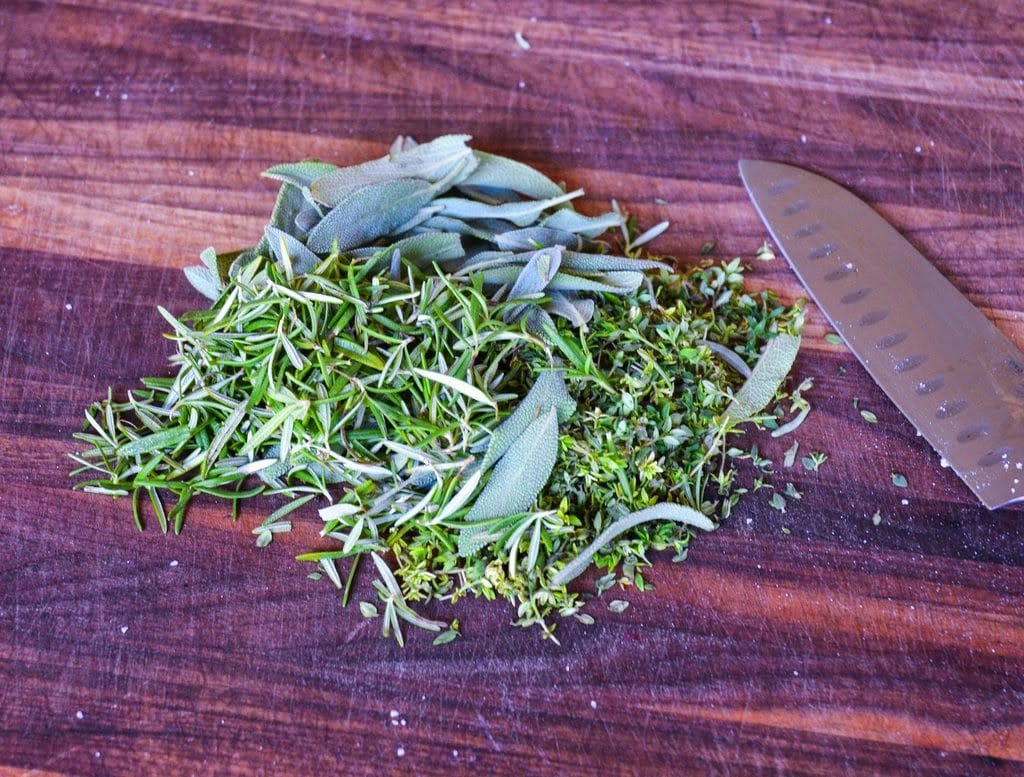
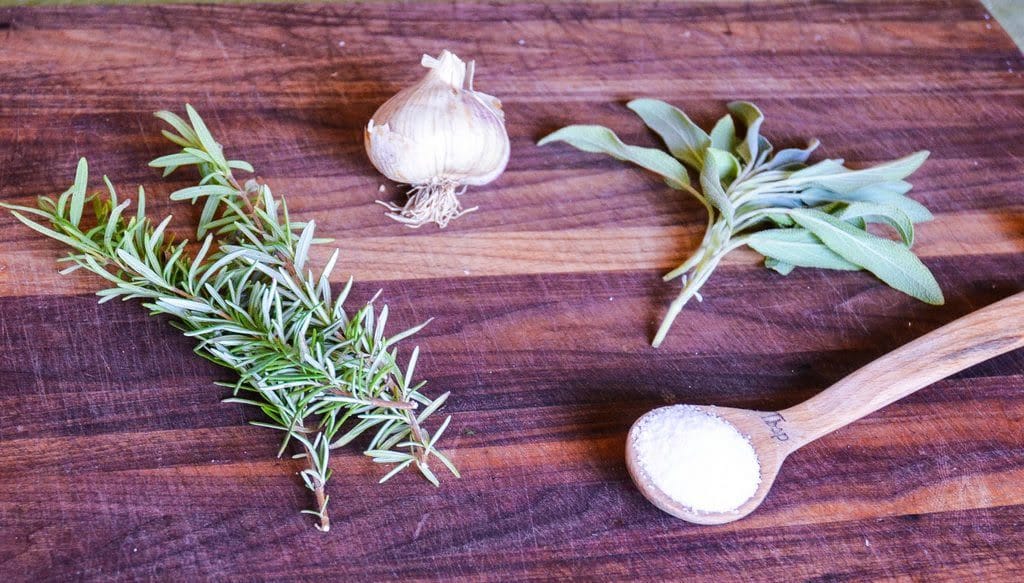
For my herb salt blend, I went out into the garden and looked for a variety of herbs that I love to cook with. I found rosemary, sageand thyme. I then grabbed a head of garlic and kosher salt. I must admit that I was thrilled that I had all these herbs growing in my garden. I grew the garlic too!
For equipment, you should have a cutting board, a sharp knife for chopping, a baking sheet and a glass jar with a lid.
You can make this recipe using a food processor, but it is optional.
1. You will need 2/3 cup rosemary, 2/3 cup sage and 2/3 cup thyme leaves. These are the amounts I used to get the flavor I liked, but you can play around with the ratio of each herb or choose different herbs to get the flavor you want.
2. Place 1/2 cup kosher salt on your cutting board and add 5 peeled garlic cloves and chop them together. The garlic should be finely minced at this point.
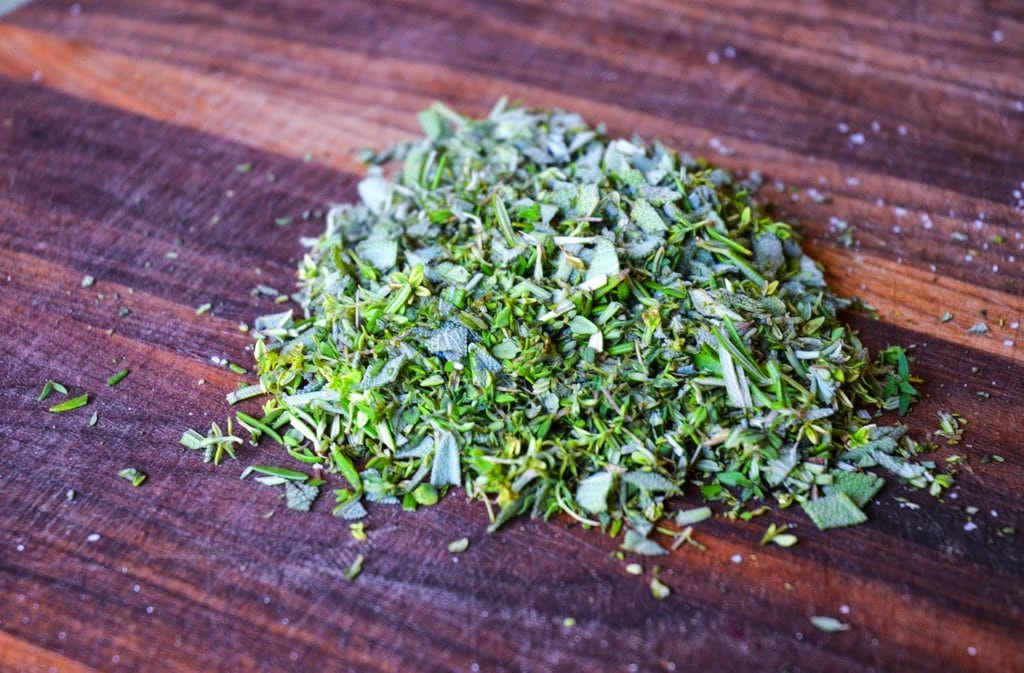
3. Chop all of the herbs together.
4. Combine the salt/garlic and the herbs together and continue chopping until finely chopped.
**You can use a food processor for steps 3 & 4 instead of chopping. Simply put all ingredients in at once and pulse for 30 seconds.
At this point you can use your herb salt to flavor a roast of beef, chicken or pork before cooking or to flavor roasted vegetables. But, if you aren’t using the herb salt right away, continue on…
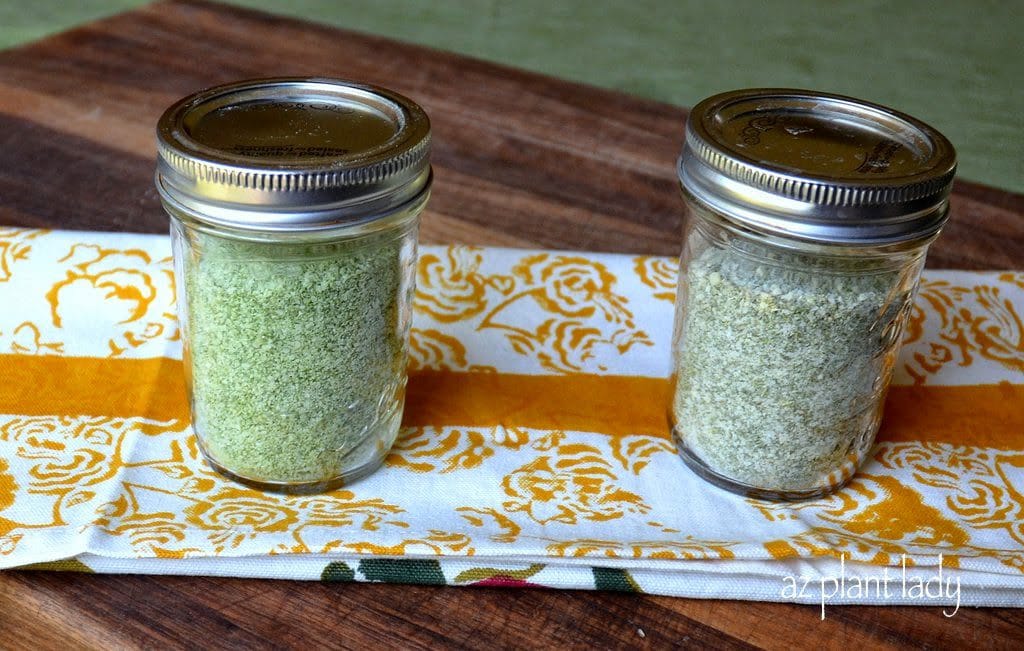
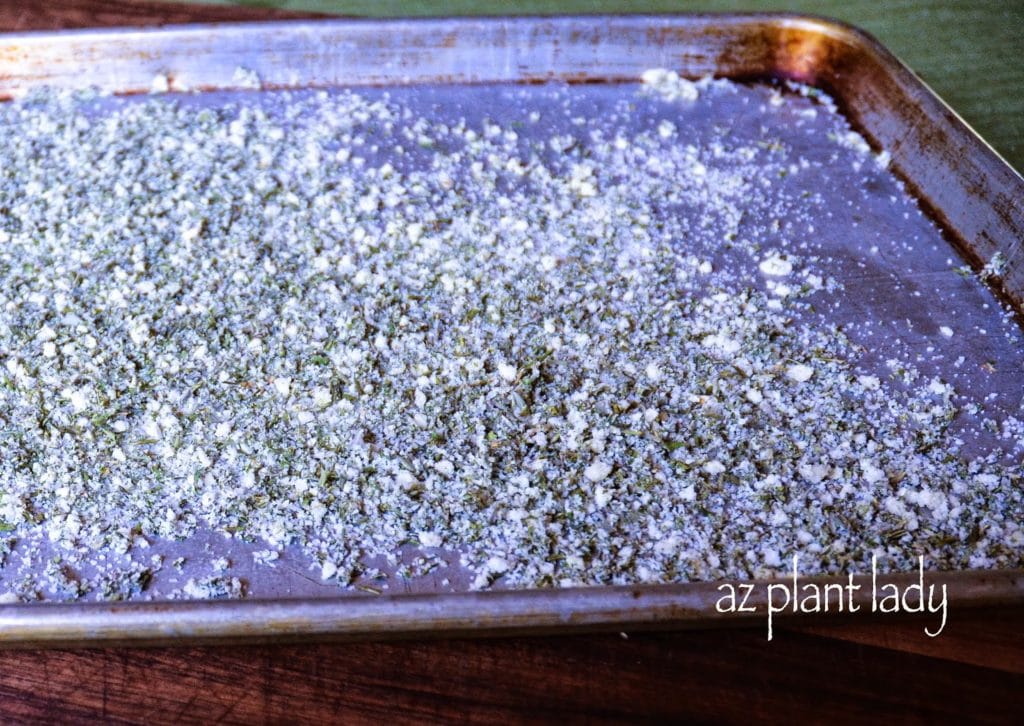
5. Put your herb salt mixture onto a baking sheet in a thin layer and bake in a 200 degree oven for 30 minutes. This step dries out the herb mixture. You can also allow it to air dry over a couple of days instead of putting it into the oven.
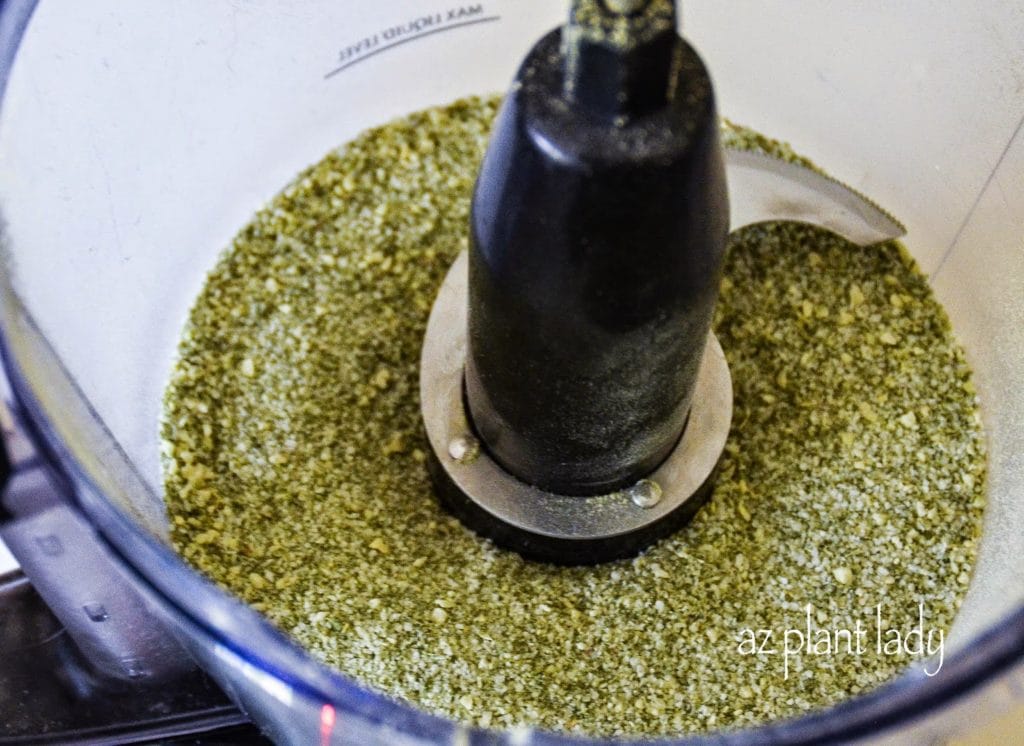
6. Place your dried mixture into a food processor and pulse for 30 seconds to get rid of any lumps.
If you don’t have a food processor, you can put the dried mixture into a Ziploc bag and roll it with a rolling pin until it is finely ground up.
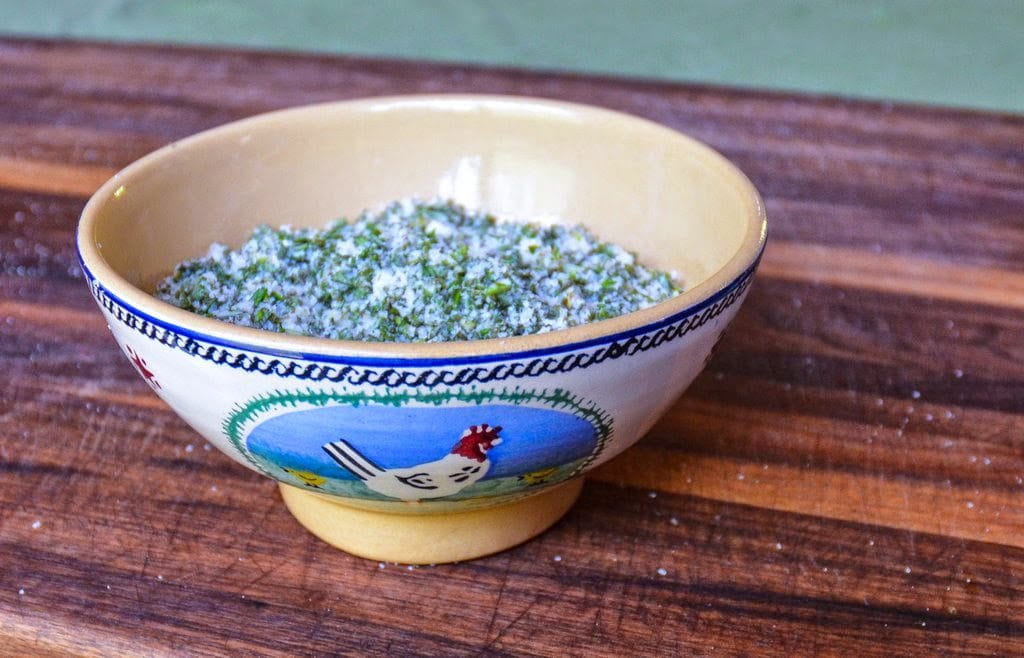
7. Put your herb salt into a glass jar with a tightly-fitted lid. Store in a dark, dry place with your spices and dried herbs to preserve its flavor.
I will use my herb saltblend to flavor a pork loin, baked chicken or even a beef roast. It would also taste great when sprinkled on roasted vegetables or put into soups, don’t you think?
As you can imagine there are a number of different types of herb salts that you can make. Here are a few different combinations that you might want to try:
Photo: Rosemary Sage Garlic Salt
All of these herb salt blends can be made following the same steps as I have done for my herb salt blend – except where noted.
Rosemary Lemon Pepper Salt – 1/3 cup rosemary leaves, 2 tablespoons lemon zest, 1 teaspoon freshly ground black pepper and 1/2 cup kosher salt. *(Increase cooking time to 1 hour)
Rosemary Sage and Garlic Salt – 1/2 cup of rosemary leaves, 1/2 cup sage, 5 peeled garlic cloves and 1/4 cup kosher salt.
Sage Thyme and Garlic Salt – 1/2 cup sage, 1/2 cup thyme, 5 peeled garlic cloves and 1/4 cup kosher salt.
If your garden is filled with herbs, this is a creative way to use them in the kitchen or give them as gifts. Even if you don’t have a garden filled with herbs, you can find fresh herbs at your local grocery store or farmers market.
So, how about you? What would herb(s) would your ideal herb salt contain?
https://www.azplantlady.com/wp-content/uploads/2014/08/DIY-Herb-Salt-1.jpg7591024arizonaplantlady@gmail.comhttps://www.azplantlady.com/wp-content/uploads/2025/08/AZ-Plant-Lady-Logo-small.jpgarizonaplantlady@gmail.com2014-08-12 14:10:002022-11-05 00:53:15DIY Herb Salt Blends From the Garden
We use cookies on our website to give you the most relevant experience by remembering your preferences and repeat visits. By clicking “Accept All”, you consent to the use of ALL the cookies. However, you may visit "Cookie Settings" to provide a controlled consent.
This website uses cookies to improve your experience while you navigate through the website. Out of these, the cookies that are categorized as necessary are stored on your browser as they are essential for the working of basic functionalities of the website. We also use third-party cookies that help us analyze and understand how you use this website. These cookies will be stored in your browser only with your consent. You also have the option to opt-out of these cookies. But opting out of some of these cookies may affect your browsing experience.
Necessary cookies are absolutely essential for the website to function properly. These cookies ensure basic functionalities and security features of the website, anonymously.
Cookie
Duration
Description
cookielawinfo-checkbox-analytics
11 months
This cookie is set by GDPR Cookie Consent plugin. The cookie is used to store the user consent for the cookies in the category "Analytics".
cookielawinfo-checkbox-functional
11 months
The cookie is set by GDPR cookie consent to record the user consent for the cookies in the category "Functional".
cookielawinfo-checkbox-necessary
11 months
This cookie is set by GDPR Cookie Consent plugin. The cookies is used to store the user consent for the cookies in the category "Necessary".
cookielawinfo-checkbox-others
11 months
This cookie is set by GDPR Cookie Consent plugin. The cookie is used to store the user consent for the cookies in the category "Other.
cookielawinfo-checkbox-performance
11 months
This cookie is set by GDPR Cookie Consent plugin. The cookie is used to store the user consent for the cookies in the category "Performance".
viewed_cookie_policy
11 months
The cookie is set by the GDPR Cookie Consent plugin and is used to store whether or not user has consented to the use of cookies. It does not store any personal data.
Functional cookies help to perform certain functionalities like sharing the content of the website on social media platforms, collect feedbacks, and other third-party features.
Performance cookies are used to understand and analyze the key performance indexes of the website which helps in delivering a better user experience for the visitors.
Analytical cookies are used to understand how visitors interact with the website. These cookies help provide information on metrics the number of visitors, bounce rate, traffic source, etc.
Advertisement cookies are used to provide visitors with relevant ads and marketing campaigns. These cookies track visitors across websites and collect information to provide customized ads.